

Help Center
Approver help center
Start with a simple approval, then explore corrections, account settings and notifications. Bookmark this page for the latest instructions.
Updated October 26, 2026 · Screenshots use redacted records or disposable sandbox examples. Layout and labels may vary by environment. Numbered callouts match the steps below each image.
Your first approval in six steps
- Open the request email link and sign in with your own registered work email.
- Enter your email code and complete any additional security check.
- Review the ticket, all service lines and the PDF.
- Choose Approve All, then Review and Sign. No satisfaction score is required to start signing.
- Complete the signature and its final submission.
- Return to confirm the ticket is signed. Optionally submit satisfaction feedback, or skip it.
Approval is separate from payment. Approved does not mean an invoice has been paid or show its QBO balance.
Quick start
First sign-in through your first completed approval.
Search and resize the desktop ticket table
Example tickets using the current table controls. On a phone, use the compact cards described in Review tickets on your phone instead.
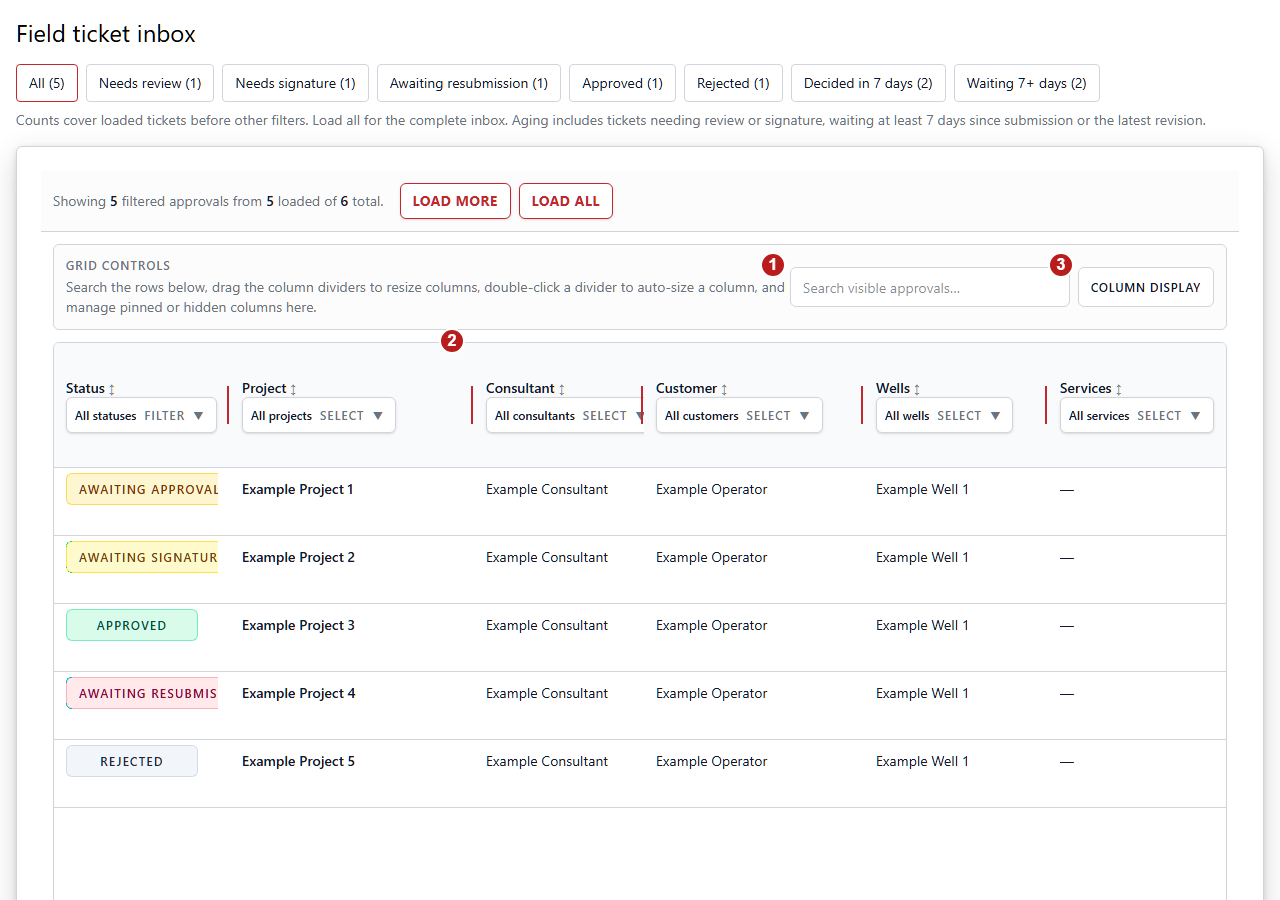
- Enter a project, consultant or company in Search approvals to narrow the loaded rows. Clear the search to restore them. Use Load More or Load All above the table when the ticket you need has not loaded yet.
- Drag the divider at the right edge of a column header to change its width. Double-click that divider to auto-size the column. Drag a header to reorder it; column choices are saved in this browser. The selection checkbox column, when present, stays fixed.
- Open Column Display to choose which columns are visible and which stay pinned while you scroll horizontally. The next topic shows these choices and how to reset them.
Hide, pin and reset table columns
Example tickets with Customer hidden and Status pinned left. Display choices affect your table layout, not ticket details, approval decisions or notification preferences.
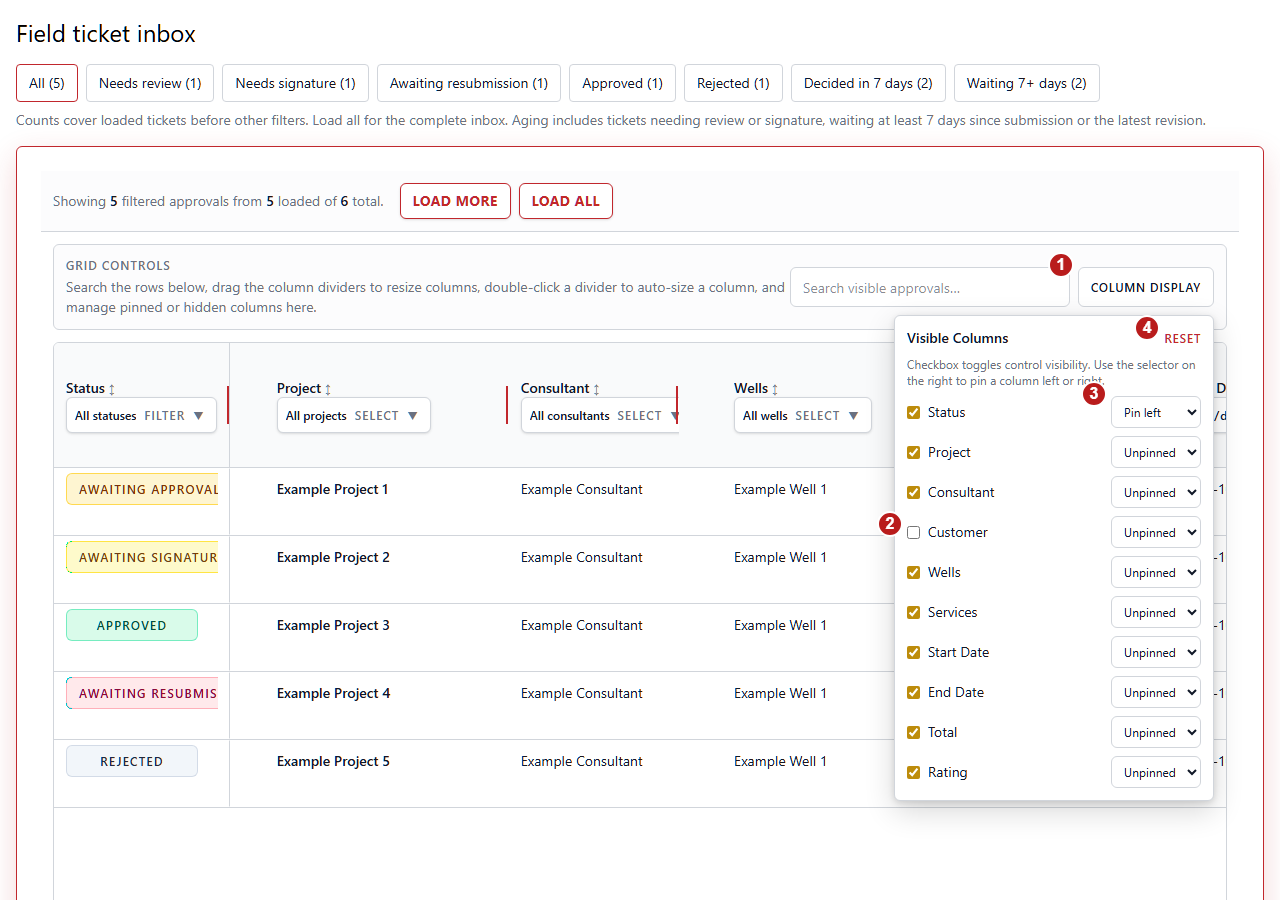
- Open Column Display above the table. Select it again to close the panel when finished.
- Clear a column checkbox to hide it; select it to show the column again. In this example Customer is hidden. Required selection controls cannot be hidden.
- Choose Pin left or Pin right beside a column to keep it visible while scrolling across a wide table. Choose Unpinned to return it to the scrolling area. In this example Status is pinned left. These choices survive a page reload in this browser.
- Select Reset to restore the default column layout, including visibility, pins, order and widths. Reset does not clear your search or status filters; clear those separately if a ticket is missing.
Keep your inbox search and filters
Example tickets after searching for Bravo. Search and filter choices are saved for this account and environment in this browser; they do not synchronize to another device. A link with a specific status can narrow the list further. Clear search and filters separately when a ticket seems missing.
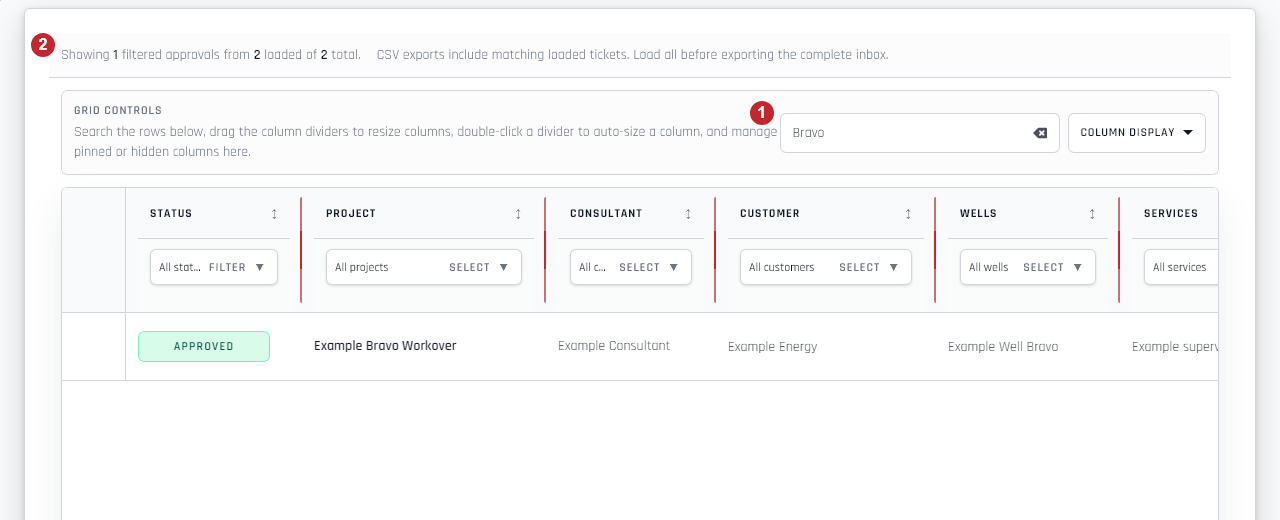
- Enter a project, consultant, well or ticket identifier in Search approvals. The table, matching count and CSV use the same search. Your first edit is available after saved filters finish restoring, and the choice remains after a reload. Clear the search field to remove this search constraint.
- Read Showing filtered approvals from loaded of total before exporting. Search and column filters apply to loaded tickets. If the inbox is partial, use Load All before relying on a complete export; the Understand your inbox summary topic shows that control. Selecting All removes a status view, while search and column filters can still narrow the list.
Export the tickets matching your search
The example search matches one Bravo ticket. CSV includes matching loaded records and is separate from the signed PDF on an individual ticket. Export does not approve a ticket or confirm invoice or consultant payment status.
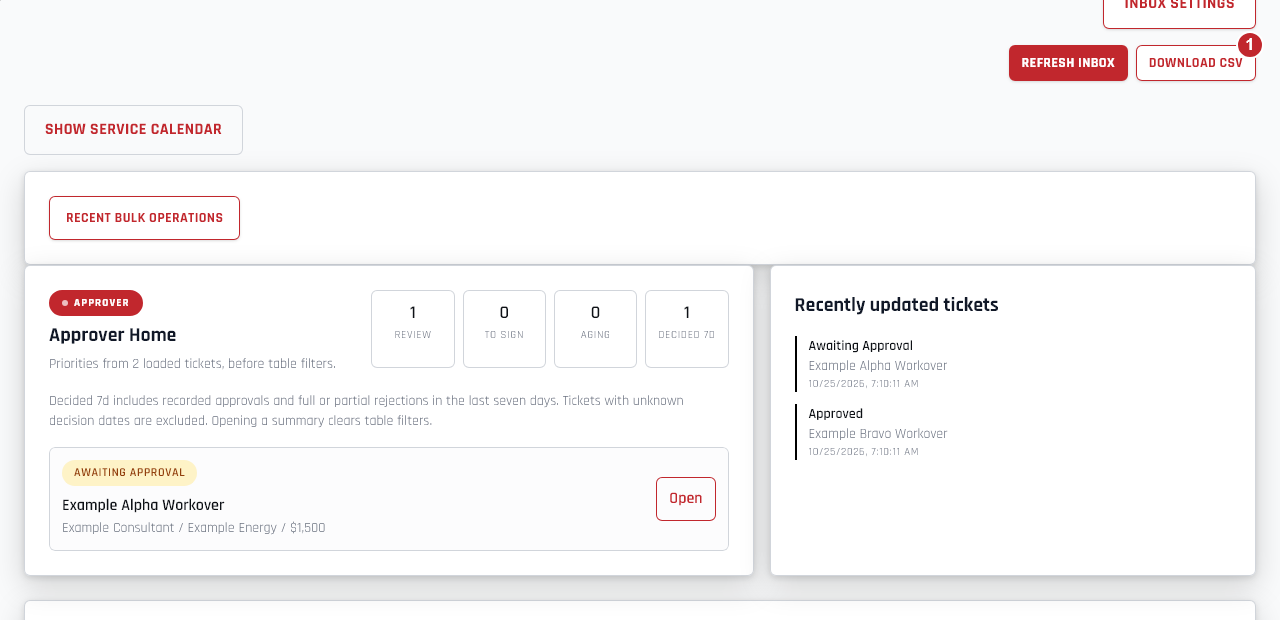
- After checking search, filters and loaded-ticket coverage, choose the CSV export button above the inbox. The CSV contains the same matching tickets shown in the table or cards. For a complete inbox export, load all accessible tickets first and clear any constraints you do not want.
Search and export matching tickets on your phone
Phones use compact ticket cards. The example search matches one Bravo ticket. Choices remain for this account and environment in this mobile browser; a desktop browser has its own saved choices. A saved search or filter can still narrow a list opened from a status link.
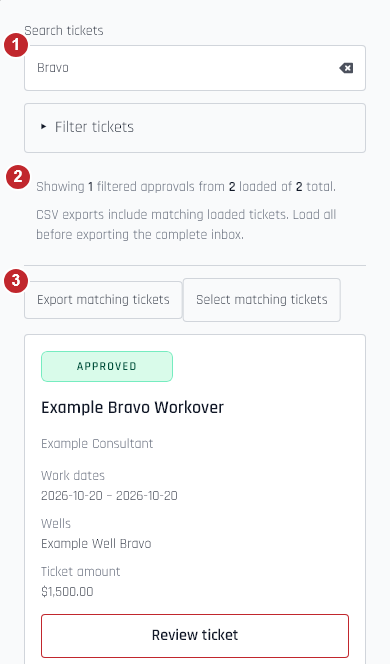
- Enter the ticket, project, consultant or well in Search tickets. Wait for Restoring saved filters to finish if it appears. Matching cards update from your first edit, and the search stays after a reload. Clear the field to remove the search constraint; use Filter tickets to change other saved constraints.
- Check Showing filtered approvals from loaded of total. Cards and exports include only matching loaded tickets. Use the loading controls when you need tickets that have not loaded; the phone inbox review and summary topics show those controls.
- Choose Export matching tickets to save a CSV of the matching loaded cards. Open an individual ticket and use its PDF viewer when you need the signed document instead. Neither export changes approval, invoice or payment status.
Understand your inbox summary
Example tickets in the current inbox layout. Summary counts describe loaded tickets before table or card filters; they are approval information, not payment status.
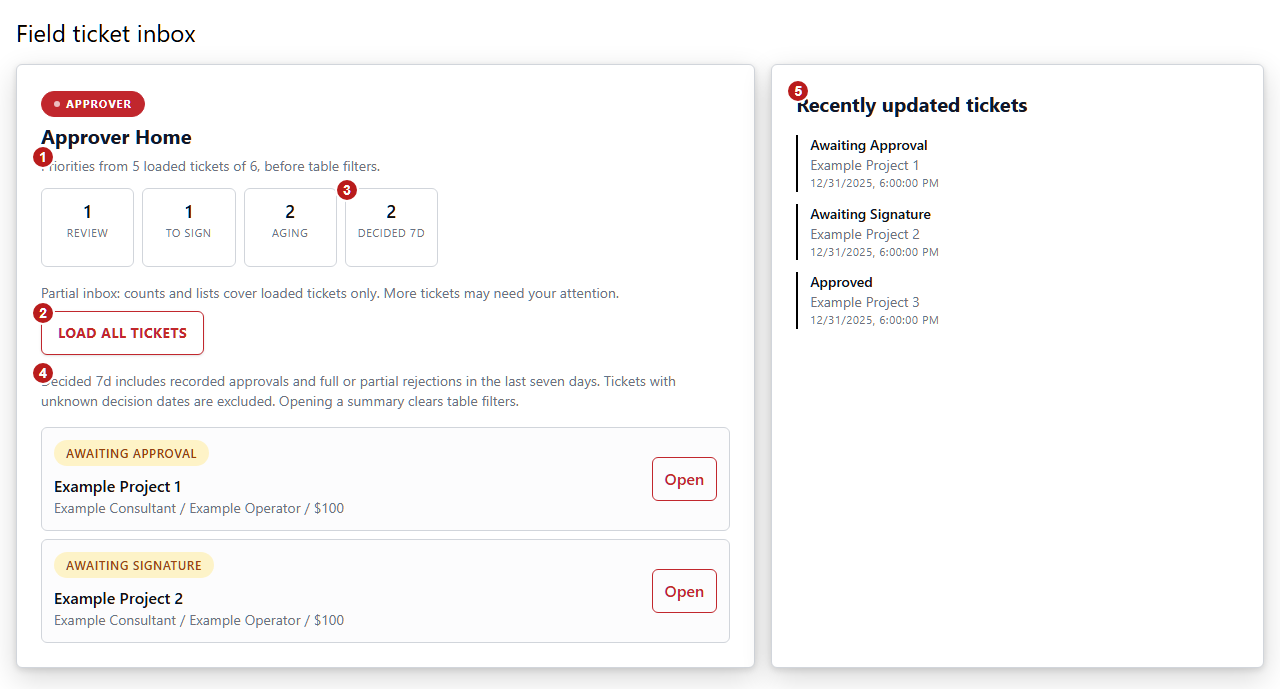
- Read the loaded-ticket count before relying on a summary. A partial inbox can omit tickets that have not loaded yet.
- When the partial-inbox notice appears, select Load all tickets to include the remaining accessible records. The notice disappears when all records are loaded.
- Select Review, To Sign, Aging, or Decided 7d to open its matching list. Selecting a summary clears search and table filters; your saved column layout stays available.
- Decided 7d includes recorded approvals and full or partial rejections in the last seven days. Unknown decision dates, synchronization updates, and failed or cancelled requests do not count as recent decisions. Use All to return to the complete list.
- Recently updated tickets shows general activity, which can differ from a decision date. Open a ticket for its details; approval does not mean its invoice or consultant payment has been paid.
Use inbox summaries on your phone
Example tickets in the current inbox layout. Summary counts describe loaded tickets before table or card filters; they are approval information, not payment status.
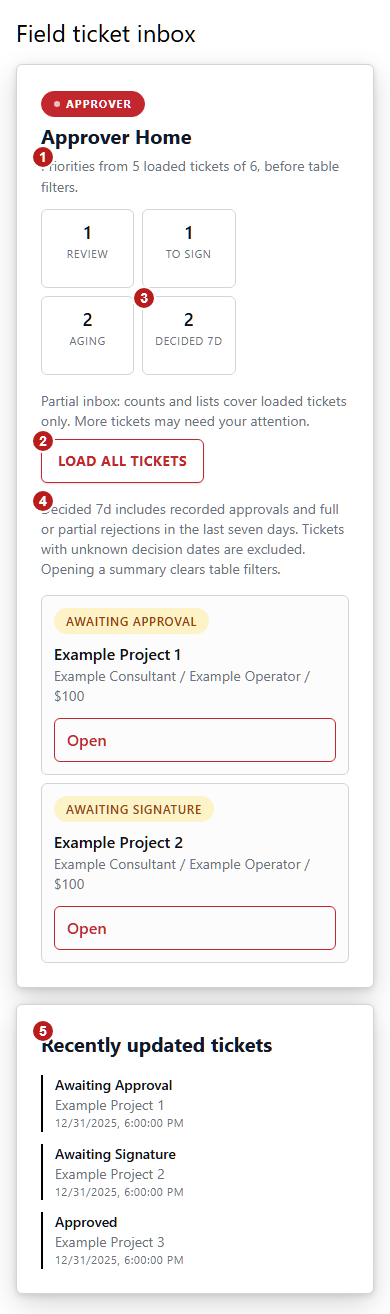
- Read the loaded-ticket count before relying on a summary. A partial inbox can omit tickets that have not loaded yet.
- When the partial-inbox notice appears, select Load all tickets to include the remaining accessible records. The notice disappears when all records are loaded.
- Select Review, To Sign, Aging, or Decided 7d to open its matching list. Selecting a summary clears search and table filters; your saved column layout stays available.
- Decided 7d includes recorded approvals and full or partial rejections in the last seven days. Unknown decision dates, synchronization updates, and failed or cancelled requests do not count as recent decisions. Use All to return to the complete list.
- Recently updated tickets shows general activity, which can differ from a decision date. Open a ticket for its details; approval does not mean its invoice or consultant payment has been paid.
Sign in for the first time
Open your approval-request link, or use All approvals. Sign-in choices appear directly after entering your email.
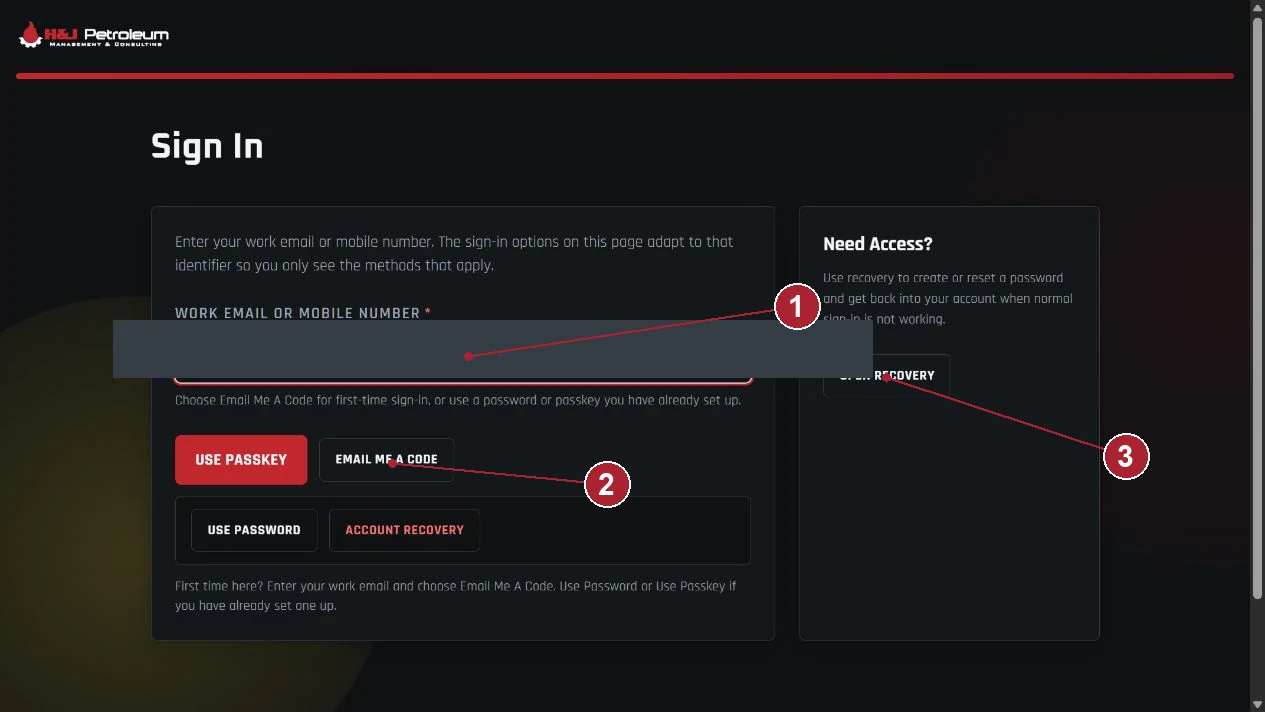
- Enter the work email registered with H&J. Use your own identity; an emailed link does not grant someone else access.
- Select Email Me A Code. Password and passkey options are visible too; use them only if you already set them up.
- Use Open Recovery if normal sign-in fails. Recovery and password setup are explained later in this guide.
Enter your email code
The code field is blank in this example. Gray blocks hide the account email, not controls.
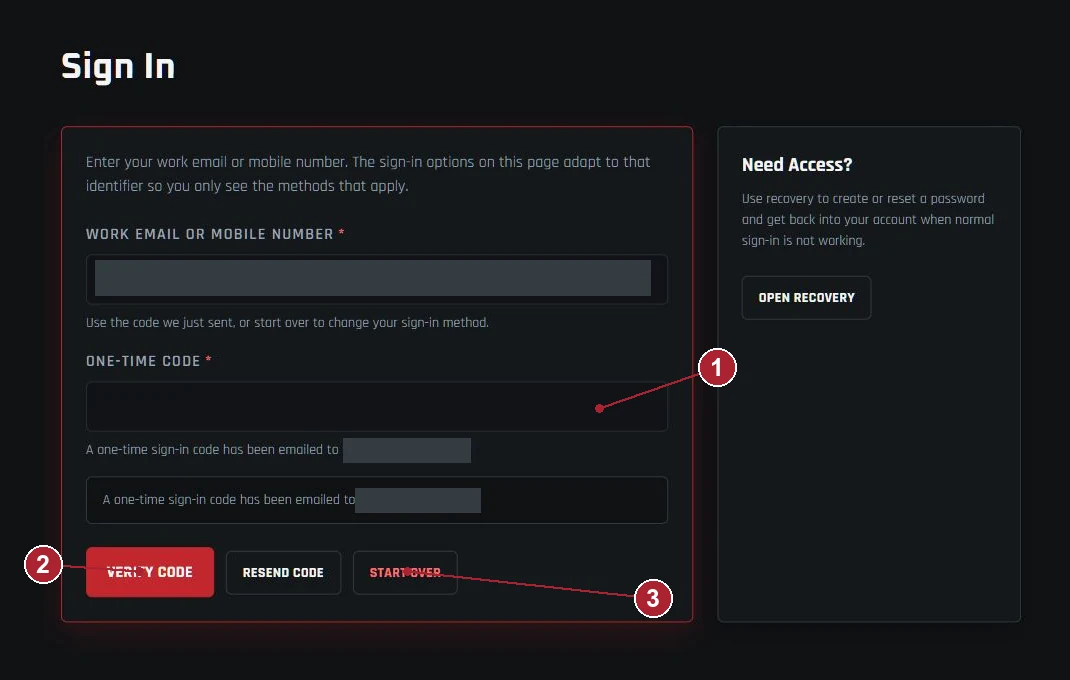
- Read the newest code in your email, return here, and enter it in One-Time Code. Never share a code.
- Select Verify Code. Complete any additional authenticator challenge shown next.
- If needed, use Resend Code after the countdown. Use Start Over to change the email or sign-in method.
Complete an extra security check
Sandbox example: this appears only when the account requires an authenticator challenge. If you cannot access that authenticator, use an available recovery method or contact H&J. Do not send the code to support.
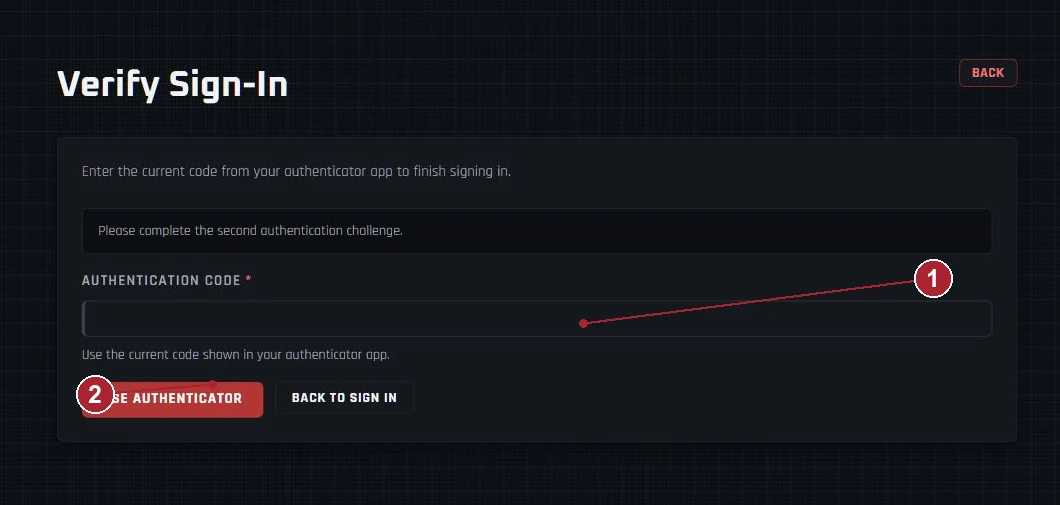
- Open your authenticator app and enter its current Authentication Code.
- Select Use Authenticator. Wait until the application opens before navigating to approvals.
Find the ticket in All approvals
Desktop example with synthetic tickets. Your real inbox contains only tickets assigned to your account.
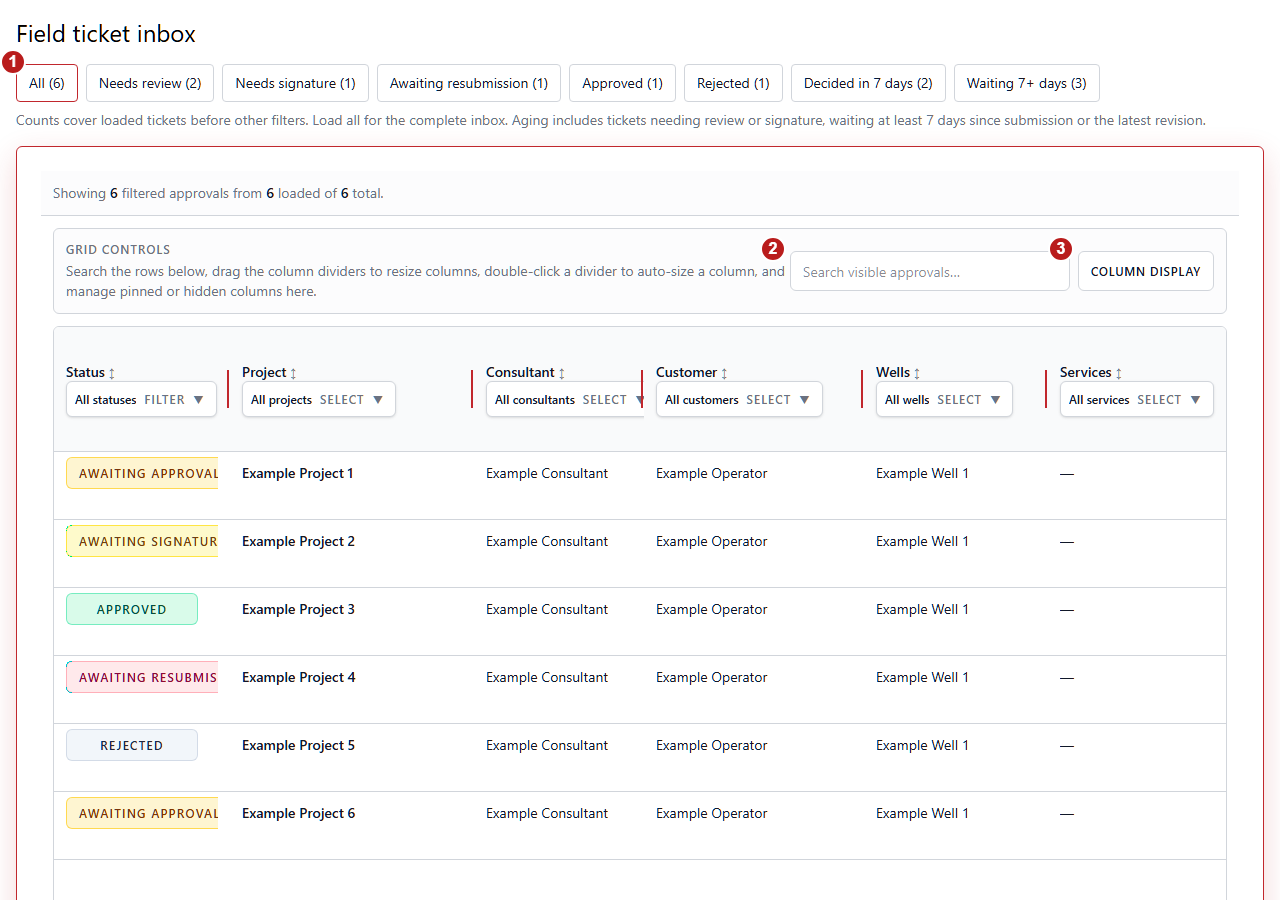
- Choose a status view such as Needs review or Needs signature. Counts refer to loaded tickets before other filters; use Load All for the full list. The selected view is remembered for your account and environment in this browser; an explicit view link takes precedence.
- Search the loaded rows by project, consultant or company. Select a matching row to review its details. Clear search and filters if a ticket seems missing.
- Use Column Display to hide or pin columns, or Reset to restore the layout. Resize and reorder columns with the headers. These choices are saved in this browser. Use Refresh Inbox above the list for current statuses.
Review tickets on your phone
Mobile uses compact cards instead of a wide table. This example uses synthetic tickets.
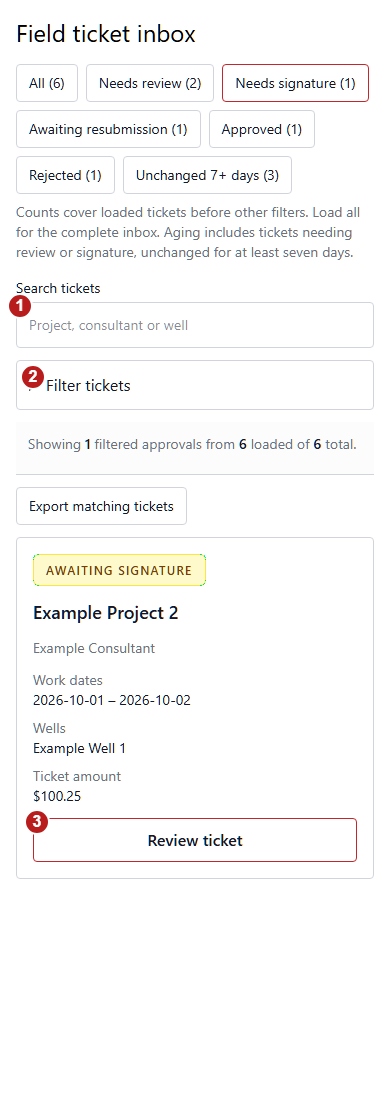
- Choose a status view above the list, then search by project, consultant or well. Counts show matching loaded tickets. Export matching tickets includes only the cards matching this search and the selected filters.
- Open Filter tickets for project, consultant, dates and other filters. Close the panel when finished. Use Load More or Load All to search beyond the records already loaded.
- Review the card status, project, consultant, work dates, wells and ticket amount, then select Review ticket. Review the full ticket and PDF before approving; opening a card does not approve it.
Review the ticket before deciding
Start at Document Preview, then scroll through the service summary, well breakdown, and detailed rows.
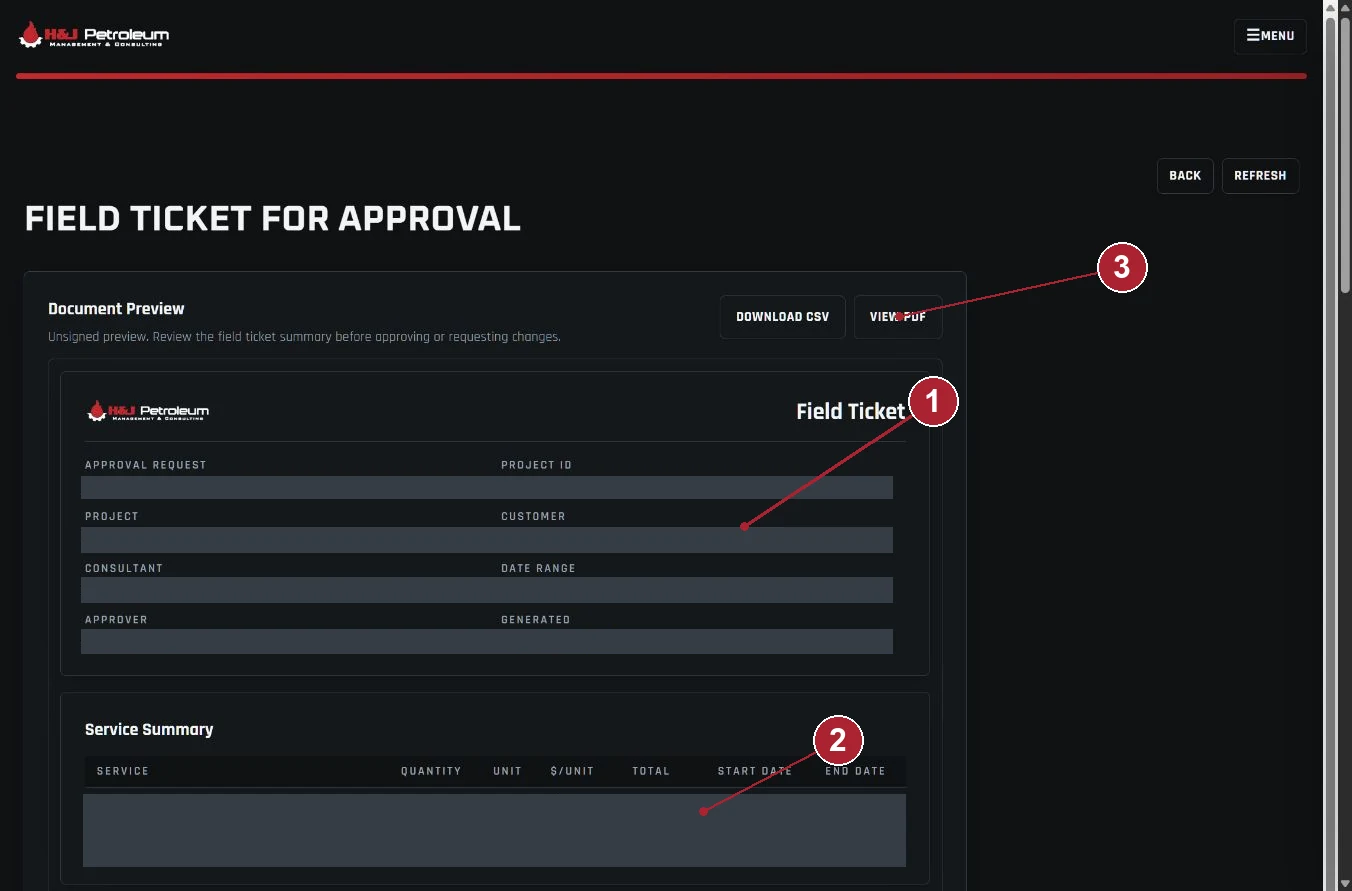
- Check the project, consultant, date range, wells and AFEs. Compare them with the work actually performed.
- Review services, quantities, customer rates and totals. Check days, hours and miles carefully for duplicates or incorrect units.
- Select View PDF to inspect the document. Download CSV exports rows; it is not a signed approval document.
Read document summaries on a phone
On a narrow screen, service and well summaries stack vertically. This synthetic example shows how to read the quantities and amounts; use Detailed Line Items on the ticket to inspect individual dates and charges.
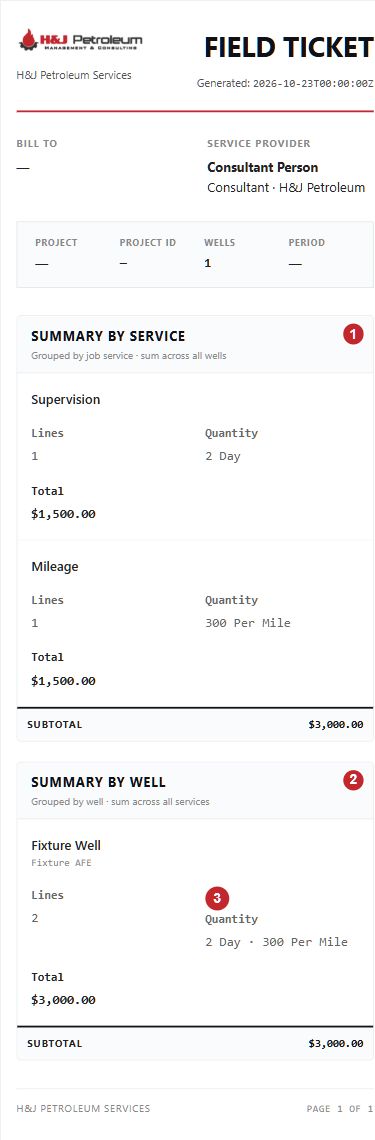
- In Summary by Service, review each service, line count, quantity with its unit, and total across wells.
- In Summary by Well, check the well and AFE, then compare the listed services with the detailed ticket rows. Both summary subtotals represent the same charges; do not add them together.
- Keep different units separate: 2 Day and 300 Per Mile are not 302 units. Compare each quantity with the work performed. Viewing the summary does not approve the ticket.
Read document details and recognize a preview
Synthetic customer-priced example. The separate document page is an unsigned preview. Use the ticket page to confirm approval status and open the retained signed PDF when available.
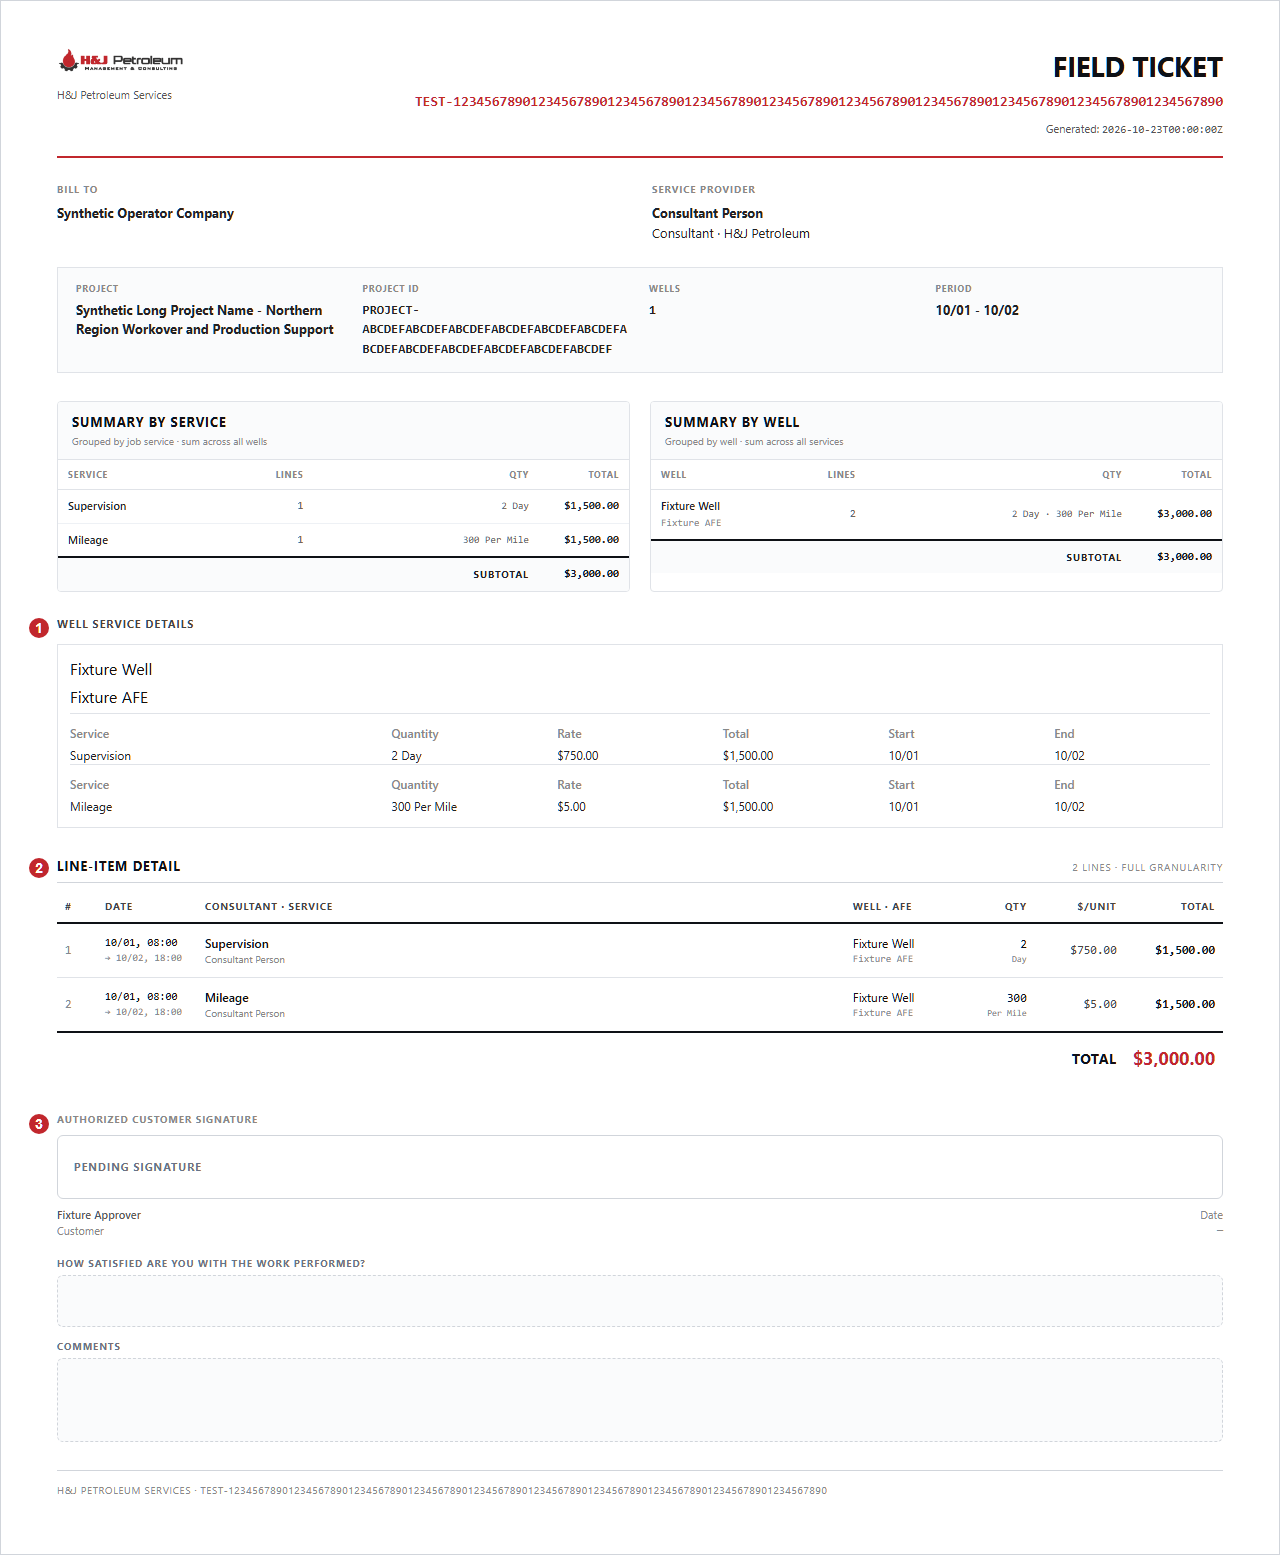
- In Well Service Details, check the well and AFE together, then each service quantity, unit, rate, total and work dates. These are another view of the same charges, not extra charges.
- In Line-Item Detail, compare the individual work dates and service rows with the summary. On phones, labelled values stack into cards; printing uses tables.
- A Pending Signature placeholder in an unsigned preview is not the approval status. Return to the ticket to check its status and use View PDF for the retained signed document when available. Viewing a preview never approves the ticket.
View, save or print the PDF
The viewer opens in a separate browser tab. Controls can vary with browser and device. Return to the field-ticket browser tab to approve or request corrections. Viewing or downloading a PDF does not approve it.
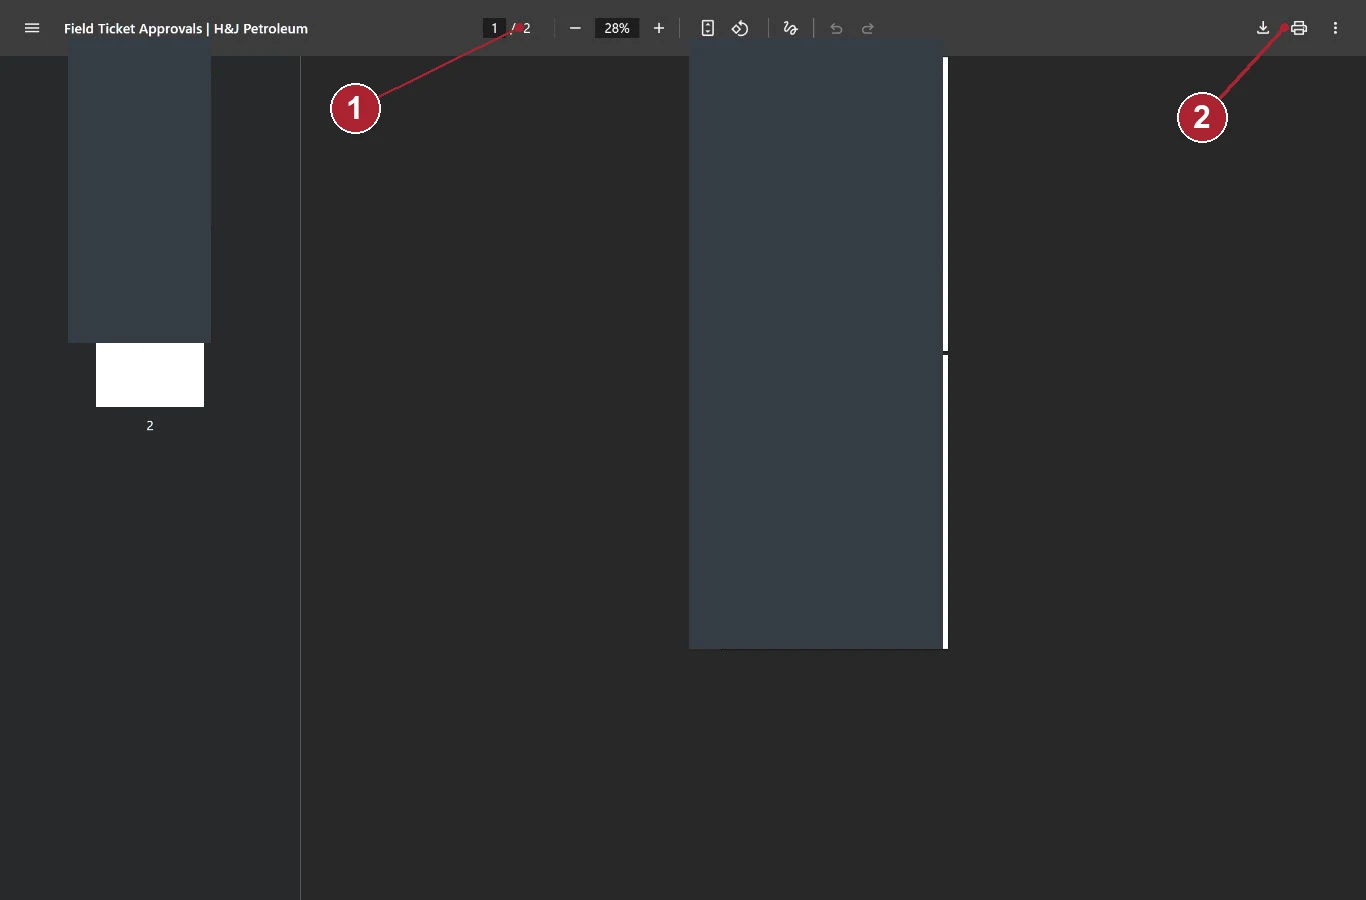
- Use page thumbnails, the page counter and zoom controls to inspect every page.
- Use the PDF viewer download or print control if you need a copy.
Choose Approve All and start signing
Deployed training example. No satisfaction score is required before signing. Selecting approval does not sign or pay a ticket.
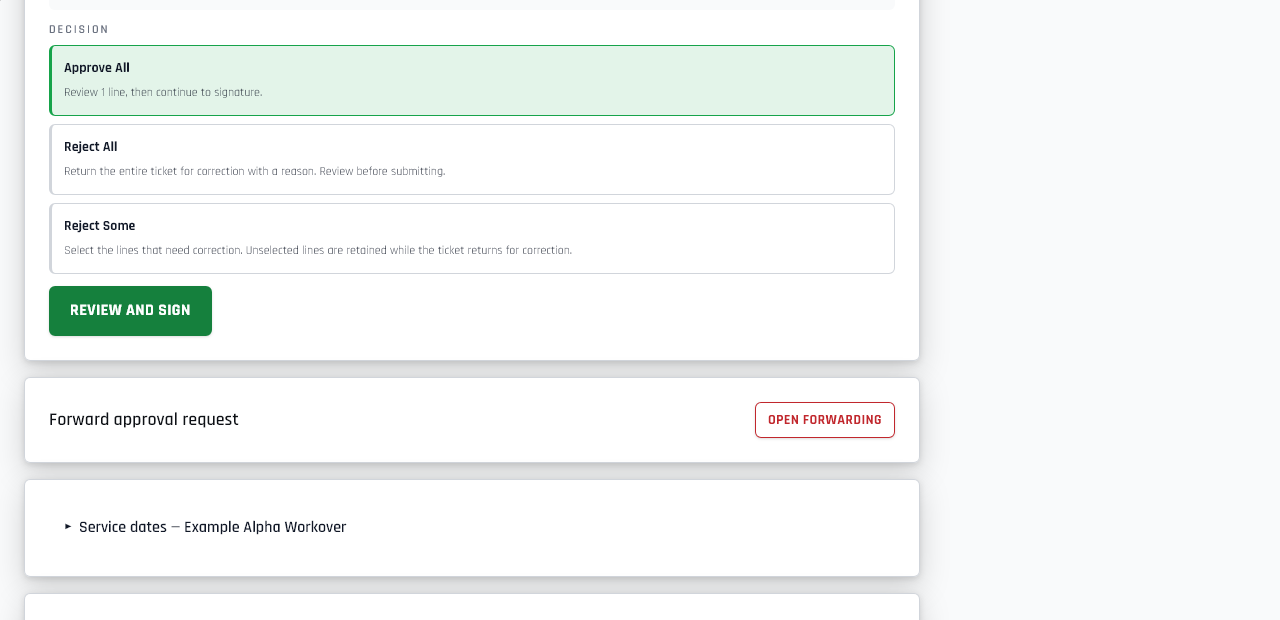
- Choose Approve All after reviewing all service lines. This selects approval; it does not sign, reject or pay the ticket.
- Select Review and Sign to begin the signature. If a signature request already exists, use Continue Signing. You will be offered optional satisfaction feedback after signing is confirmed.
Open or resume the signature request
Mobile example using synthetic ticket data. The signing action comes before the document preview on a phone.
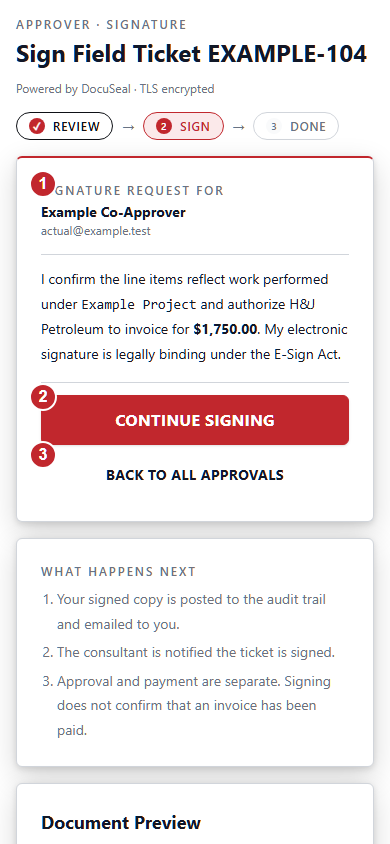
- Check the signature request recipient. It may be a co-approver rather than the originally assigned approver. If the identity is not recorded, confirm it on the secure signing page.
- Choose Continue Signing and finish the signature submission. Opening the signing page alone does not complete approval. If you already finished, use Check Approval Status above the signing panel. A timeout does not mean Approved.
- Use Back to All Approvals to leave the page. When available, Cancel Signature Request withdraws the request; coordinate with other approvers before using it.
Review the signing document
SANDBOX EXAMPLE - DocuSeal testing service. The production branding may differ; no signature was submitted. If the document is wrong, return to the ticket and request corrections. Do not sign merely to dismiss this page.
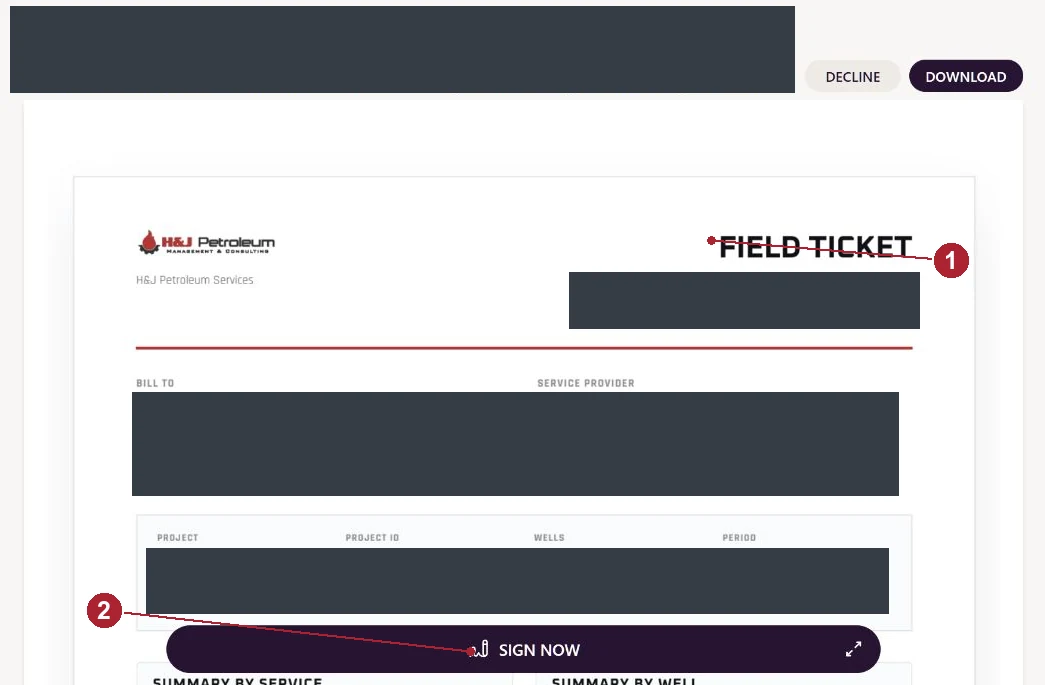
- Check the document identity and scroll through all pages. Confirm you are signing the correct ticket.
- Select Sign Now to open the signature field.
Use the signature pad or Type
SANDBOX EXAMPLE - The signature panel appears over the document near its Approver Signature field.
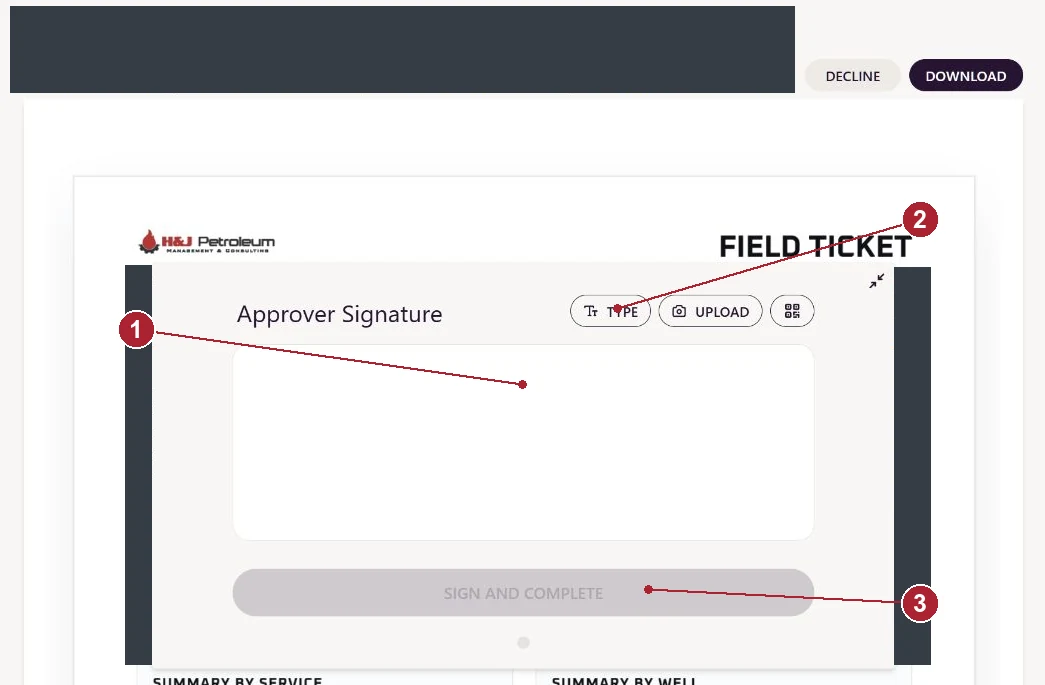
- Draw your signature in the signature pad using a mouse, stylus or touchscreen.
- Select Type if you prefer a typed signature. Upload is another option where offered.
- Review the signature before the final step. A blank signature leaves Sign and Complete disabled, as shown.
Type your signature and finish
SANDBOX EXAMPLE - Blank entry shown; the final submission was not performed for this guide.
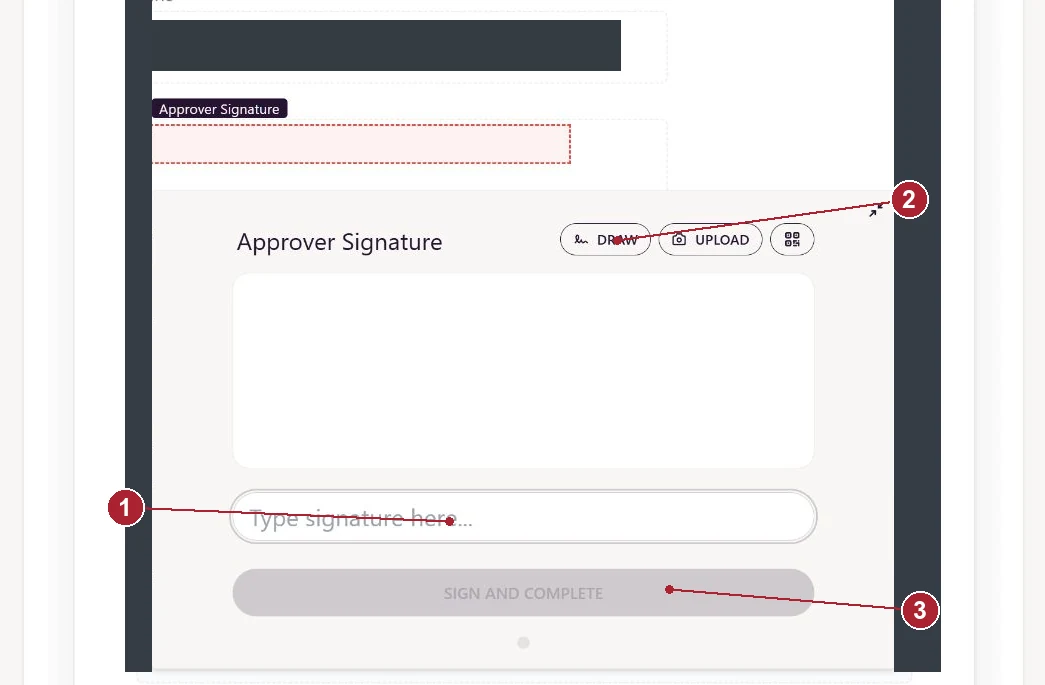
- Enter your own name in Type signature here and review the rendered signature above.
- Select Draw to switch methods if desired.
- Only when the document is correct and you intend to approve, select Sign and Complete. Wait for completion, then return to the ticket.
After signing: confirmation and optional satisfaction
Deployed training example of confirmed completion. Satisfaction feedback is optional. Reopening a completed ticket shows its full detail view.
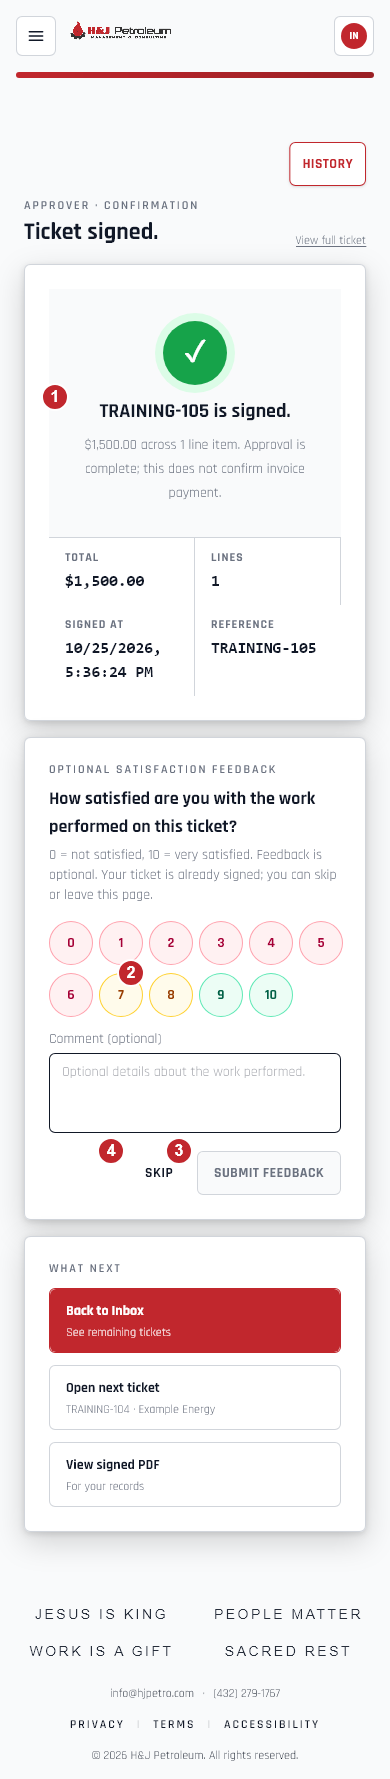
- Confirm the ticket is signed and review the total, reference and recorded signing time. Approval is complete; it does not confirm invoice payment. Use View full ticket for the details.
- Optionally choose a satisfaction score for the work performed on this ticket: 0 means not satisfied and 10 means very satisfied. Add a comment if helpful.
- Select Submit Feedback to save your chosen score. If saving fails, retry or leave the page; the signed approval remains complete. A low score also offers a request for operations to contact you.
- Choose Skip to leave no new feedback, or use Back to Inbox, Open next ticket or View signed PDF. Feedback is never required to use those controls. Existing recorded feedback is retained.
Confirm that approval is complete
An existing completed ticket does not require a second approval. Approval and payment remain separate.
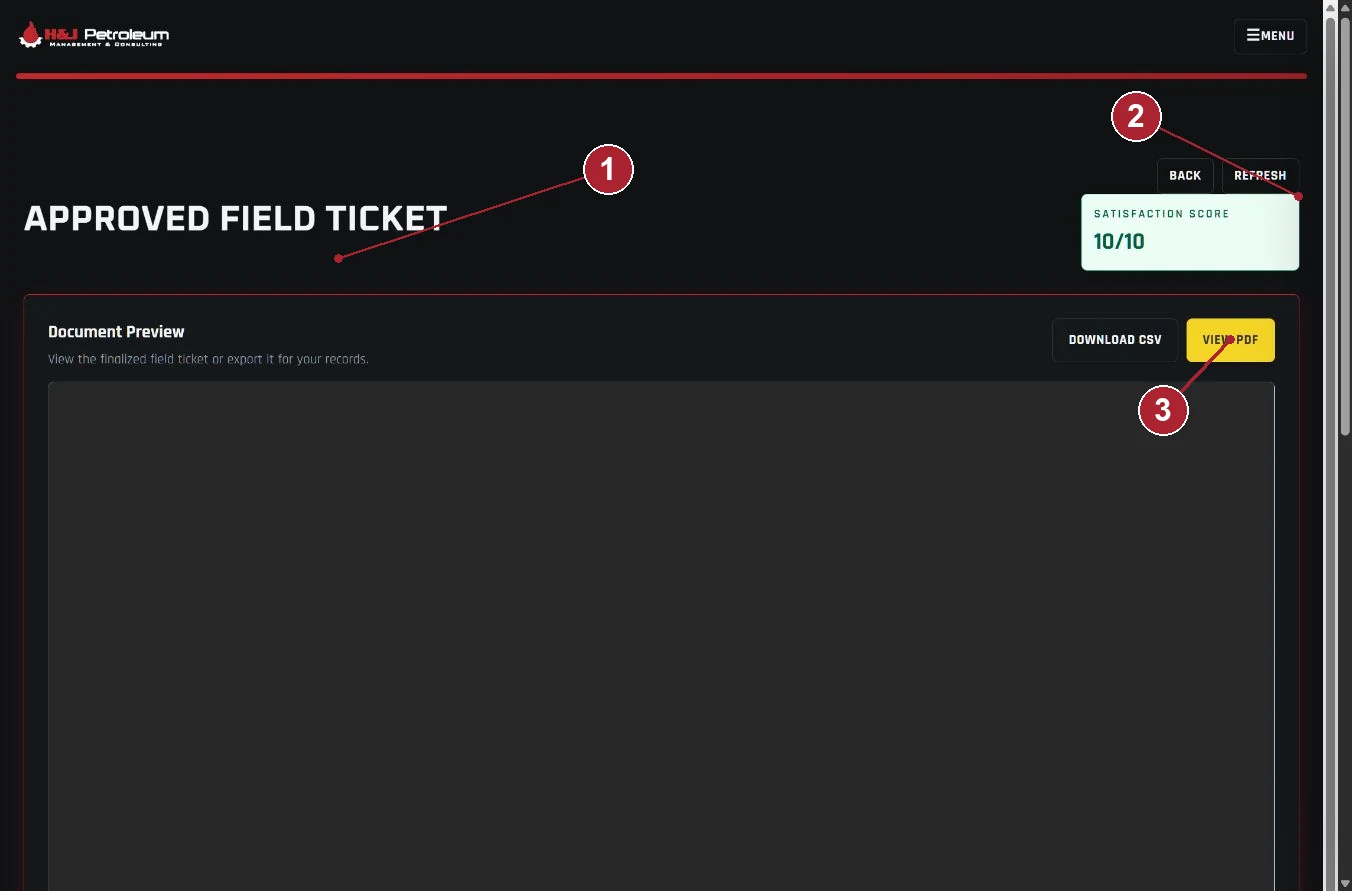
- Confirm the heading/status is Approved. If it still says Awaiting Signature, resume signing and finish the final submission.
- Use Refresh if the status has not updated after signing. If it remains unchanged, contact H&J instead of starting duplicate requests.
- Select View PDF to open the signed document when available. If the document preview could not refresh, reload the ticket to try again; this does not undo a confirmed approval. Approval status does not confirm payment or a QBO invoice balance.
Open a ticket’s approval history
Training ticket captured from the deployed app. History is available while reviewing, signing, viewing the completion receipt, or reopening a finalized ticket.
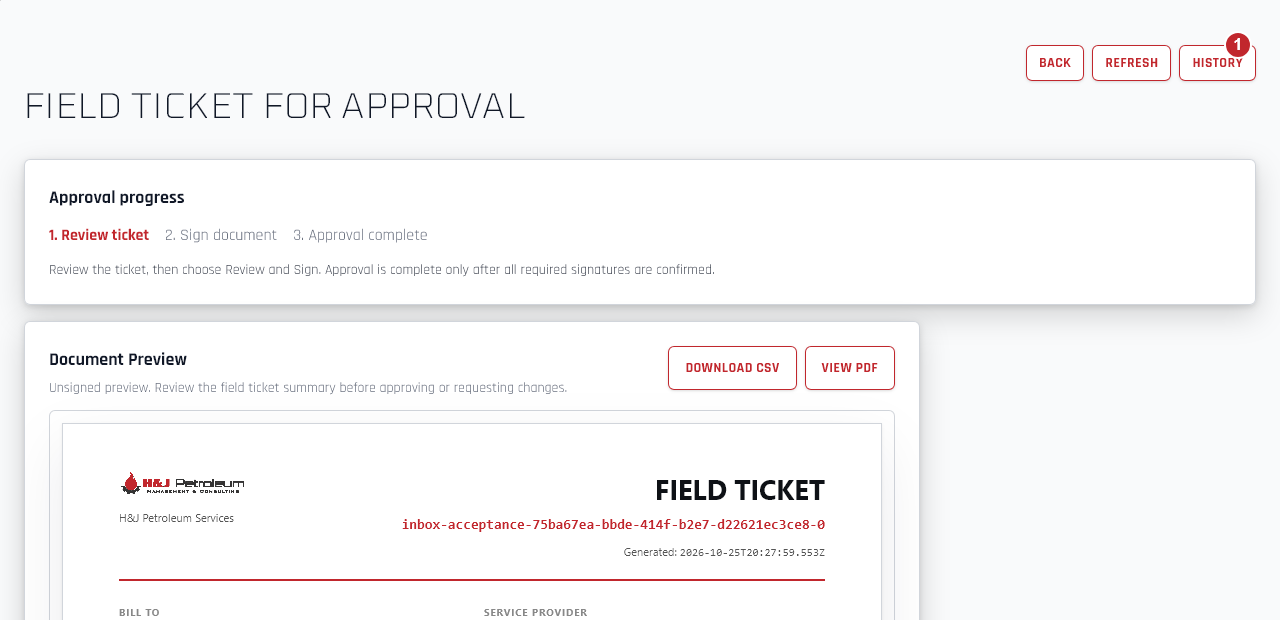
- Open the ticket from All approvals or its request link. Select History in the ticket header. History is a read-only record of approval and signing events.
Distinguish the assigned approver and requested signer
Training example of an uncompleted signature request. Older records may contain fewer details.
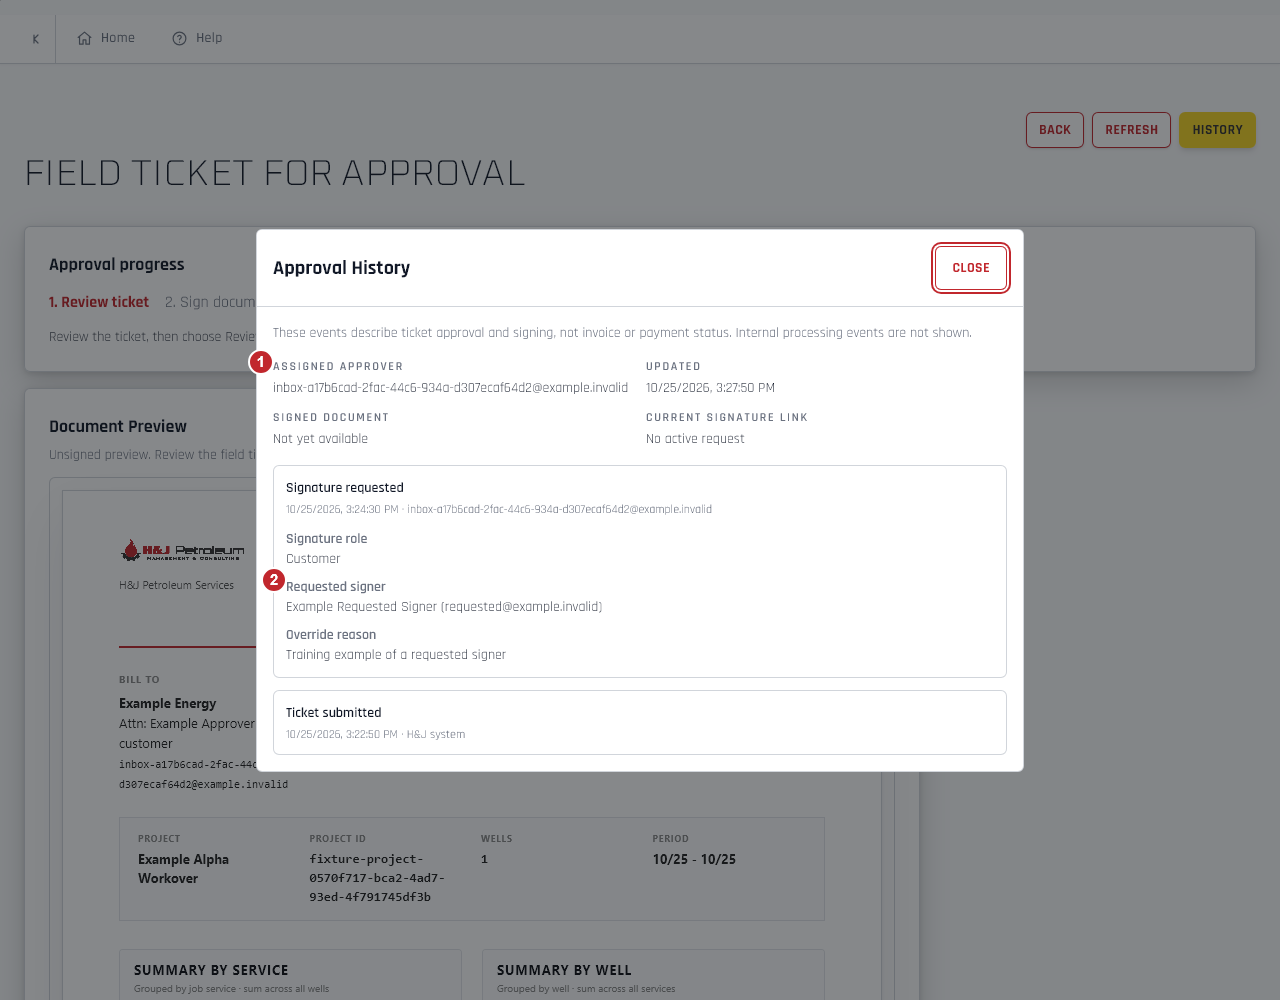
- Read Assigned approver for the ticket’s assigned contact. This assignment stays distinct from people named in individual signing events.
- Read Requested signer on a Signature requested event. This identifies the requested recipient; the request alone does not confirm that the person signed. Missing signer details remain unrecorded.
Read the recorded signer and signature progress
Training completion event captured from the deployed app. The timeline shows the newest recognized approval and signing events first; internal processing events are omitted.
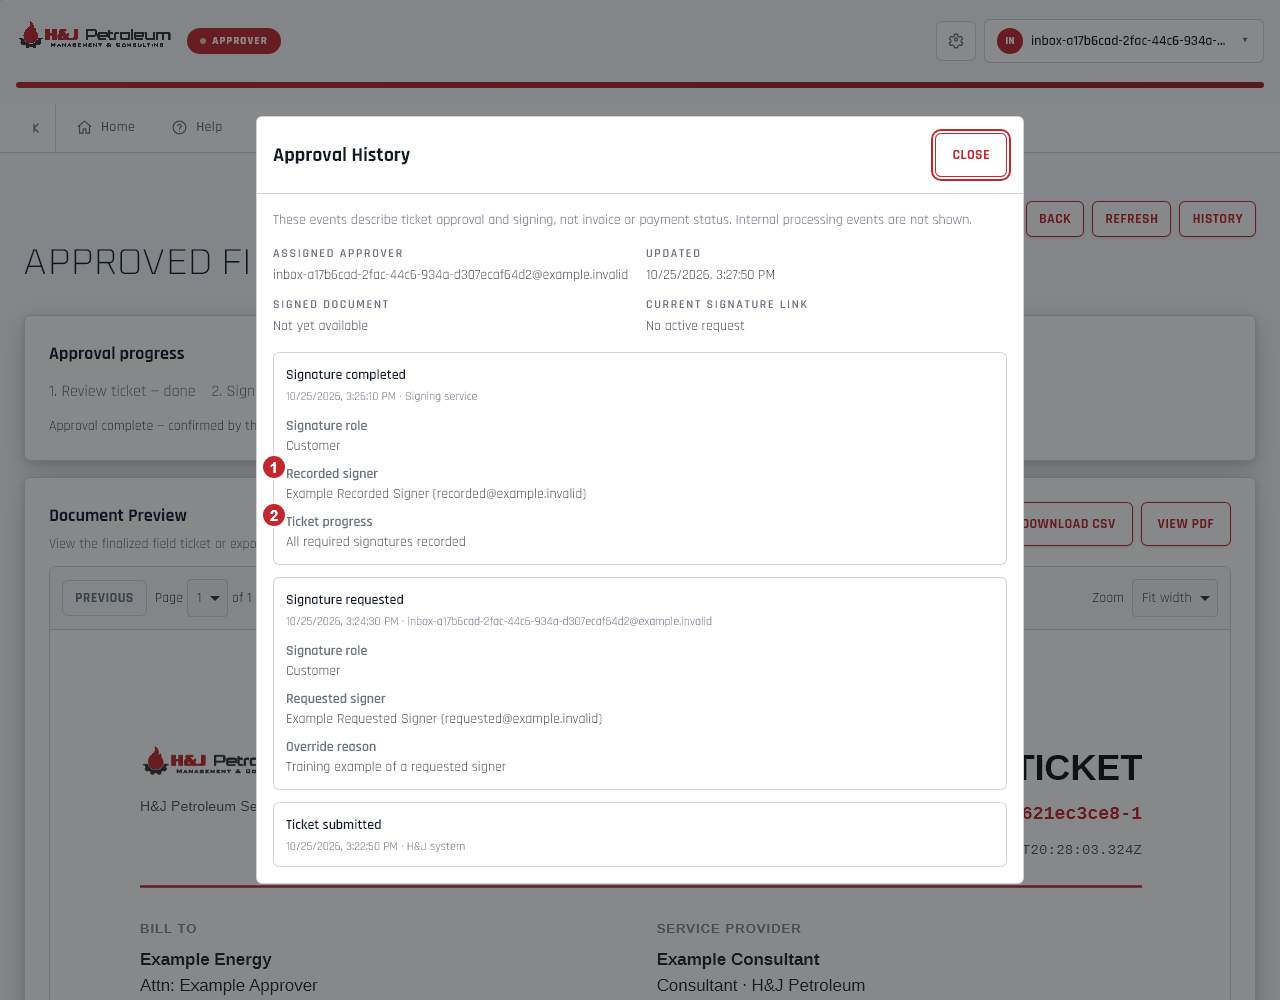
- Read Recorded signer on a Signature completed event. It shows the signer recorded for that event and can differ from the assigned approver or an earlier requested signer. Older events without a recorded identity are not filled in from another request.
- Read Signature role and Ticket progress. Additional signature required means another signature is still needed; All required signatures recorded describes signing completion. Ticket approval and signing history do not establish an invoice balance or confirm payment.
Scroll history on a phone and return to the ticket
The history panel scrolls independently on a phone. It also shows recognized rejection, correction, resubmission and forwarding milestones when those events were recorded.
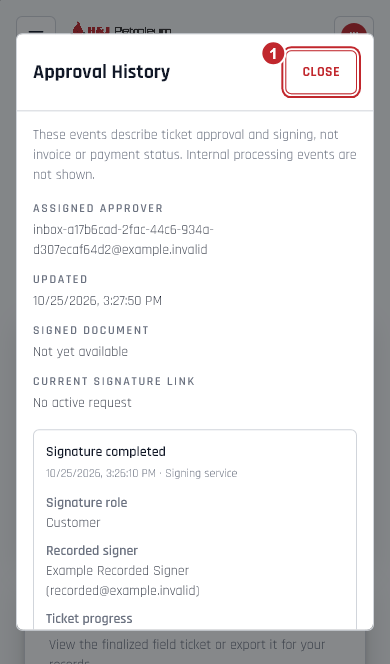
- Scroll within the history panel to review earlier events. Select Close to return to the ticket. On a keyboard, Escape also closes the panel and returns focus to History.
Return to your saved default with Reset filters
An explicit All view can show more tickets than your saved default. This training example contains two tickets.
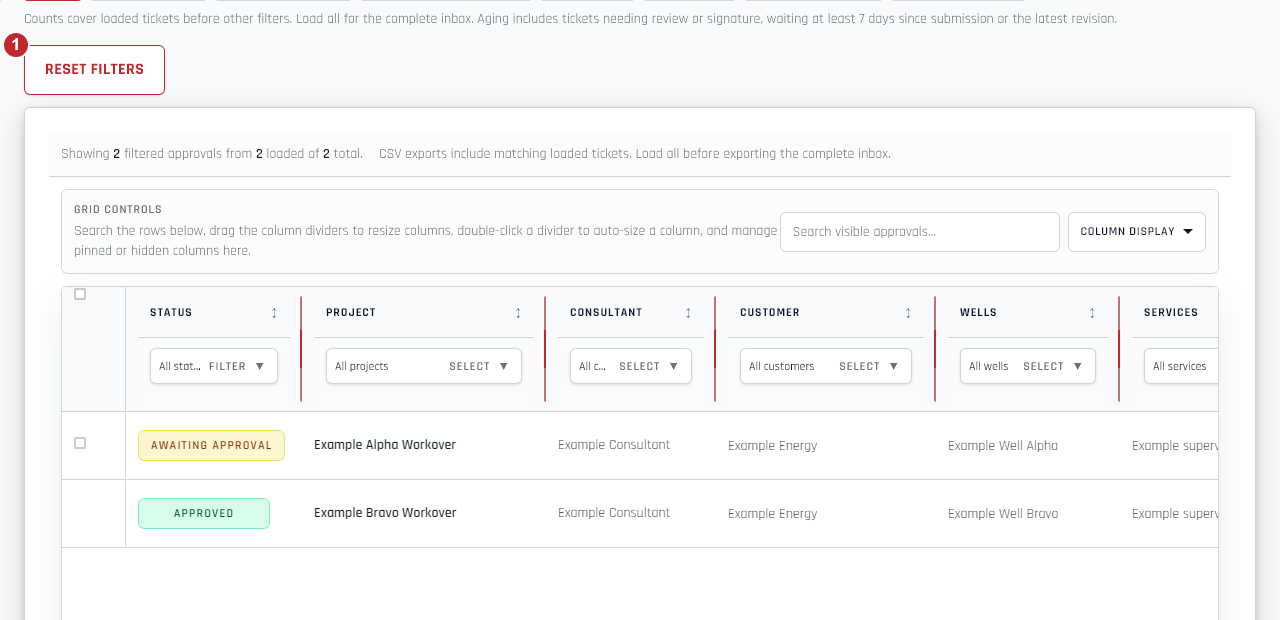
- Select Reset filters to clear the inbox search and filter overrides, remove a status view from the address, and follow your saved default again. Changing your default later will also apply after this reset. Table column layout is separate. If a ticket is still missing, check your access and whether all tickets have loaded.
Statuses and corrections
Find pending tickets, reject all, or request changes to selected rows.
Filter pending and completed tickets
The status views apply to desktop and mobile. Example tickets shown here contain no customer data.
- Choose a view: Needs review, Needs signature, Awaiting resubmission, Approved or Rejected. Waiting 7+ days includes review/signature tickets waiting at least seven days since submission or the latest revision. Background updates do not reset the wait. Approval is separate from invoice payment.
- Search within loaded tickets and combine with column filters on desktop or Filter tickets on mobile. A custom status filter replaces the selected view. Clearing a view does not clear other filters.
- Column Display changes the desktop layout, not ticket access. On mobile, use ticket cards and Review ticket. Load More or Load All before assuming your search covers the complete inbox.
Reject All: return the entire ticket
Use when the whole ticket is wrong. Selecting a decision card alone does not submit a rejection.
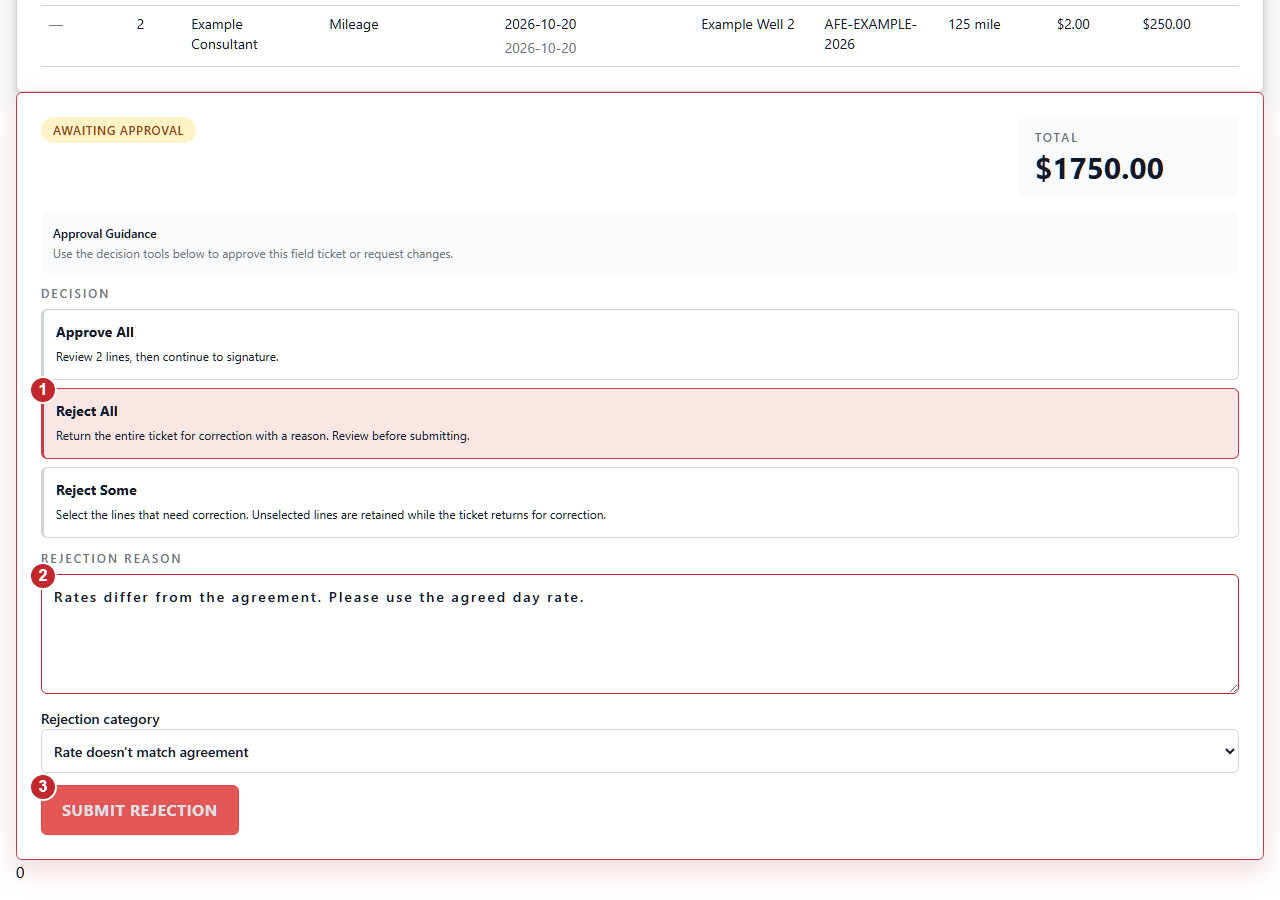
- Choose Reject All in the Decision area.
- Choose a rejection category and explain what is wrong and what the corrected ticket should show.
- Select Submit Rejection to review the affected lines. Use Back to editing to change anything, or Confirm and submit rejection to return the ticket. Wait for confirmation and check its status.
Reject Some: choose the rows
Review service lines and select only those needing correction. On mobile, secondary details expand when needed.
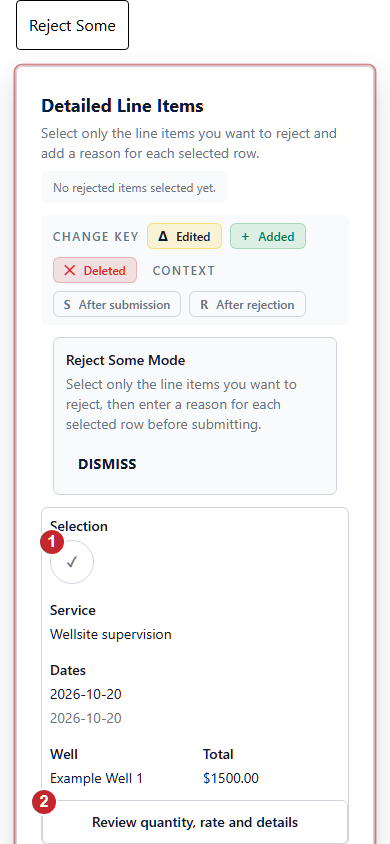
- Choose Reject Some in the Decision area. Existing requests may require Edit Requested Changes first. Mark only the lines needing correction; toggle a selected line back if chosen by mistake.
- On a phone, use Review quantity, rate and details to inspect the full line. Desktop retains the table. Correct lines should remain unselected.
Explain the correction for each row
Example ticket: each selected line keeps its category and explanation together on mobile.
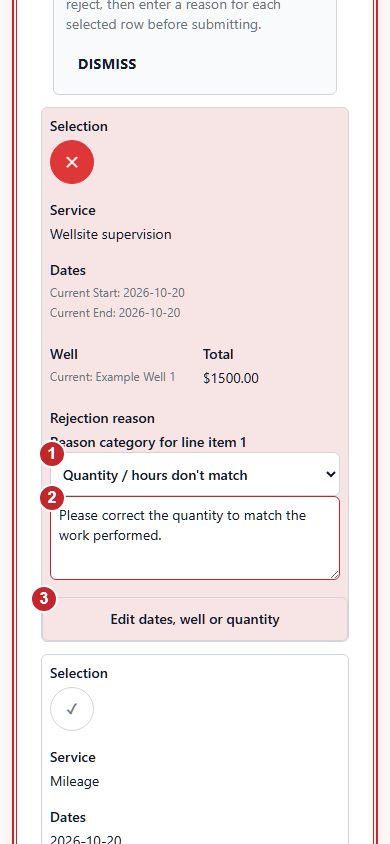
- Choose the reason category that best describes the problem.
- Explain what is wrong and what the corrected entry should show. Every selected line needs a category plus a comment or requested correction.
- Use Edit dates, well or quantity for optional corrections. These are requests, not proof the underlying entry has changed.
Submit requested changes and follow up
Select Submit Rejection or Submit Requested Changes to open this review. Nothing is sent until you confirm.
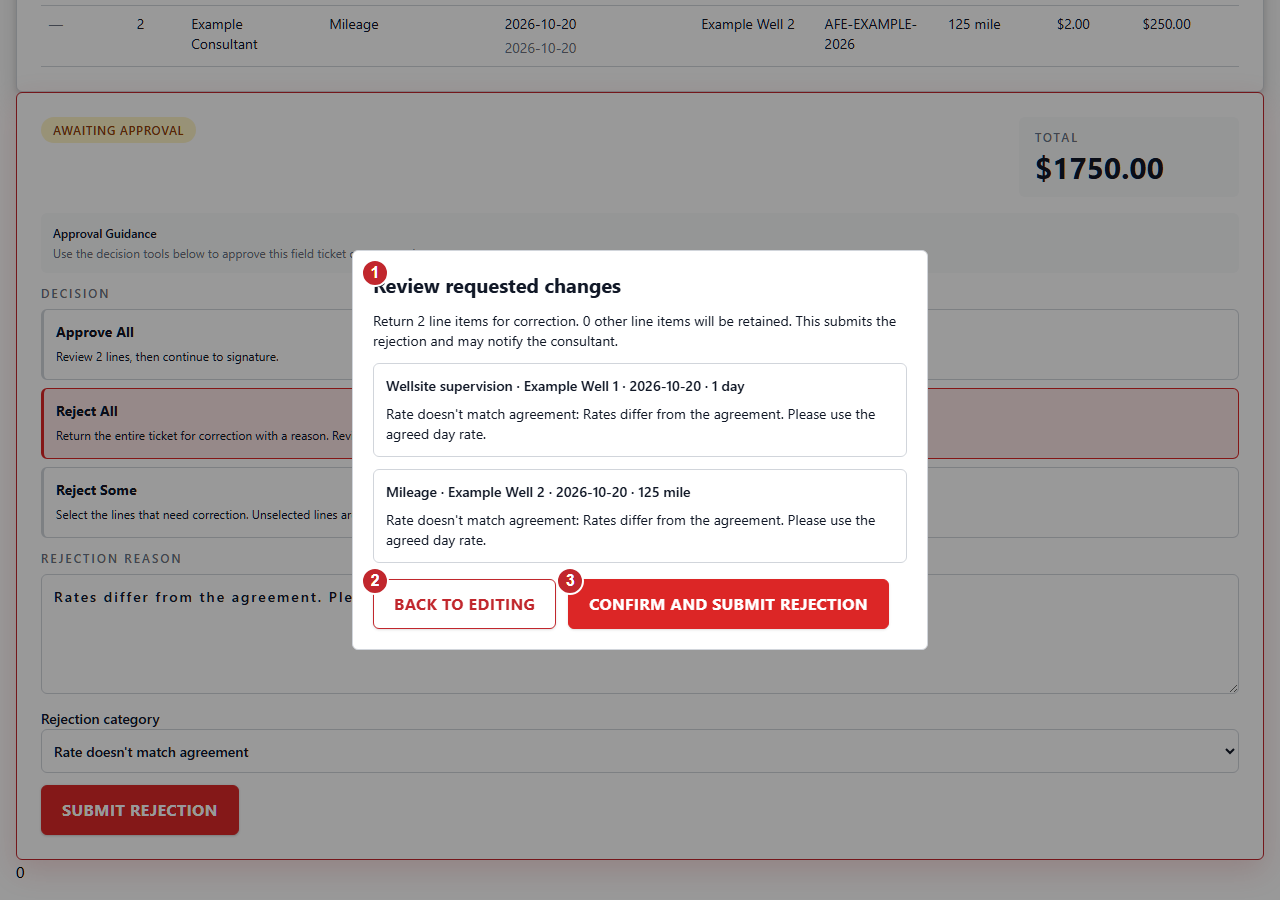
- Check the lines being returned, their reasons and requested corrections, and the count of retained lines.
- Use Back to editing or Escape to return without submitting and change any selection or explanation.
- Choose Confirm and submit rejection when ready. Wait for confirmation and check for Awaiting Resubmission or Awaiting Revision. On resubmission, review corrected lines and the full total. Partial rejection does not release payment or separately sign retained lines.
Forwarding and completed copies
Forward a request, share a signed PDF, check delivery outcomes and manage shared-copy access.
Forward or share an individual ticket from the desktop inbox
The pinned Forward or share column offers the action available for each ticket. Training projects are shown.
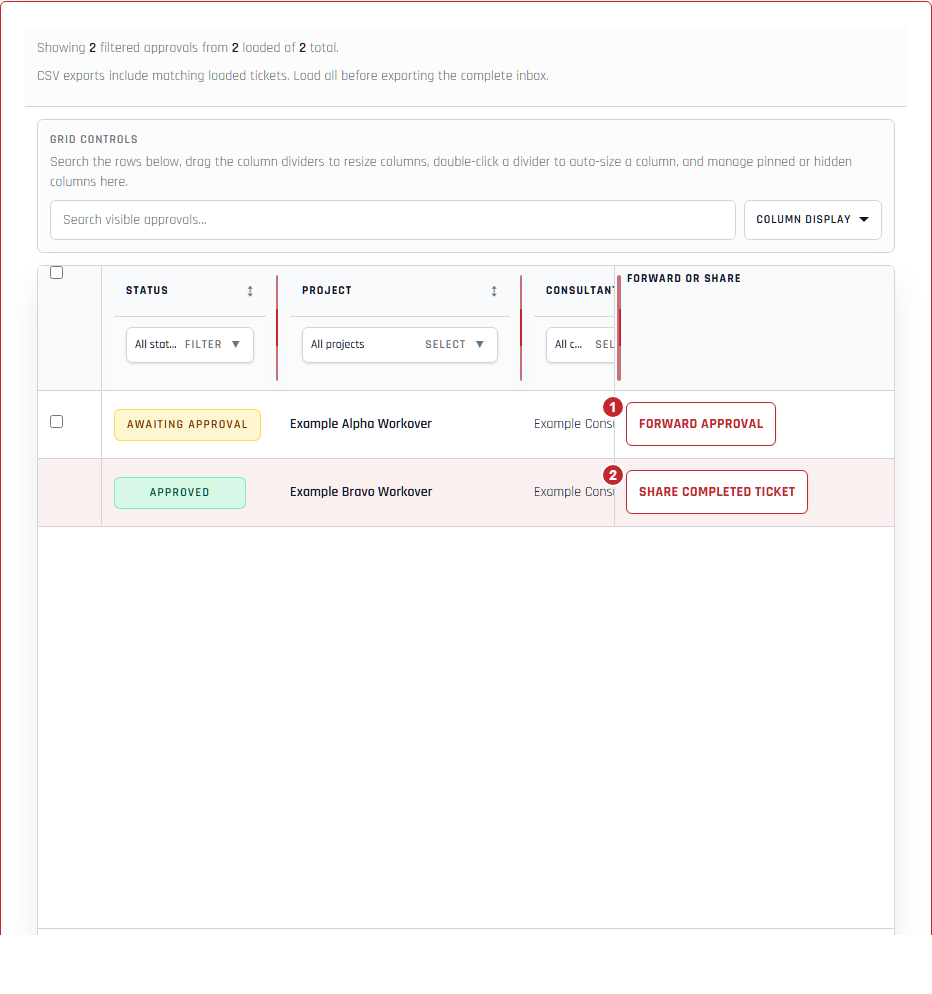
- Choose Forward approval on an eligible pending ticket to open its recipient form and forwarding history. This does not approve the ticket; its assigned approver stays unchanged.
- Choose Share completed ticket on an approved ticket with a signed PDF to open signed-copy sharing. This does not request another signature or confirm payment. If no shortcut is offered, open the ticket and review its state.
Forward a pending ticket from its phone card
Phone cards retain Review ticket and provide a separate forwarding shortcut when the current ticket is eligible.
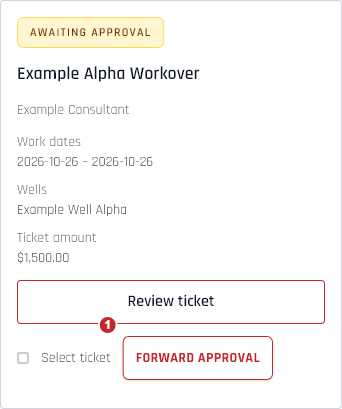
- Choose Forward approval on the intended card. Check the project and ticket status before entering recipient details. Review ticket still opens the full approval.
- Continue: In the opened form, follow Forward an individual approval request to identify the signer, select channels and review delivery outcomes. Opening the form sends nothing.
Share a completed signed ticket from its phone card
Sharing sends a customer-facing signed copy; it does not create another approval request.
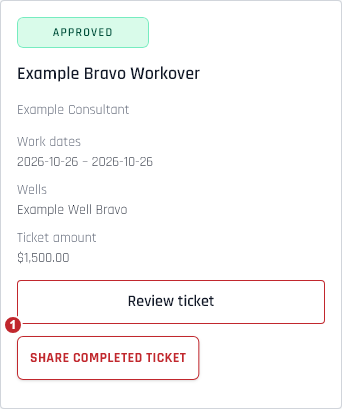
- Choose Share completed ticket on the intended approved card. A signed-document reference is required before this shortcut is available.
- Continue: Follow Share a completed signed ticket to review the recipient and delivery channels. Existing authorized recipients retain a copy in Shared tickets; guests receive access to one document without a new account. Nothing is sent until you choose Share signed PDF.
Check the forwarding mode and close an unsent draft
The same recipient form and forwarding history open in a panel from the desktop inbox or phone card. Training example; no request has been sent.
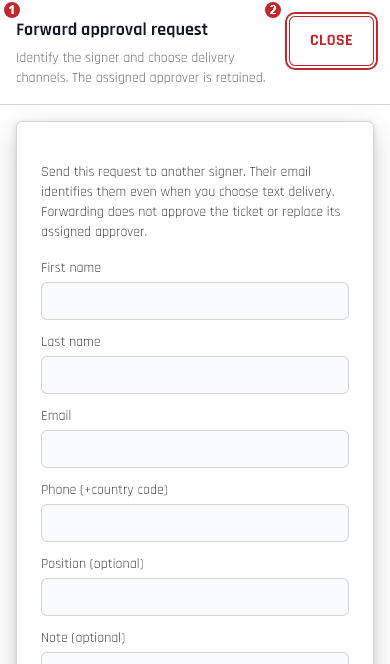
- Read the panel heading: Forward approval request identifies a signing request; Share completed ticket identifies a signed-copy share. Check the current ticket before filling in the form.
- Choose Close to discard an unsent draft and return to its inbox action. On a keyboard, Escape also closes it and returns focus. Switching account or environment discards the previous draft; reopen the intended ticket in the new context.
- Continue: Closing a panel does not cancel a request already sent. Review forwarding history for delivery or shared-copy status before retrying or revoking anything.
Forward an individual approval request
Send a request to another signer without approving the ticket or changing its assigned approver.
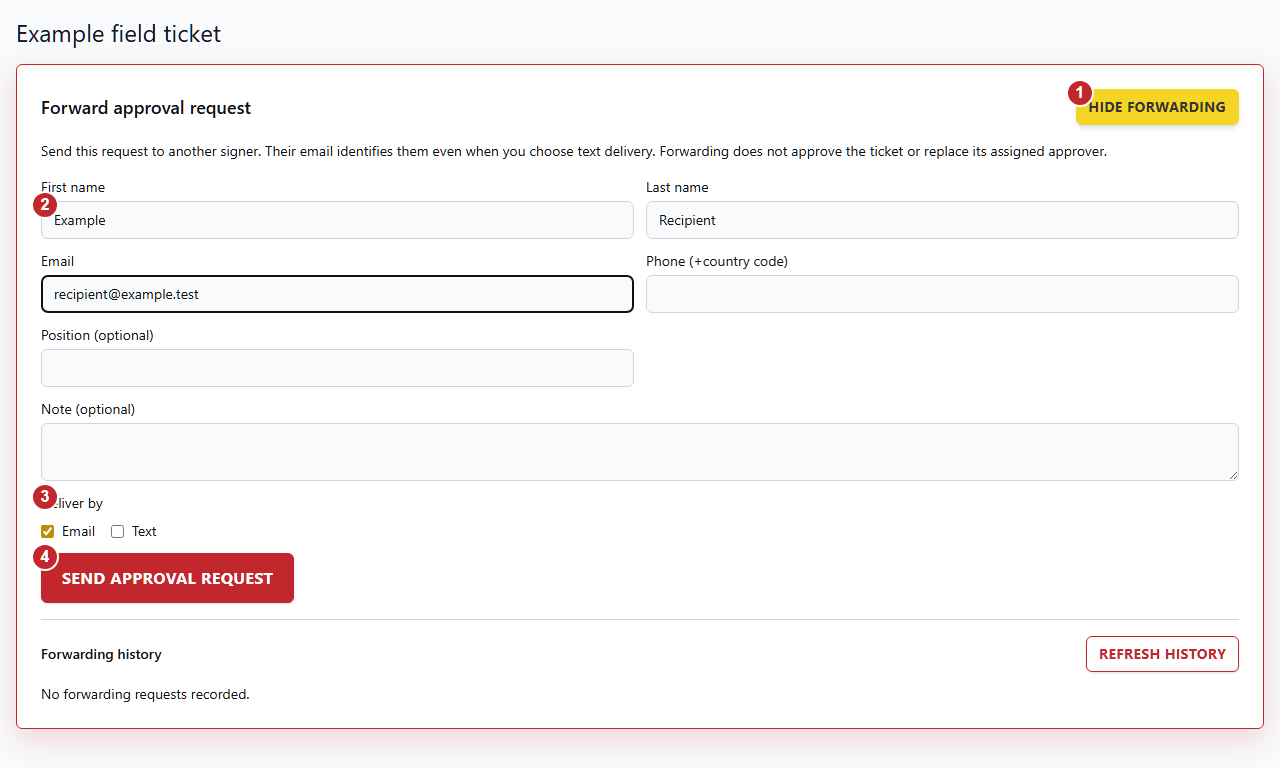
- Open the pending ticket and choose Open forwarding. Forwarding is separate from Approve All, Reject All and Reject Some. Another signer’s active request must be completed or cancelled before switching signers.
- Enter the recipient’s first name, last name and email. Email identifies the signer even when you choose text delivery only. Add their position and a note if useful.
- Choose Email, Text or both. Text requires an international phone number beginning with + and the country code. Check every address and number before sending.
- Choose Send approval request. Wait for the delivery outcomes and review Forwarding history. Forwarding does not approve, sign or pay the ticket; the named recipient still has to complete the signature.
Share a completed signed ticket
Share the customer-facing signed PDF. Existing authorized users retain a copy; guests get document-only access without a new account.
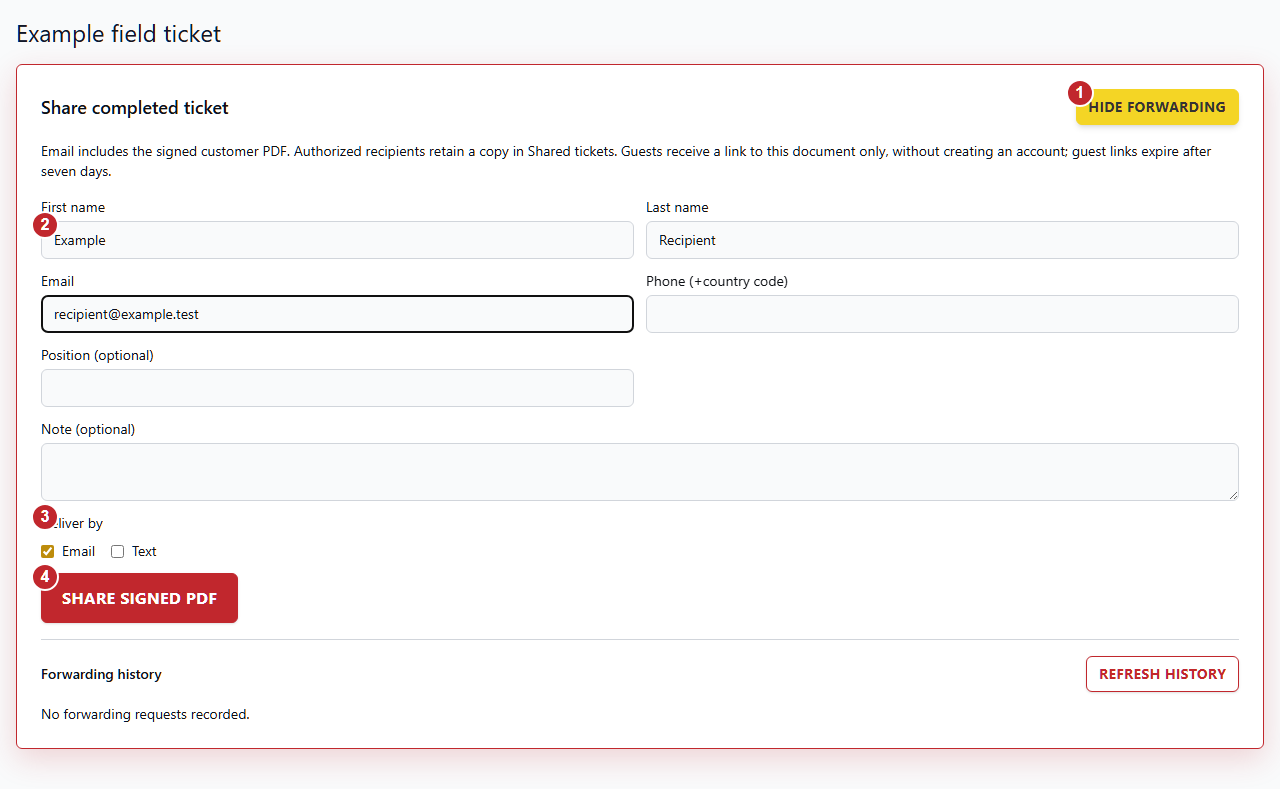
- Open the approved ticket and choose Open forwarding in Share completed ticket. This shares the signed copy and does not create another signature or approval request.
- Enter the recipient’s name and delivery details. An existing authorized recipient uses their own sign-in and retains a copy in Shared tickets. A recipient without an authorized account receives a document-only link; H&J does not create an account for them.
- Choose Email, Text or both. Email includes the signed PDF attachment. Text carries an H&J document link. Guest links expire after seven days and do not grant access to other tickets or approval actions.
- Review the details and choose Share signed PDF. Check each selected channel in Forwarding history. Sharing does not change approval, invoice or payment status.
Check forwarding outcomes and resume safely
Delivery-provider acceptance is different from recipient access, ticket approval and payment. See Retry copy preparation below for preparation failures. Training screenshots use synthetic delivery history; they do not show a live delivery.
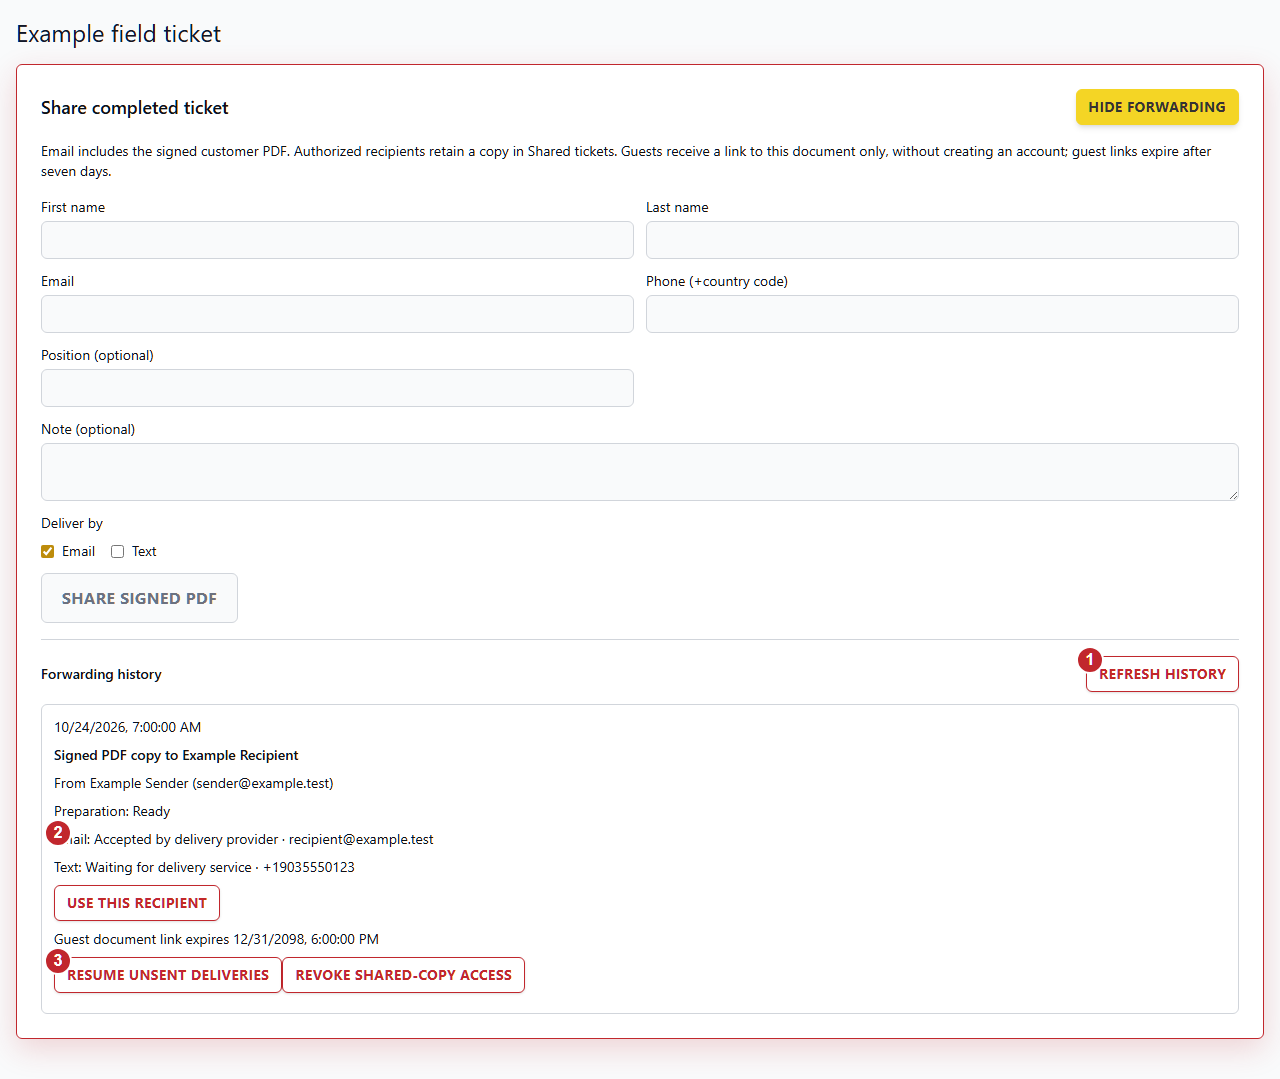
- Open forwarding and choose Refresh history. After an interrupted response, check the saved request before creating another one. History retains the sender, recipient and time.
- Read Email and Text separately. Accepted by delivery provider does not mean the recipient opened the message. Routed to shows a test or configured delivery destination. Waiting for delivery service means the channel has not been dispatched.
- Use Resume unsent deliveries to continue the same saved request. Accepted deliveries are preserved. An unconfirmed result may already have reached the provider; contact H&J rather than starting a replacement delivery.
Retry copy preparation
Use the existing history action when preparing a shared copy failed. This training screenshot contains synthetic delivery rows; the retry button was not selected during capture.
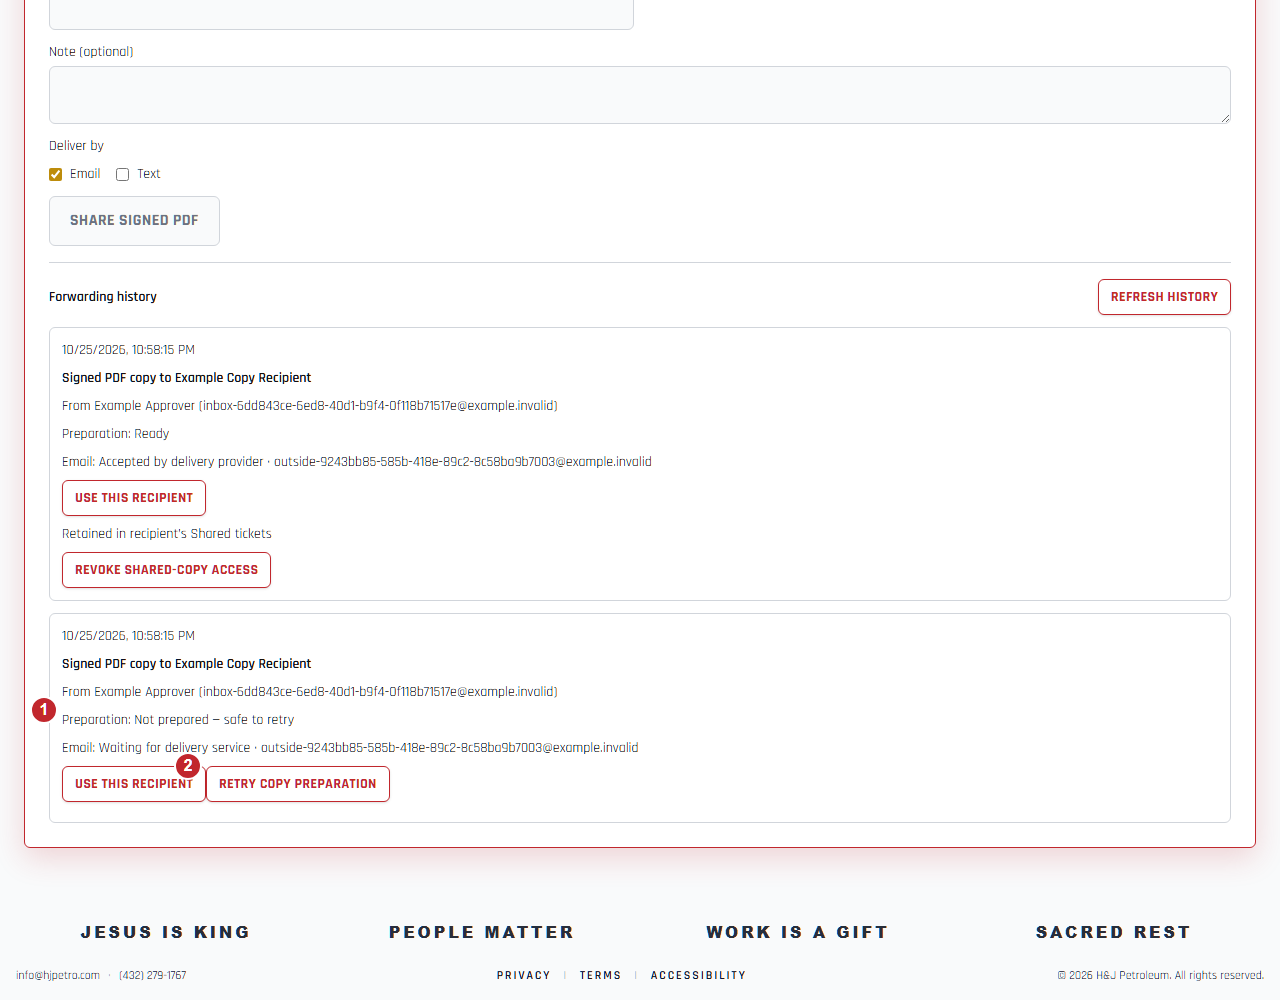
- Read the Preparation status for the intended recipient. Not prepared — safe to retry indicates that this copy was not prepared. Review the delivery status separately; do not create another signature or send a new copy to work around an uncertain result.
- Choose Retry copy preparation on that history entry when available. The app retries the existing request. Wait for the updated status and use Refresh history after an uncertain response. An unconfirmed preparation requires H&J review rather than a new signature or repeated sends.
Replace an expired link for unsent deliveries
Prepare a new share deliberately while preserving previous delivery history and avoiding duplicate accepted messages.
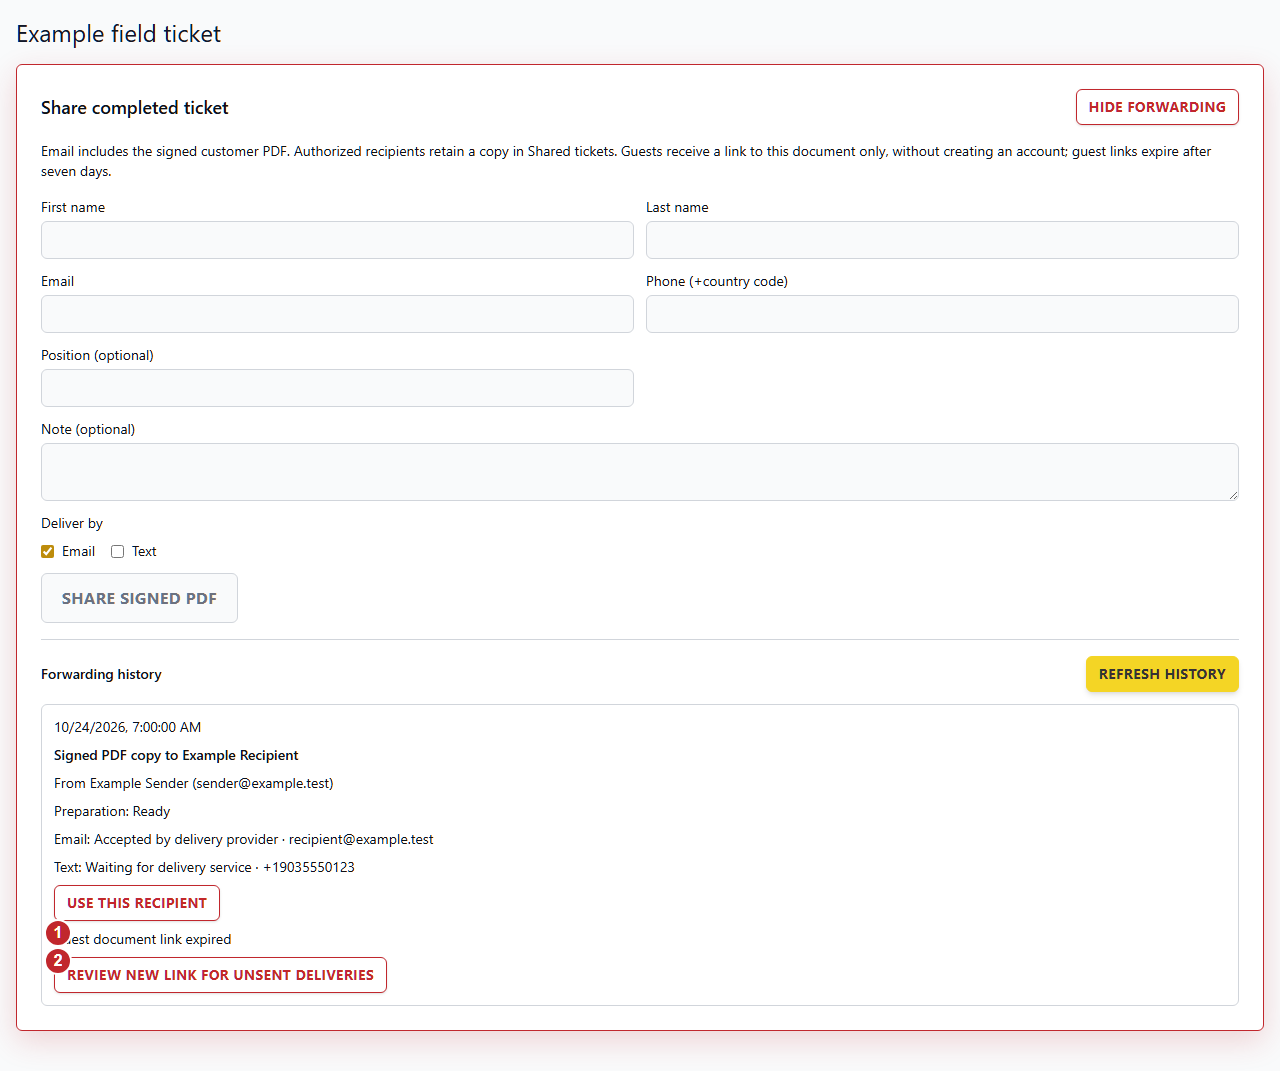
- Refresh forwarding history and check the shared-copy status. An expired or revoked link cannot be resumed as though it were still usable. Existing email attachments and downloaded copies are separate from link access.
- Choose Review new link for unsent deliveries. Review the new draft: only channels known to be unsent are selected. Accepted or unconfirmed deliveries are not selected. Nothing is sent until you choose Share signed PDF. The new share gets a new link and the original history remains intact.
Revoke access to a shared copy
The sender or intended account recipient can remove access through H&J. Delivered attachments and downloaded files cannot be recalled.
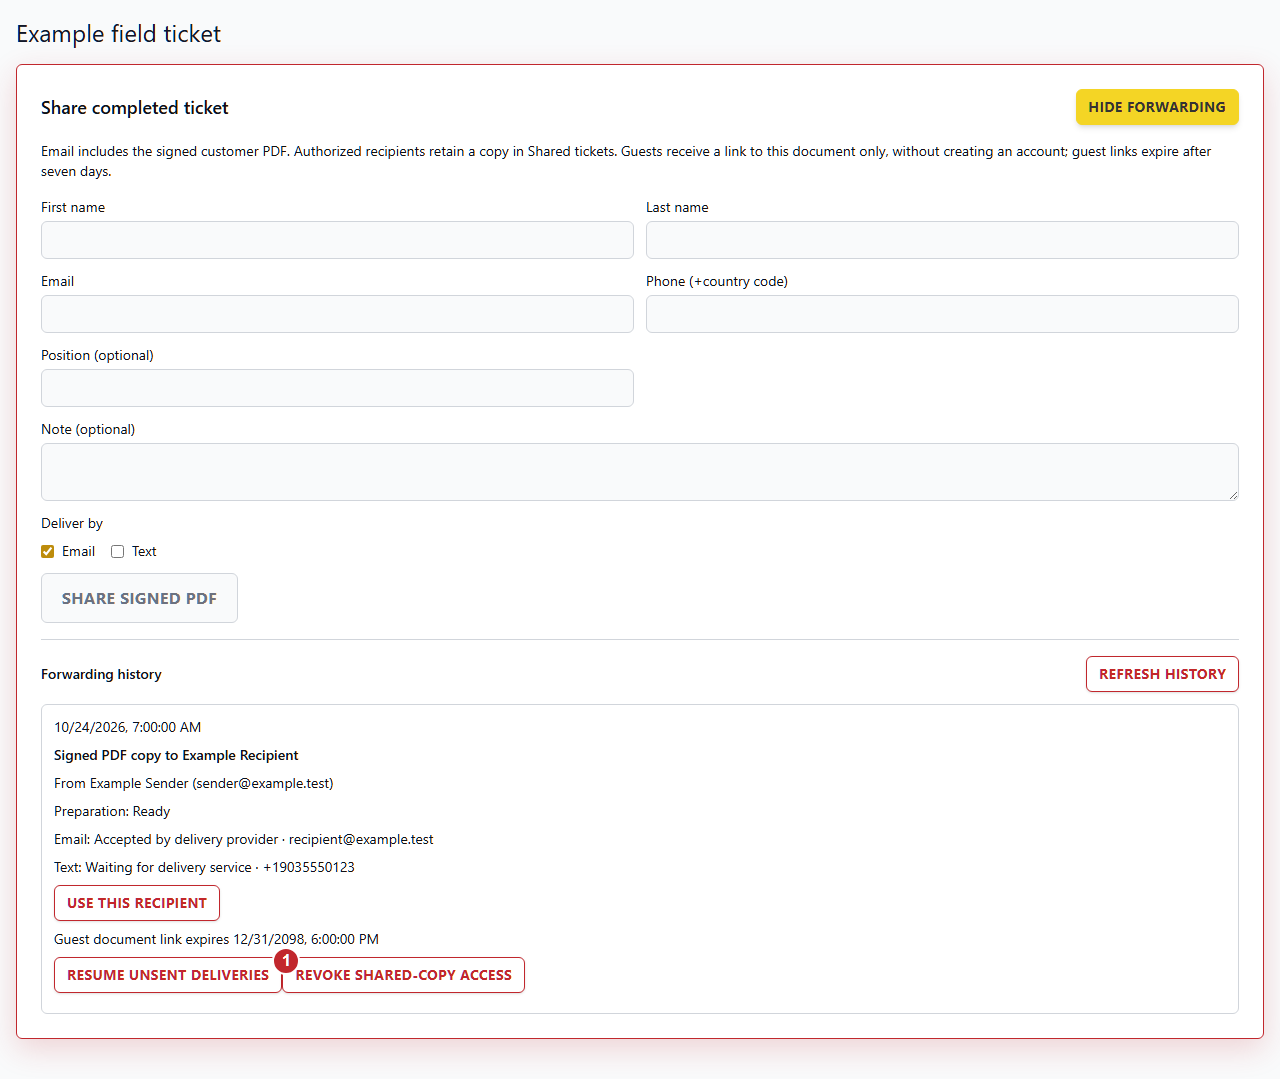
- In the ticket’s Forwarding history, choose Revoke shared-copy access for the active copy you are permitted to manage. This opens the confirmation shown in the next topic; access stays active until you confirm.
Confirm the exact shared copy to revoke
Revocation removes access through H&J to one shared copy. It does not recall email attachments or downloaded files, alter the original ticket, or change approval and payment status. Training account and recipient shown.
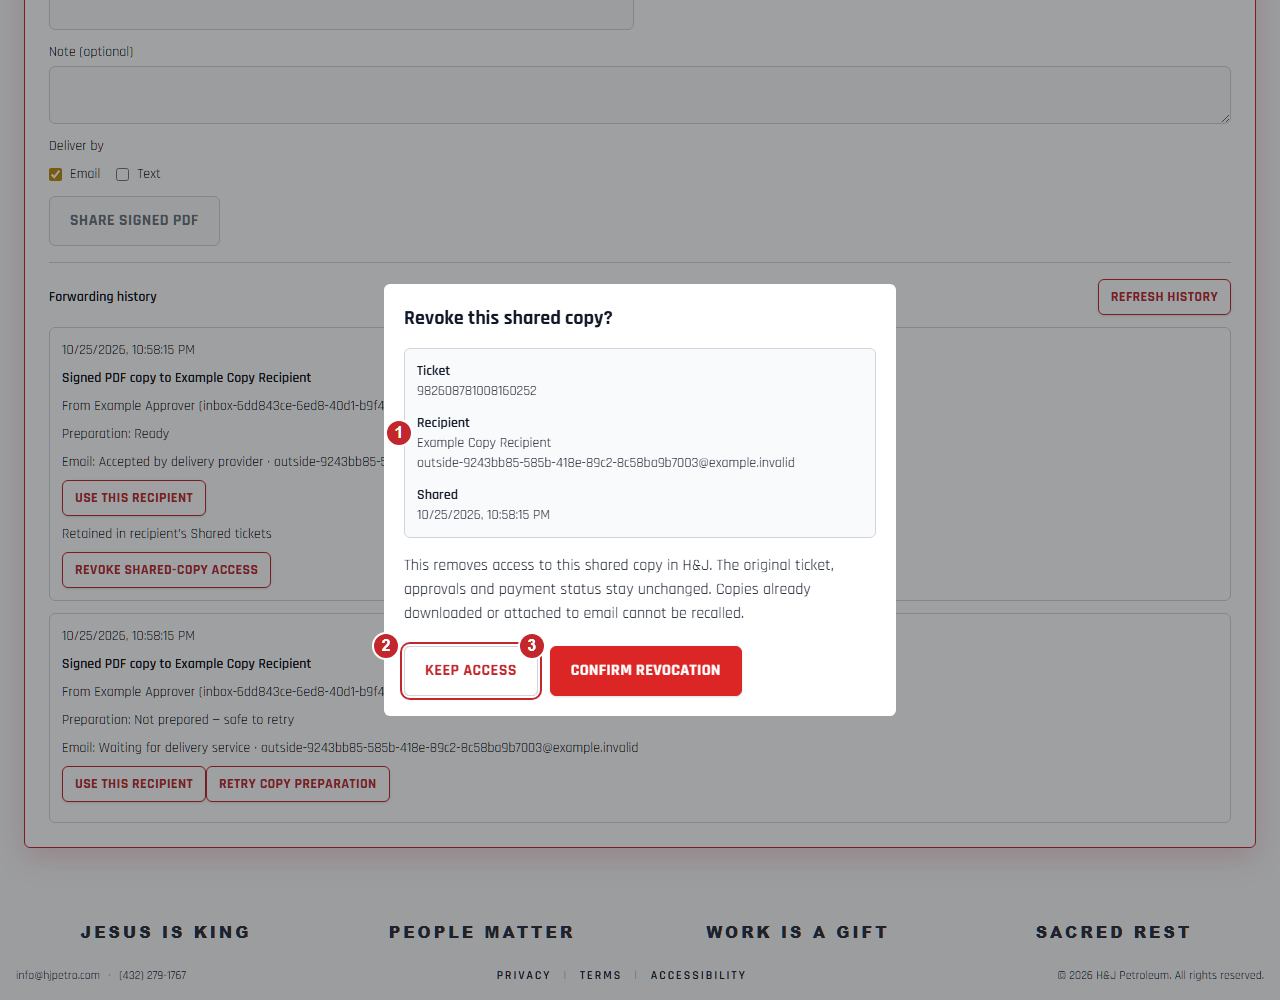
- Check the ticket, recipient and shared date in Revoke this shared copy? Make sure this is the copy you intend to revoke.
- Choose Keep access, or press Escape, to cancel before submitting. The dialog closes and focus returns to the same Revoke shared-copy access button.
- Choose Confirm revocation to remove access. Wait while the request is saved; do not repeat the action. If an error appears, follow its message and refresh history before assuming whether access changed.
Verify shared-copy access was revoked
A saved revocation is distinct from approval, payment and delivery status. A previously accepted email or downloaded attachment cannot be recalled. Training history shown.
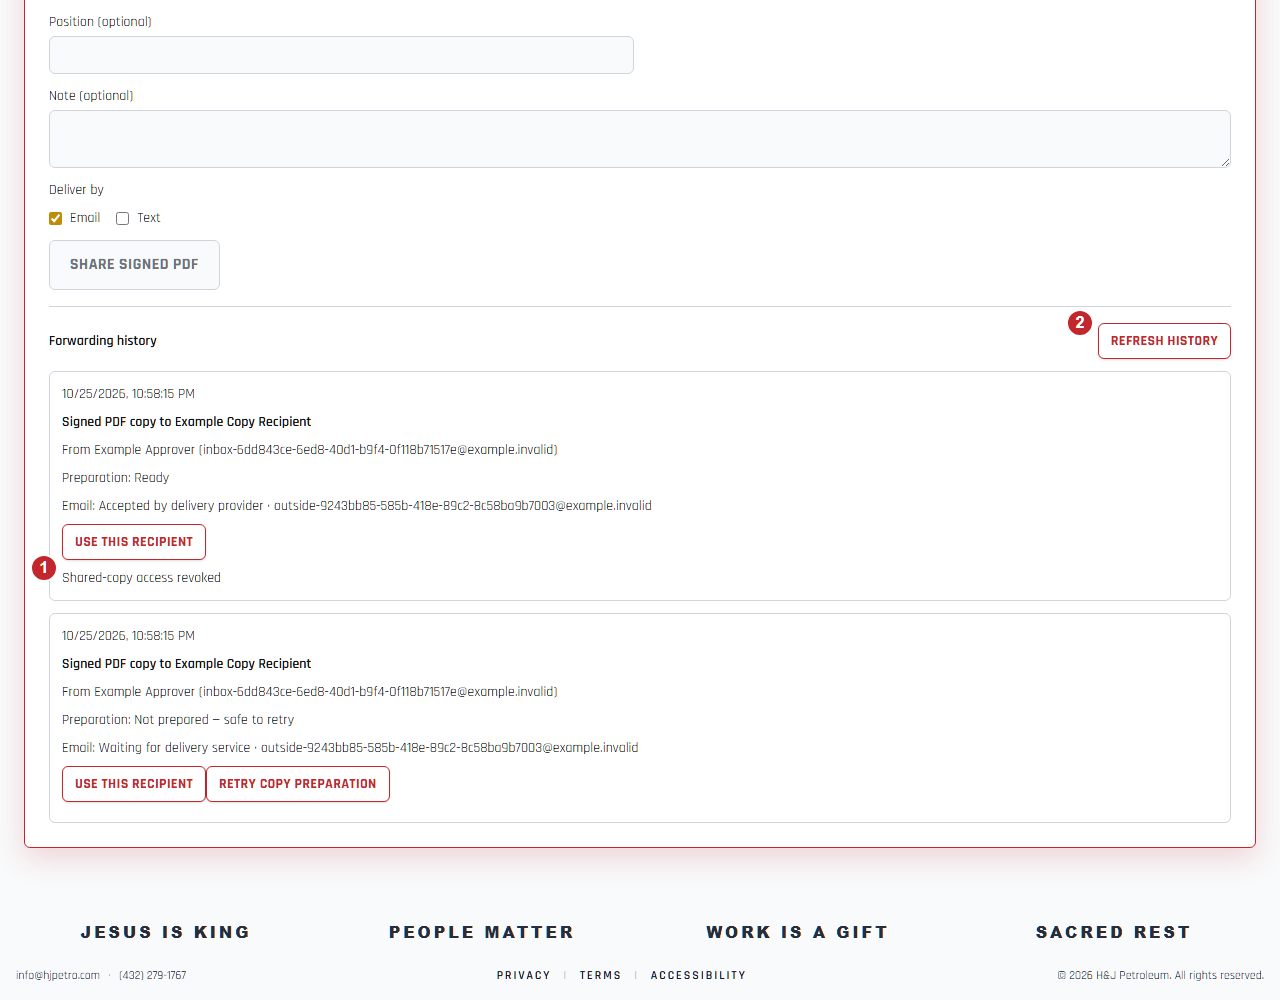
- Look for Shared-copy access revoked on the intended history entry. This confirms the H&J copy’s access was removed; the original ticket and its approval remain unchanged.
- Choose Refresh history to read the current saved state, especially after an uncertain response. If revocation is not confirmed, review the current status or contact H&J before repeating it. Revoking a link does not delete a delivered attachment.
Find completed copies shared with your account
Shared tickets holds read-only signed copies separately from your approval inbox.
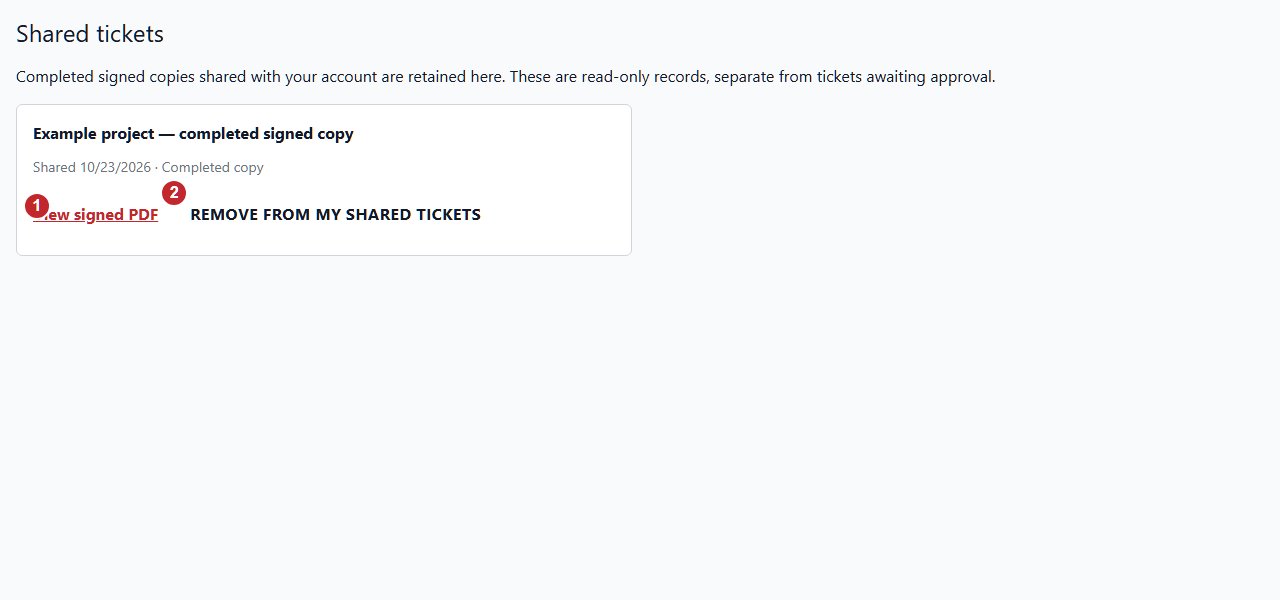
- Sign in with your own authorized email and open Shared tickets from the account menu. Find the completed copy and choose View signed PDF. A shared copy does not give you project-wide access or permission to approve the original ticket.
- Choose Remove from my shared tickets only when you want to remove your access to that copy, then confirm. The sender’s original ticket is retained. Existing downloaded files remain on your device.
Open a document-only sharing link
Guests can view one completed signed customer PDF without creating an account. This is not a signing request.
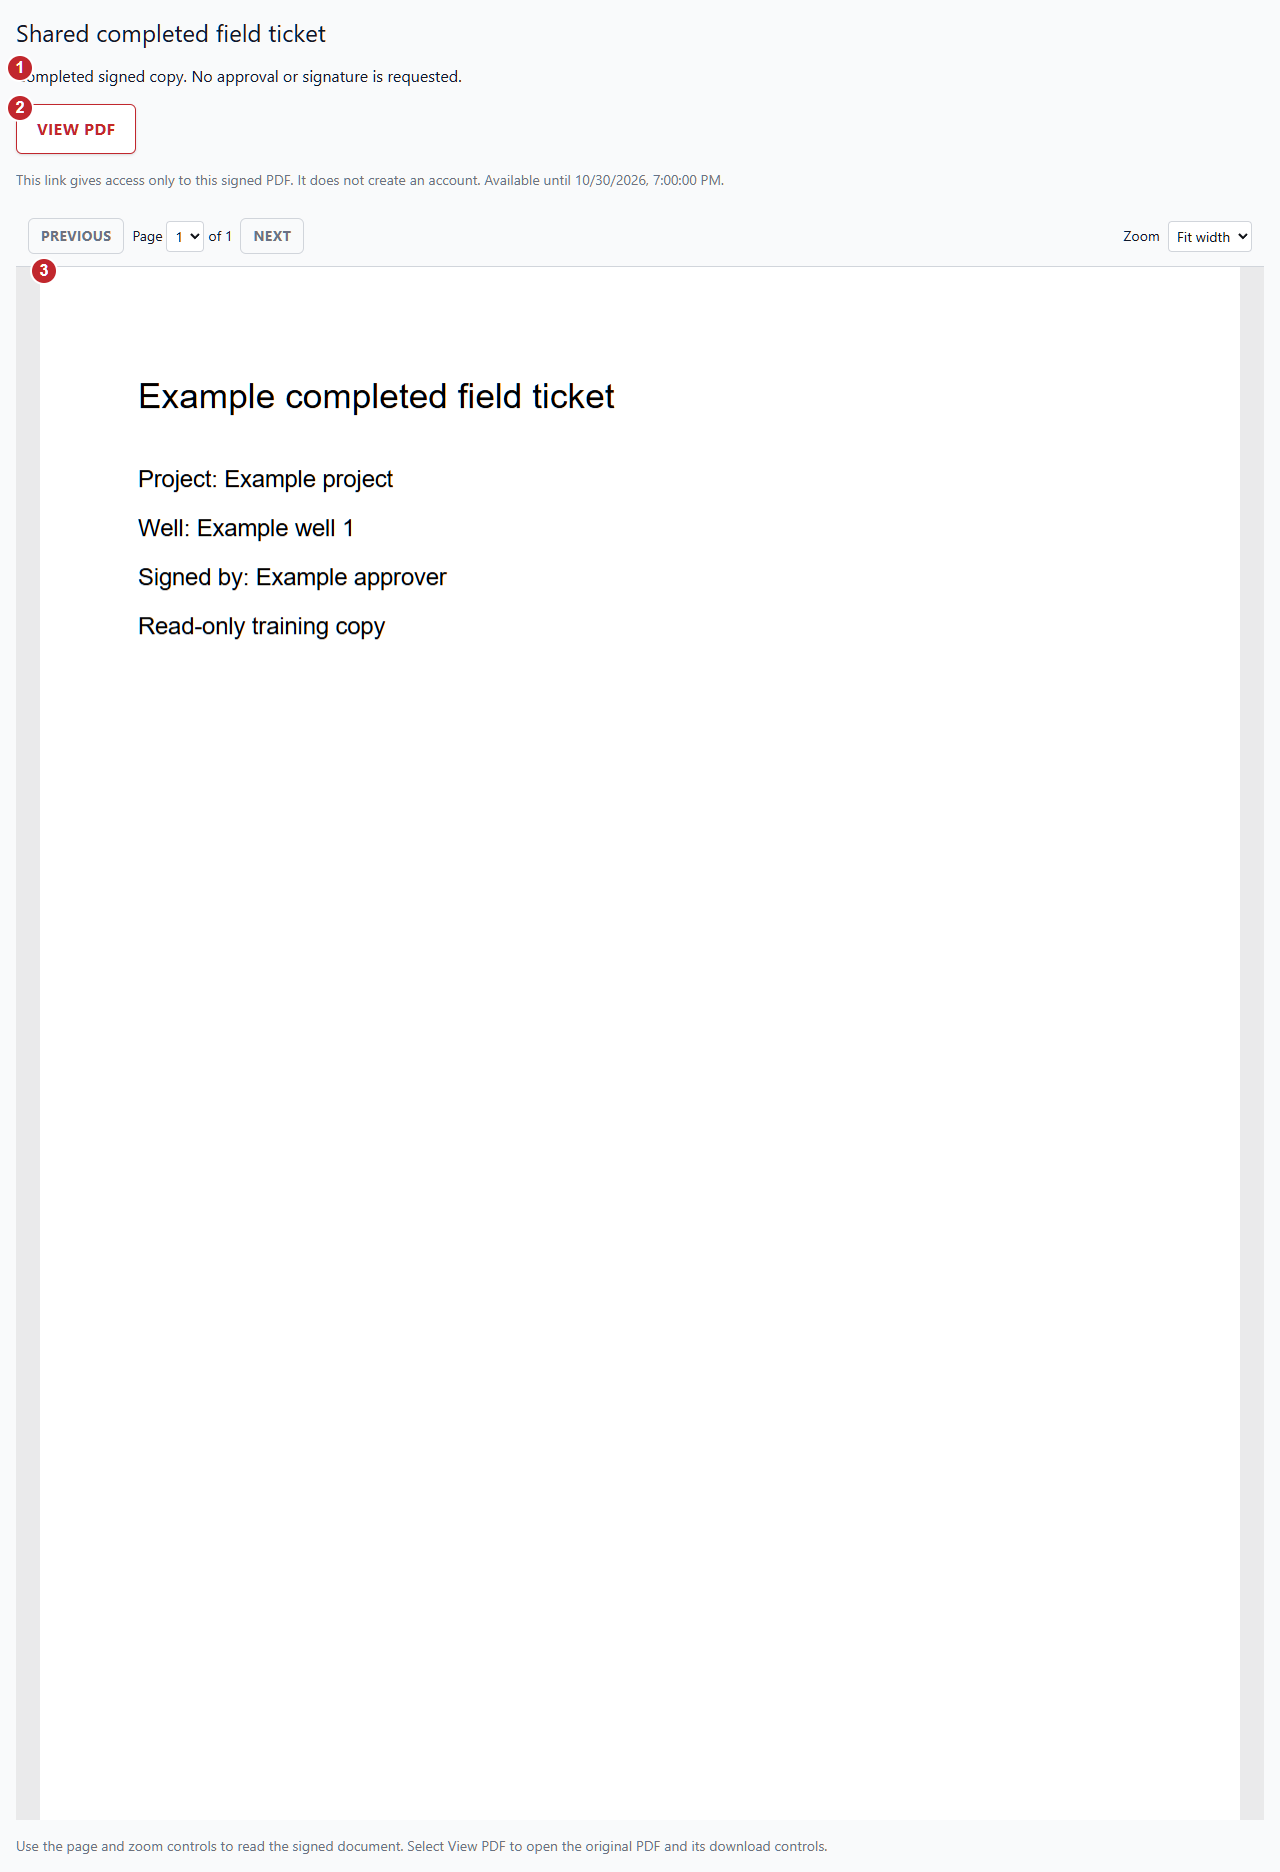
- Open the original H&J sharing link from the message. Check that the page says Completed signed copy and that no approval or signature is requested. Guest access is limited to this document and expires at the date shown.
- Use View PDF if the inline preview is unavailable in your browser. The existing browser viewer provides any download or print controls; H&J does not add a separate Download PDF button.
- Review the signed PDF in the page. Use Previous, Next or the Page selector to read every page. Choose Fit width or a larger Zoom level; at larger zoom, scroll within the document to read across it. If the link expired or was revoked, ask the sender for a new copy. Guest access does not create an account, show other tickets or allow approval or payment actions.
Bulk actions and recovery
Select tickets, prepare signing requests, forward a batch and recover interrupted work.
Bulk actions: select the right tickets
Use a batch for tickets that still need a decision. Completed tickets and existing signature requests cannot be selected. This is a disposable sandbox example.
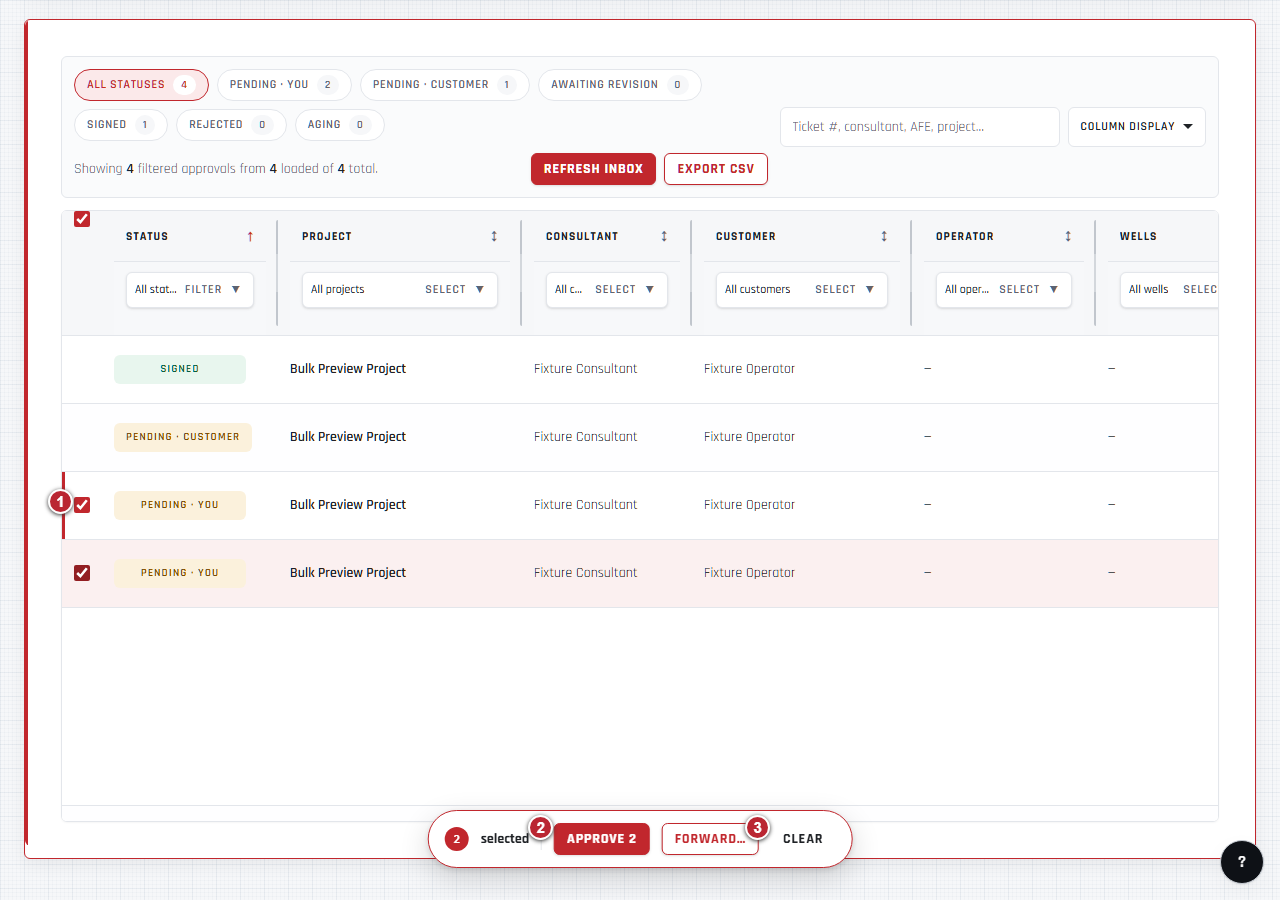
- Select the checkbox beside each ticket you want to prepare or forward. Check the project and ticket details first. Select matching tickets on mobile, or the header checkbox on desktop, applies to eligible matching records currently loaded; it does not fetch unloaded tickets. Select at most 50 tickets per batch.
- Use Approve to review the selection before preparing signature requests. Use Forward instead when another person should review the tickets. Neither opening the dialog nor selecting tickets completes an approval.
- Use Clear to remove the selection. If more than 50 tickets are selected, reduce the selection before continuing. The app does not silently drop extra tickets.
Bulk actions: prepare tickets for signing
Preparing a batch creates signing requests. Each ticket still needs its own signature before approval is complete.
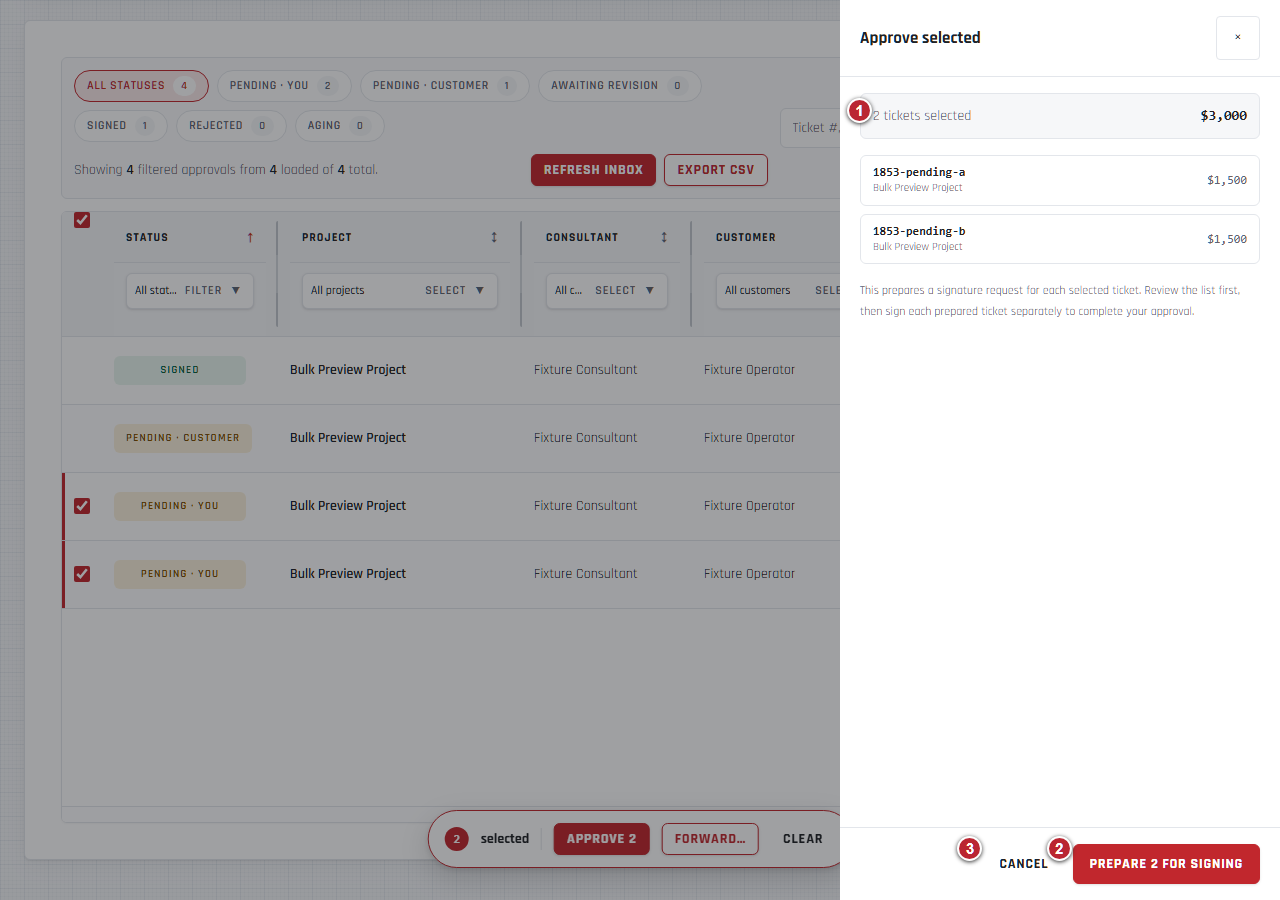
- Review the selected ticket references, projects and total. Return to the inbox if the selection is wrong.
- Select Prepare for signing once and wait for the per-ticket results. Open each successful Sign link and finish its signature. A prepared result is not a completed approval or a payment confirmation.
- Select Cancel to return without submitting. If the connection fails after submission, check the same saved operation instead of starting a replacement batch. The recovery topics below explain the next steps.
Bulk actions: forward selected tickets
Review the recipient carefully. A saved batch retains its original tickets and recipient when resumed.
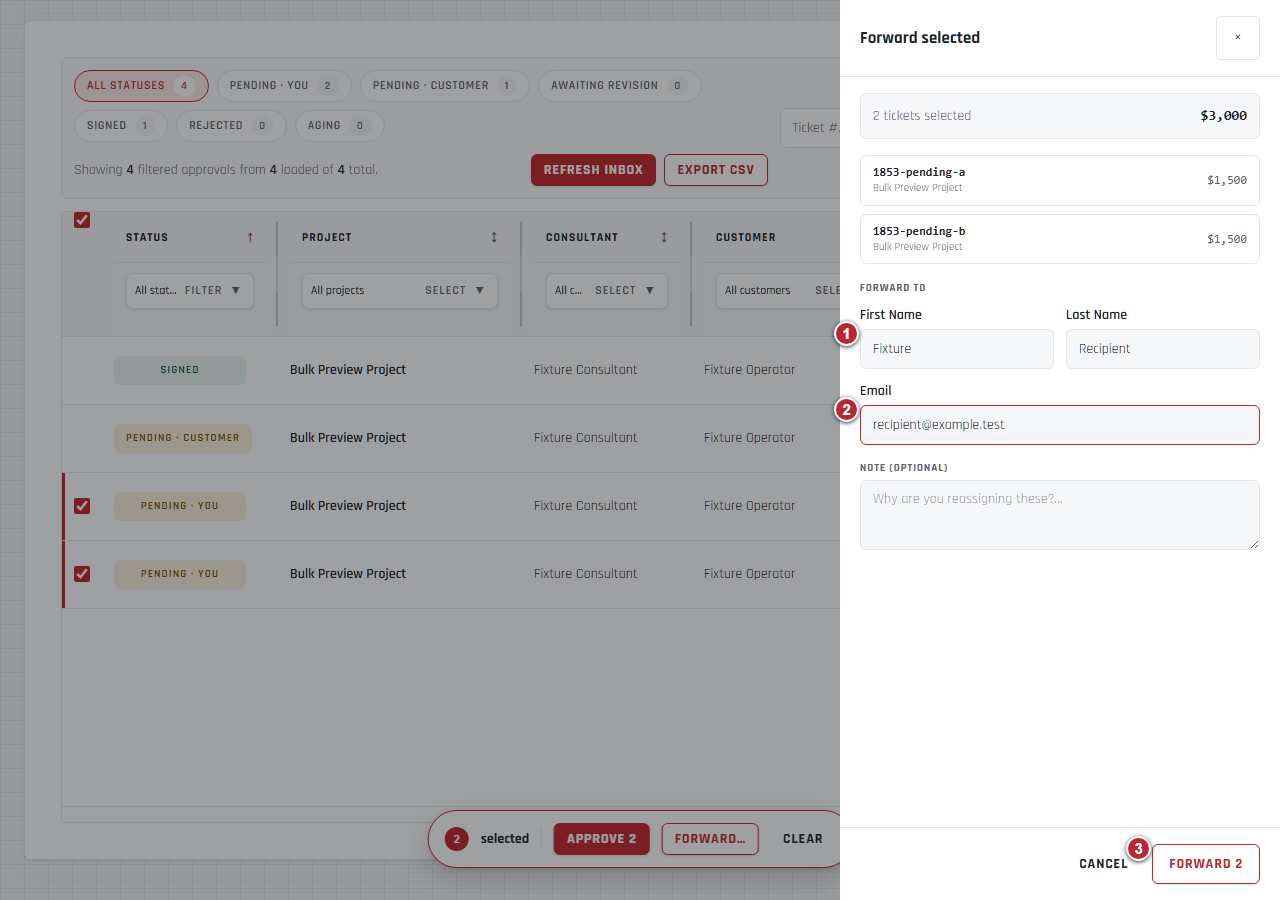
- Enter the recipient’s first and last name. Review the selected ticket references and projects above the recipient fields.
- Enter and check the recipient’s email address. Add an explanatory note if needed. Do not use forwarding to bypass project permissions or send a request to an unintended person.
- Select Forward once and wait for the per-ticket results and email or text-message status. Accepted for delivery means the message transport accepted it; it does not confirm receipt or approval. If delivery is unconfirmed, contact H&J before sending another message.
Bulk actions: recover a saved batch
Recent bulk operations remains available after a reload or lost connection. It uses the original request and checks your current ticket access.
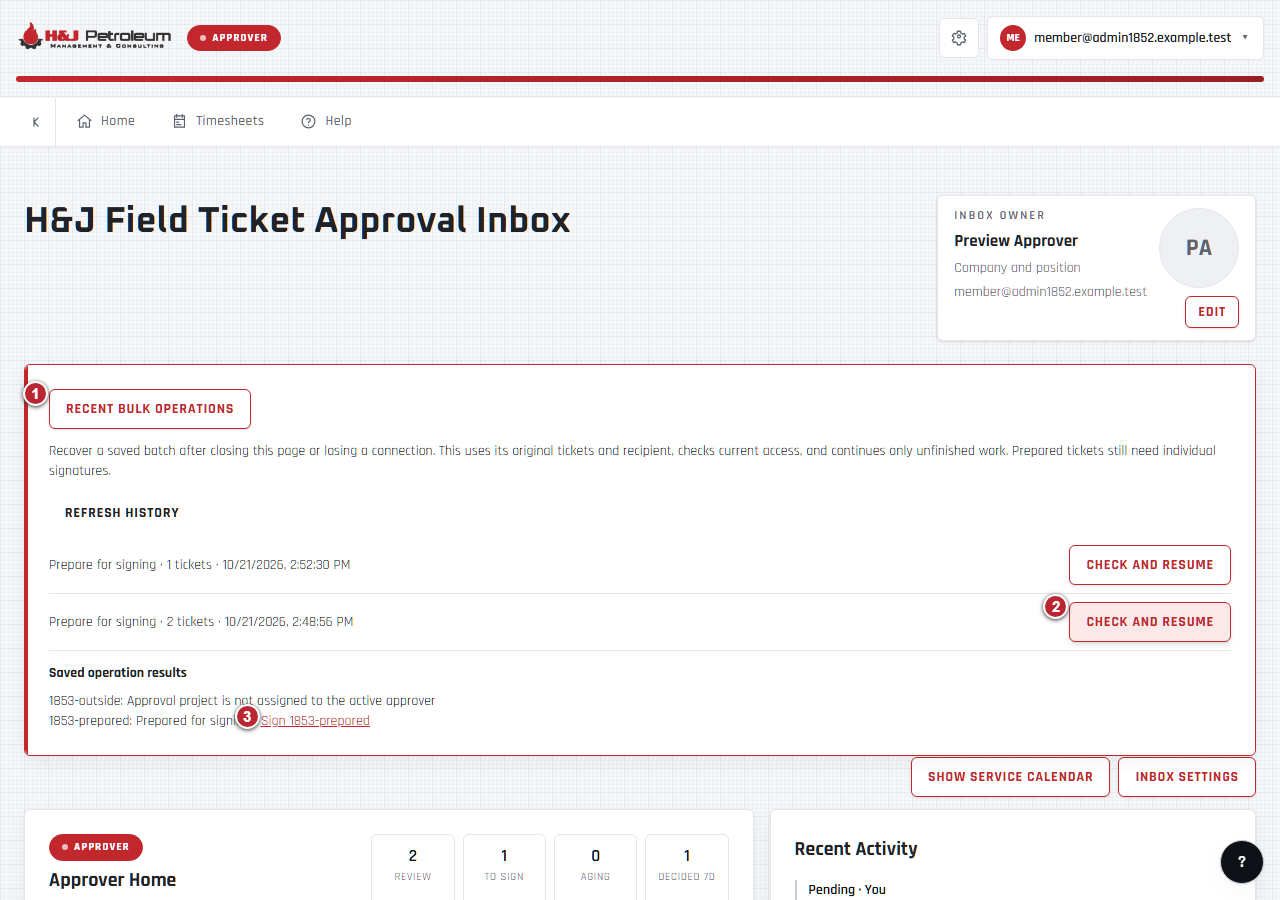
- Open Recent bulk operations in All approvals. Use Refresh history or Load older operations to find the original batch by its action, ticket count and time.
- Select Check and resume for that batch. Wait for Saved operation results. Successfully completed actions are not repeated; only safely resumable work can continue. A ticket you can no longer access will not expose a signing link.
- Use each available Sign link to finish the individual ticket. Review any skipped, failed or Needs review details. Deferred messages can be checked later with the same saved operation; an unconfirmed message is not automatically resent.
Bulk actions: handle an unresolved result
An interrupted operation may have started even when its final result could not be saved. Treat this differently from a confirmed failure.
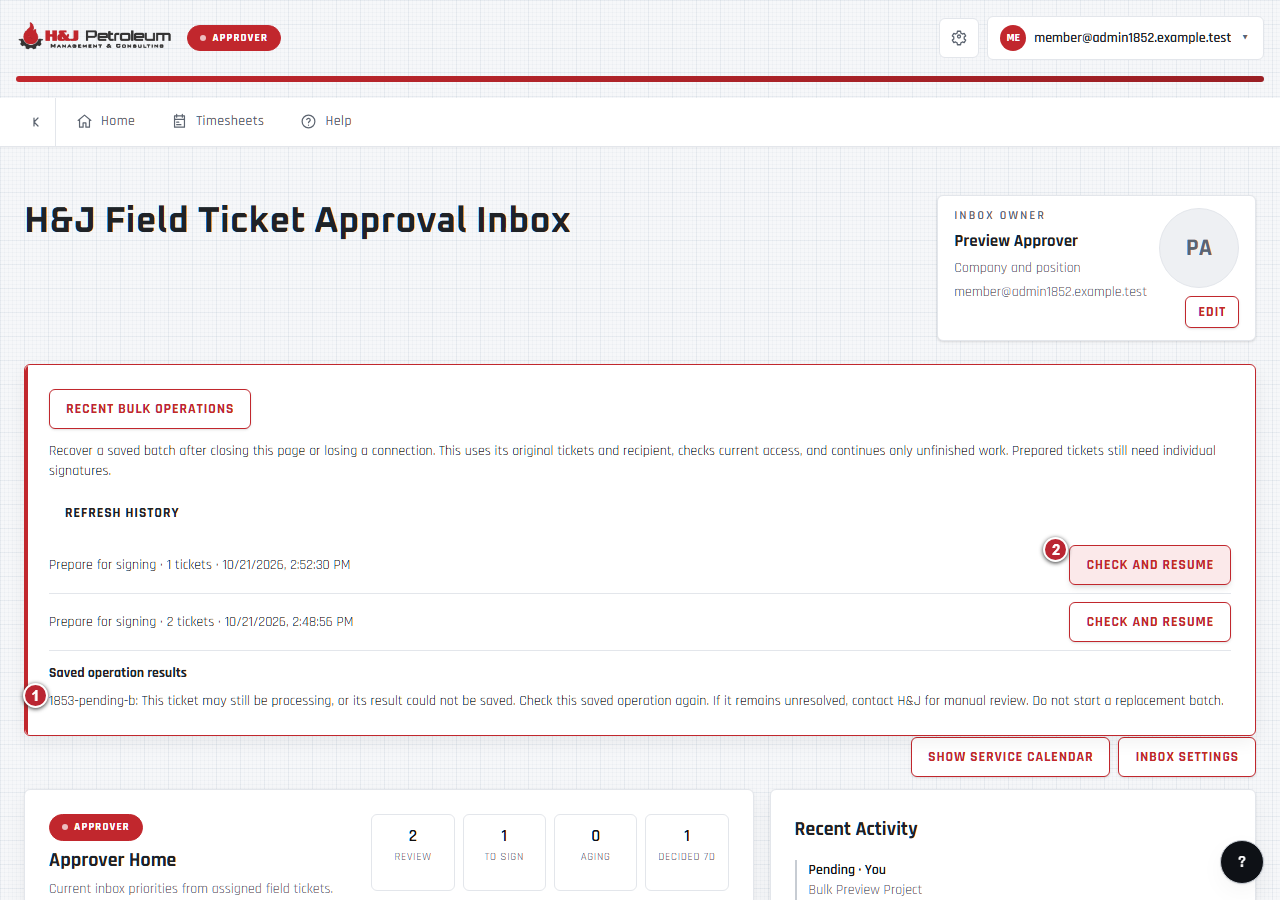
- Read the result carefully. A Needs review result may still be processing or may require manual reconciliation. Do not assume that no signature request was created, and do not start a replacement batch.
- Check and resume the same saved operation again. If it stays unresolved, contact H&J with the ticket reference, batch time and displayed message. H&J must verify the existing request before deciding whether another action is appropriate.
Bulk actions on a phone
Use the mobile ticket cards and the same confirmation steps. The dialog scrolls independently and keeps its confirmation controls visible.
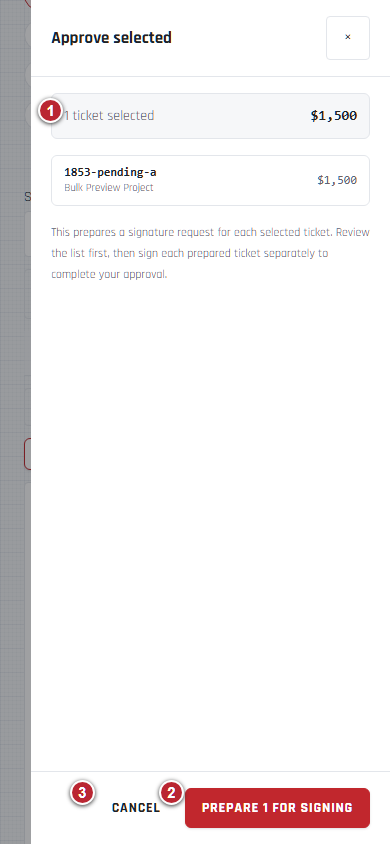
- Use Select ticket on the relevant cards, then open Approve or Forward in the selection bar. Review the ticket references and total in the dialog.
- Use Prepare for signing or Forward only after reviewing the details. Wait for results; preparing tickets does not sign them. Use the individual signing links afterward.
- Use Cancel or the close control to return before submitting. After an uncertain response, use Recent bulk operations to recover the original request instead of creating another batch.
Account and preferences
Contact details, notifications, passwords, recovery, authenticator and passkeys.
Use the site menu on a computer
Public-page navigation before sign-in. This production screenshot shows the header on a wide screen; your signed-in workspace has its own navigation.
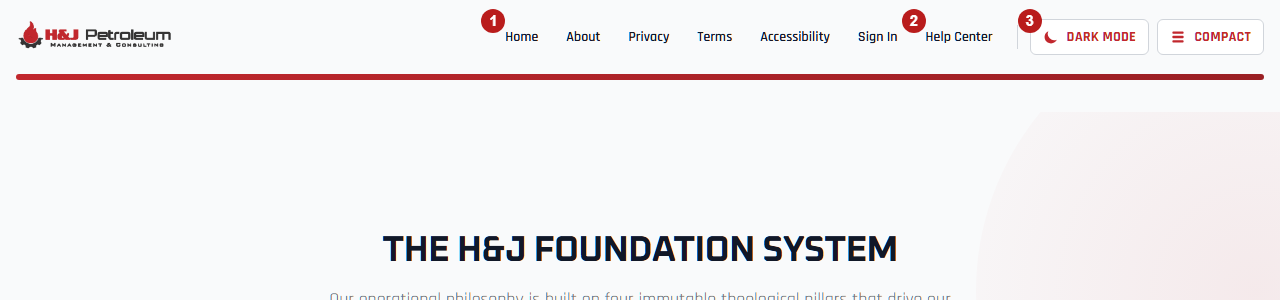
- Use the links across the top to open a page. Select Sign In to access your approvals with your own registered email.
- Select Help Center to return to the guides. Signing in does not change which customer records your account can access.
- Use Dark Mode or Light Mode to change appearance, and Compact or Comfortable to change spacing on this device. These controls do not change notification preferences.
Use the site menu on a phone
On public pages, select Menu at the top right to open this drawer. The screenshot shows production; available page links can differ by environment and account.
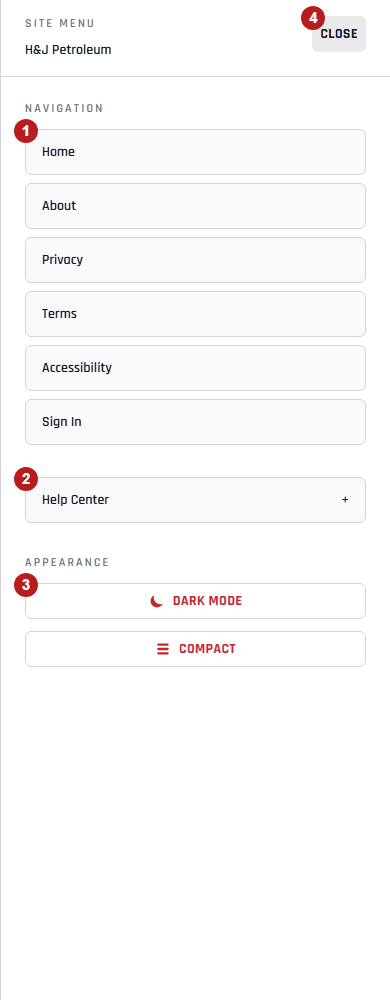
- Choose a page under Navigation, or select Sign In to access your approvals. Choosing a link closes the drawer.
- Expand Help Center to see the available guides, then choose a topic.
- Change appearance or spacing with the controls under Appearance. Notification delivery settings are separate from these device preferences.
- Select Close to return to the page. With a keyboard, Escape also closes the menu and returns focus to Menu; Tab stays inside while it is open. Widening the window to the desktop layout closes the drawer and restores page scrolling.
Find your profile and security settings
Production navigation, October 21, 2026. Admin shortcuts appear only for accounts with admin access.
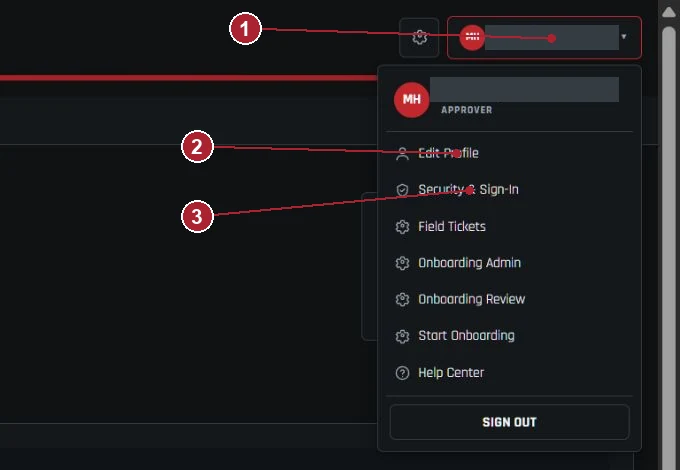
- Open Account and security using your initials/email at the top right. The gear beside it changes appearance and navigation layout.
- Choose Edit Profile to update contact details and notification preferences.
- Choose Security & Sign-In for password, passkey and authenticator settings. Use Approvals in the main navigation to return to your inbox. The Field Tickets shortcut shown here opens an admin workspace.
Update your profile
Production Account Profile page. Personal values are hidden; the field labels and layout are retained.
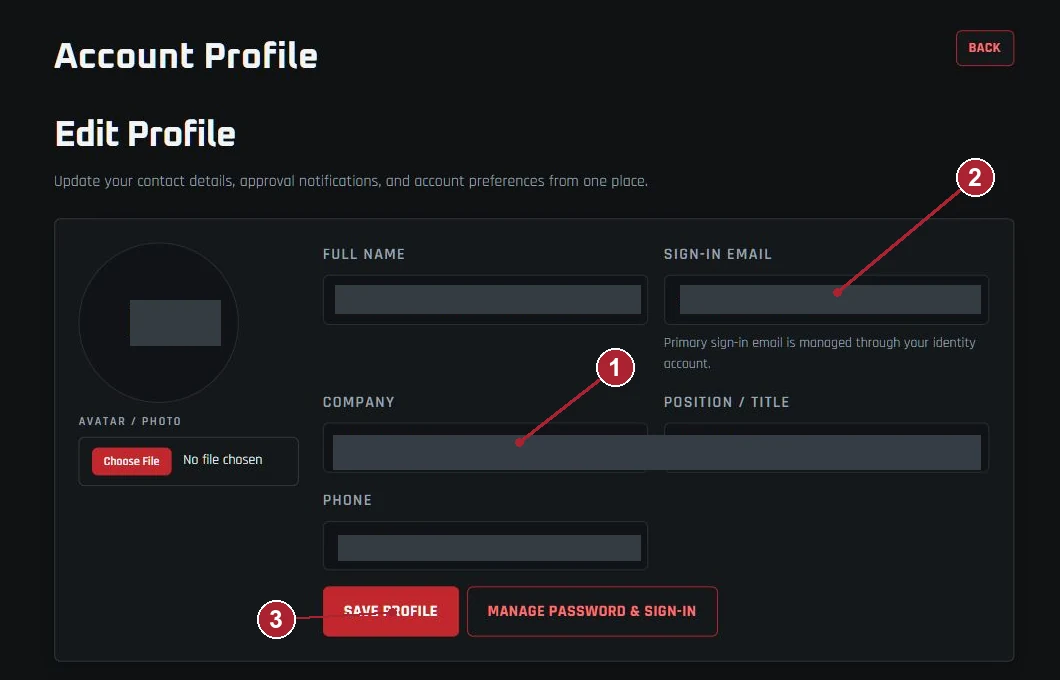
- Review and edit your Full Name, Company, Position / Title and Phone. Avatar / Photo is optional.
- Sign-In Email is read-only. Ask H&J to coordinate an email change; changing Company does not grant access to another company's tickets.
- Select Save Profile and wait for confirmation. Use Manage Password & Sign-In for credential changes.
Choose notification destinations and channels
Contact Preferences in Edit Profile has its own Save Preferences button. For default inbox views, daily digests and aging reminders, use Inbox Settings from All approvals.
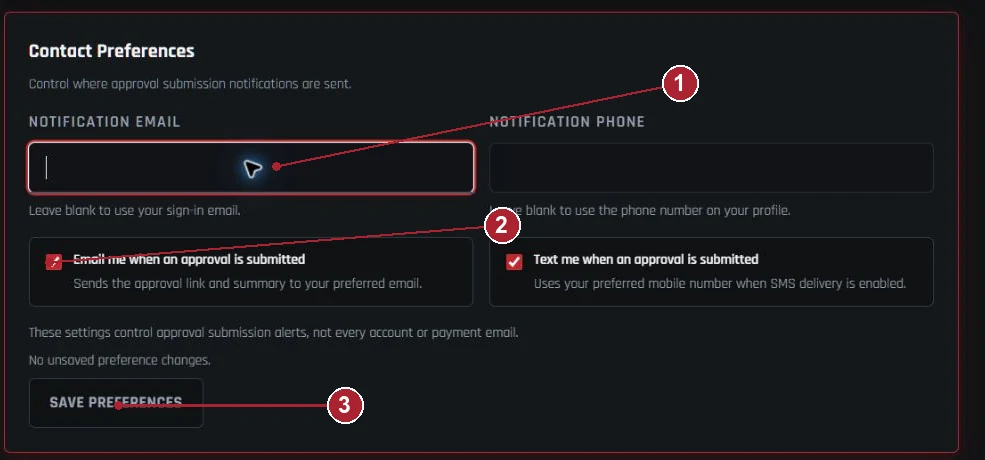
- Set Notification Email or Notification Phone only for an alternate destination. Blank fields use your sign-in email or profile phone.
- Choose email and text alerts. Text delivery depends on SMS being enabled. Keep email enabled if you rely on it for approval requests.
- Select Save Preferences and confirm success. Unsaved profile edits remain separate. Reopen the page to verify retained choices. These controls concern approval-submission alerts, not every service email.
Change your sign-in email
Open Account and security, choose Security & Sign-In, and confirm Signed-In Identity is your account. Changing the sign-in email keeps your account and project access; it does not change your project contact or notification destinations. Keep a working password. A fresh sign-in check may be required.
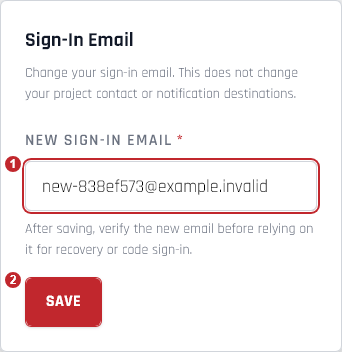
- Enter your new address in New Sign-In Email. Use an address you control.
- Select Save in the Sign-In Email section and wait for the result. If the page requests a fresh sign-in, complete it and return to Security Center. Then check Signed-In Identity and its verification status.
Check your changed email and verification status
After saving, read Signed-In Identity. This training account is marked as sent; that status does not prove inbox delivery. Your account may show a different verification status.
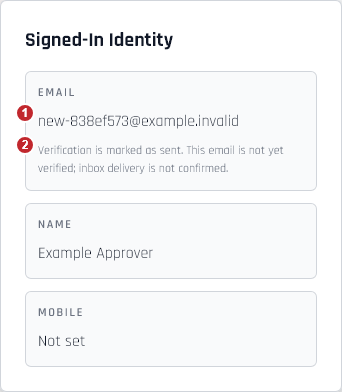
- Check that Email shows the address you saved. Your project contact and notification destinations are separate; ask H&J if those also need updating.
- Read the verification message. Verified means the address is verified, not that messages are delivered. Pending does not confirm sending; marked as sent does not confirm delivery or verification. Keep a working password until the address is verified, and contact H&J if verification is unavailable or does not complete.
Remove an existing authenticator
Open Security Center and find Two-Step Verification Enabled. Remove the authenticator only when you know your working password and intend to stop using this extra sign-in check. The action takes effect when its request succeeds; there is no separate confirmation dialog.
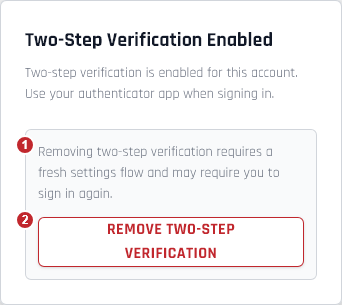
- Read the removal notice. A fresh sign-in may be required. If removal is unavailable, reload settings or contact H&J; do not assume the authenticator was removed.
- Select Remove Two-Step Verification once and wait for the result. If reauthentication is requested, complete it before retrying. Check the resulting section as shown in Confirm authenticator removal.
Confirm authenticator removal
After successful removal, the heading no longer says Enabled and the Remove Two-Step Verification button is gone. This image is deliberately cropped to the heading to exclude the account-specific setup QR code and secret. A new setup form may appear below it.

- Check that the section now says Two-Step Verification. An error or an unavailable action does not confirm removal. Use your working password at the next sign-in; set up a new authenticator only if you intend to enable two-step verification again.
Set or change your password
Open Security Center and confirm Signed-In Identity is your account. A fresh sign-in check may be required before changing credentials. This training image shows an empty password field; never share your password.
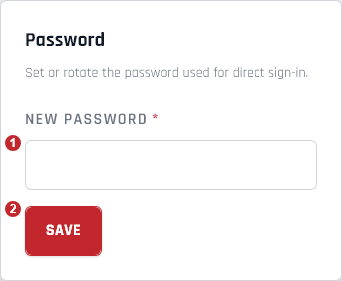
- Enter your new password in New Password. Follow the on-screen requirements and store it securely.
- Select Save in the Password section and wait for success. If the request fails, the new password is not confirmed. Never send your password to H&J.
Sign out across your browsers and devices
Open Account and security, choose Security & Sign-In, and find Sessions. See Find your profile and security settings for the account-menu screenshot.
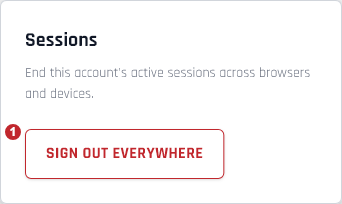
- Select Sign Out Everywhere. Your current browser returns to sign-in. Other browsers will need to sign in again when they next request protected information.
Wait for all-session sign-out to finish
The current phone example shows the progress message and disabled action while the request is running.
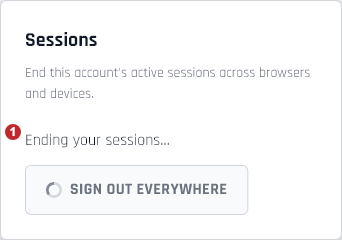
- Wait while Ending your sessions… is shown. The button stays disabled until the request finishes; the current browser then opens the sign-in page.
Retry an unsuccessful all-session sign-out
If the page says it could not end your sessions, stay in Security Center and retry when you are ready.
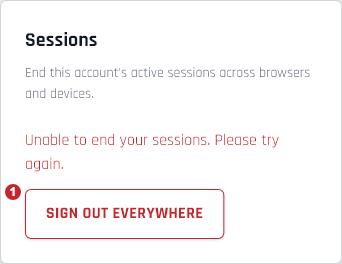
- If Unable to end your sessions appears, select Sign Out Everywhere again to retry. An error does not confirm that other sessions ended. If the error continues, contact H&J.
Sign in with your password later
Production sign-in page after selecting Use Password.
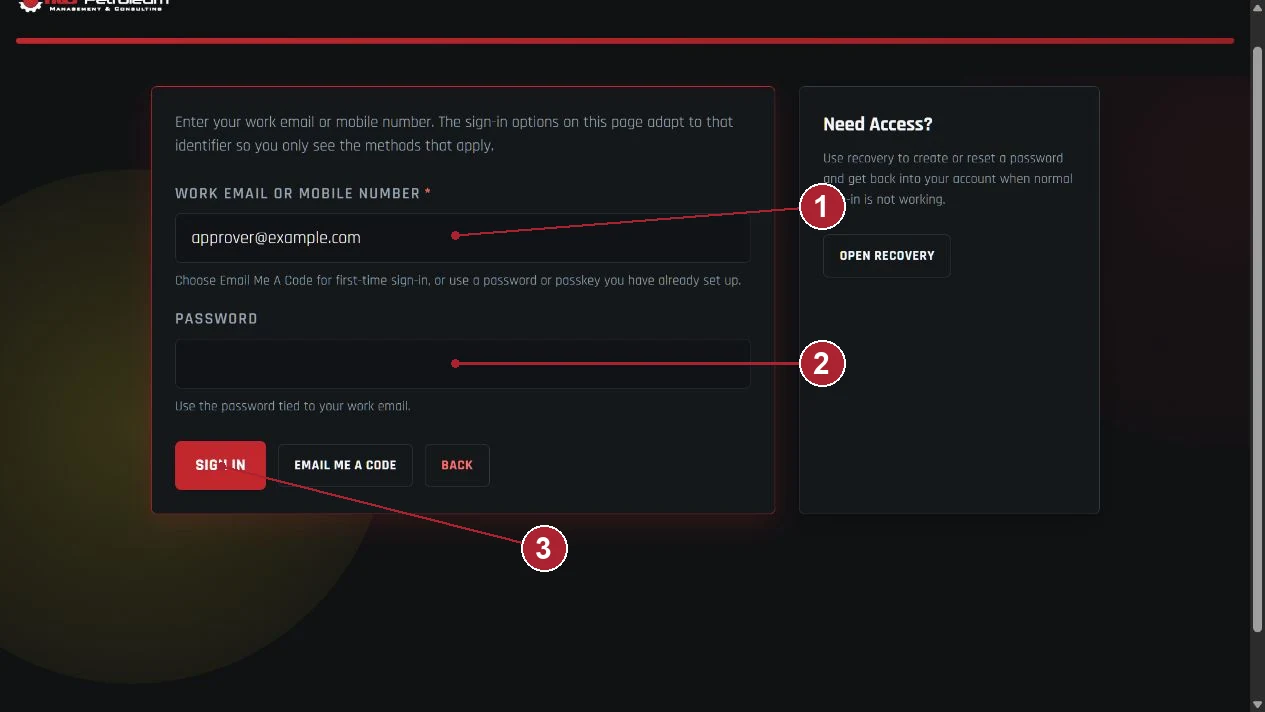
- Enter the same registered work email you used when setting the password.
- Select Use Password from the visible choices, then enter the password in the field shown here.
- Select Sign In and complete any additional security check. Use Email Me A Code or Open Recovery if you cannot use the password.
Recover access
Use Open Recovery on the sign-in page. The following topics show code verification, any required authenticator check, and password reset. Recovery does not add project permissions.
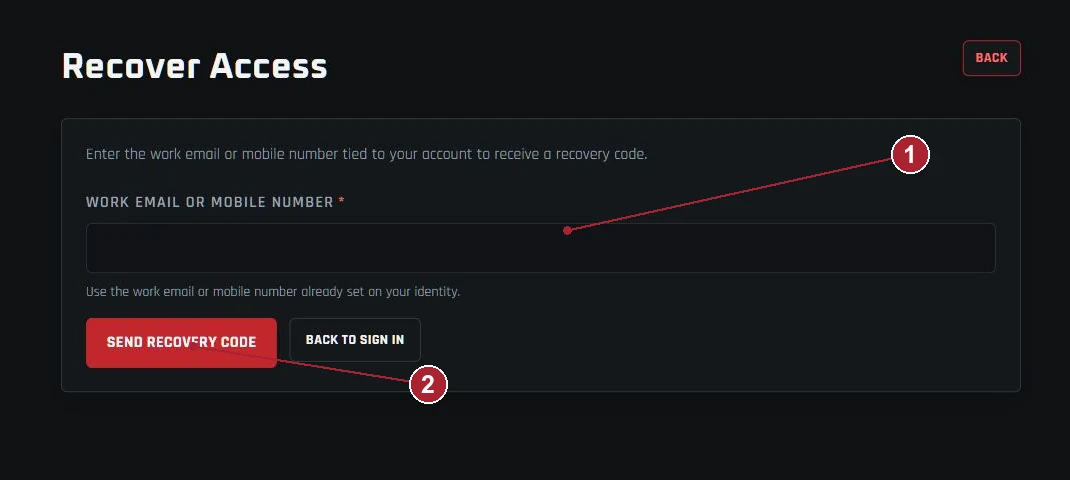
- Enter the work email or mobile number already tied to your account.
- Select Send Recovery Code. If asked to choose a recovery address, select one you can access.
Enter and verify your recovery code
Use the latest recovery code from your registered address. It is different from an authenticator-app code.
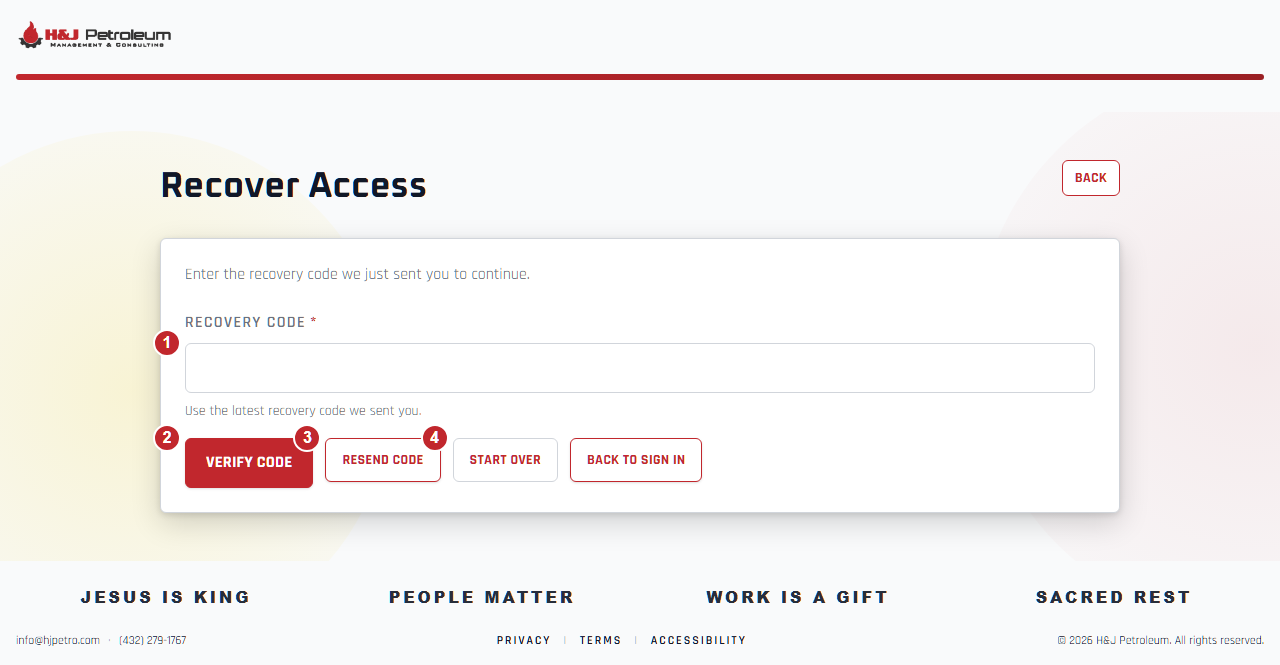
- Enter the latest recovery code in Recovery Code. Never share the code with another person.
- Select Verify Code. If your account uses an authenticator app, complete the next verification screen before Security Center opens.
- If a new code is needed, select Resend Code and use only the newest code. If the registered address is unavailable, contact H&J.
- Use Start Over to return to the beginning if you need to correct the recovery address. This does not change your account permissions.
Complete the authenticator check after recovery
An account with two-step verification still requires its authenticator after a recovery code is verified. Recovery does not remove MFA.
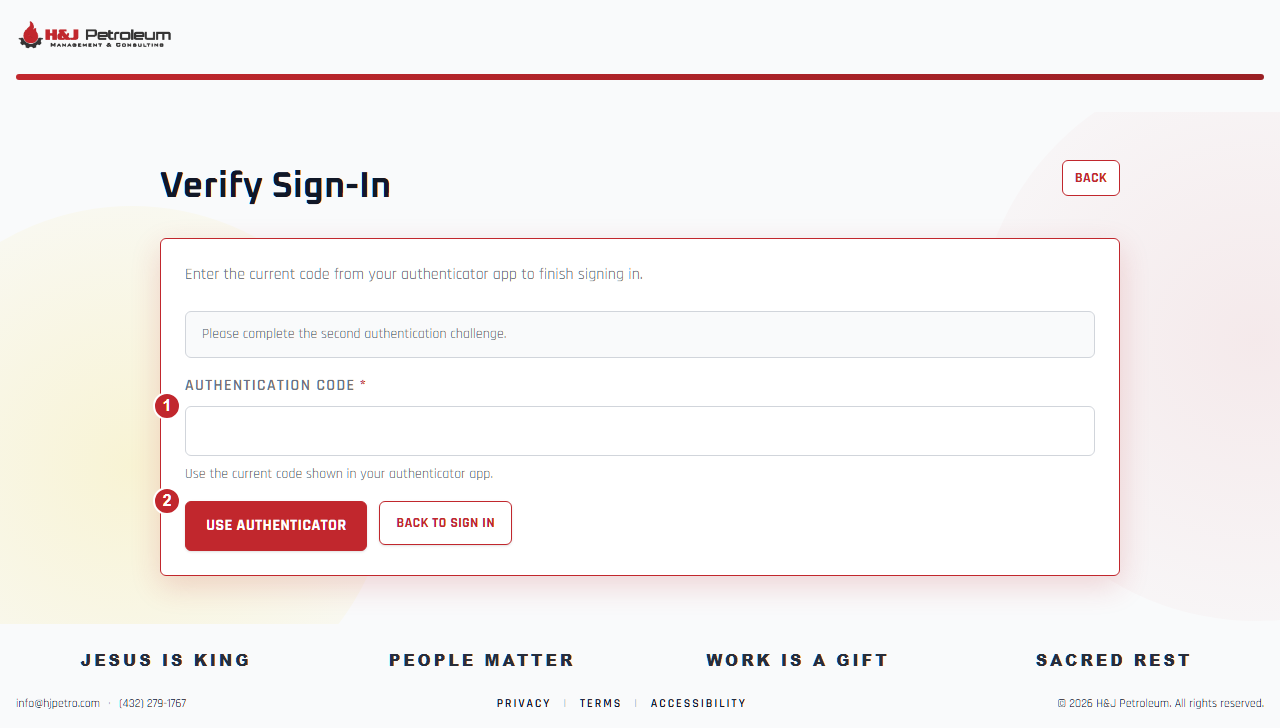
- Open your authenticator app and enter its current code in Authentication Code. Do not enter the email recovery code here.
- Select Use Authenticator to continue to Security Center. If you cannot access the enrolled authenticator, contact H&J for account recovery support.
Set a new password after recovery
After any required verification, Security Center opens for your own account. Additional sections can differ between environments.
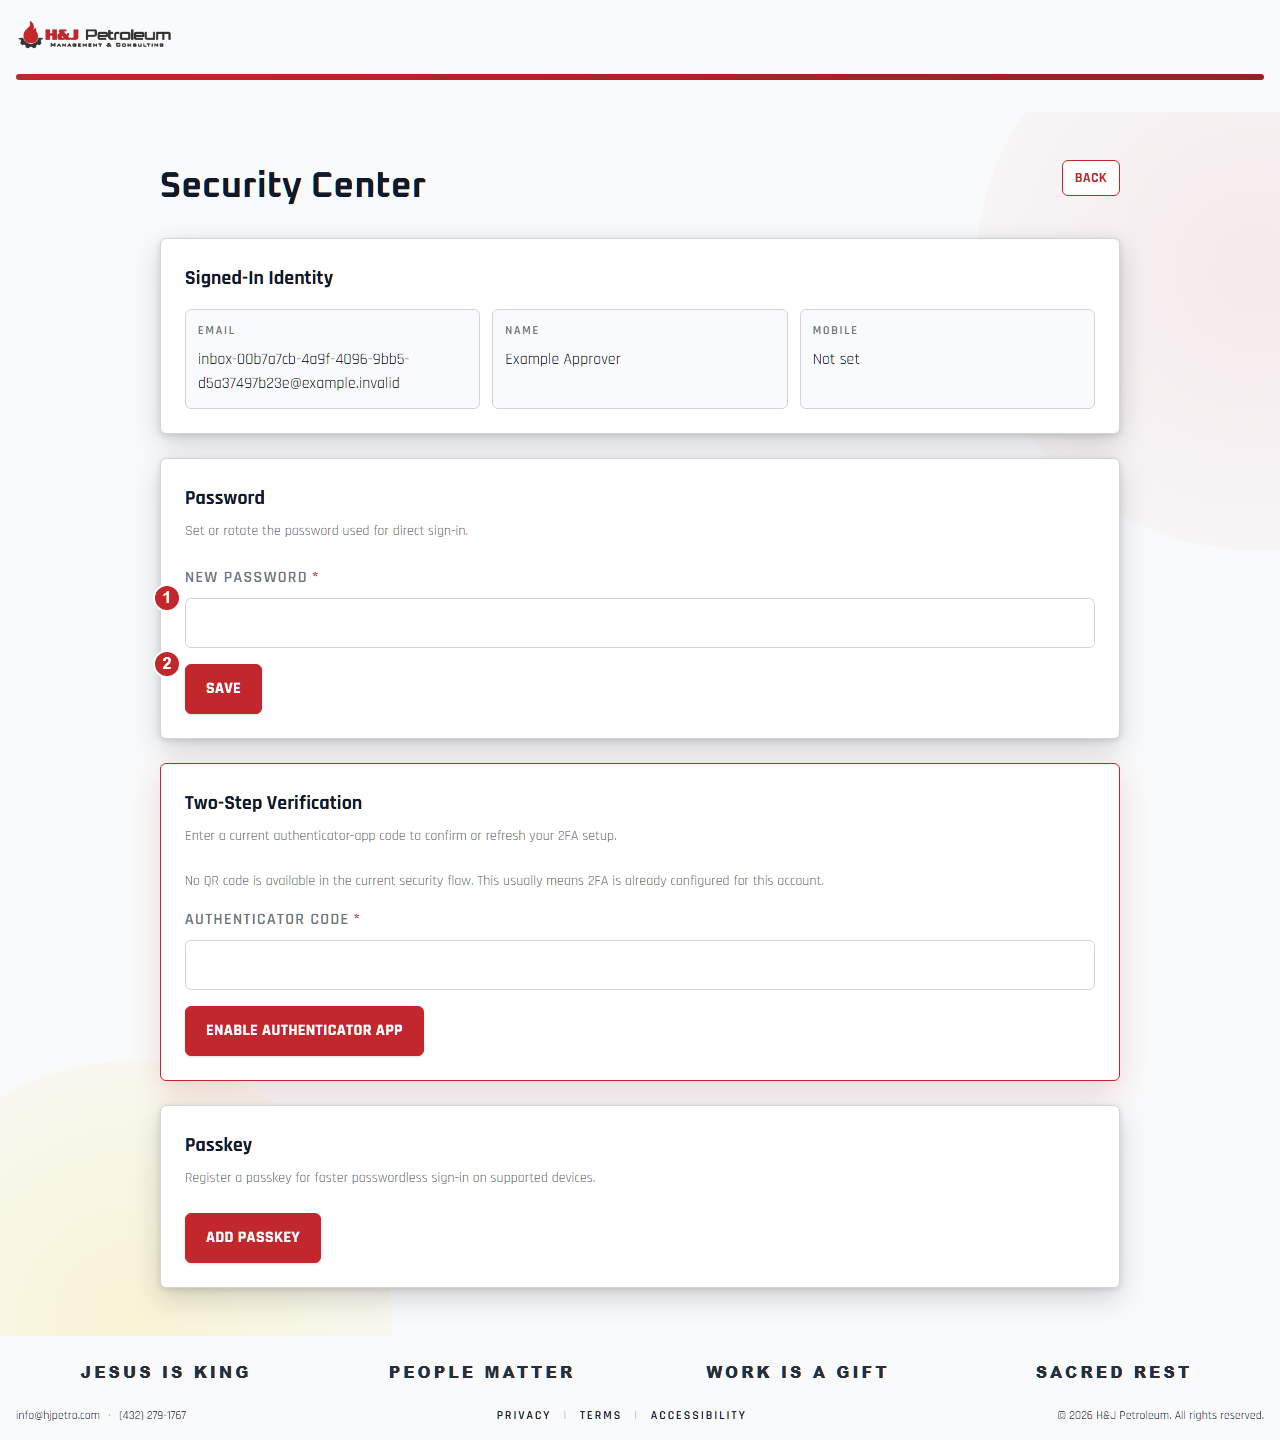
- Check Signed-In Identity, then enter your new password in the Password section. Follow the on-screen requirements and store it securely.
- Select Save in the Password section. Do not select a different section’s Save or change your authenticator to reset a password. Wait for the confirmation shown in the next topic.
Confirm the password was saved
The confirmation can appear above the form or as a notification near the bottom of the screen.
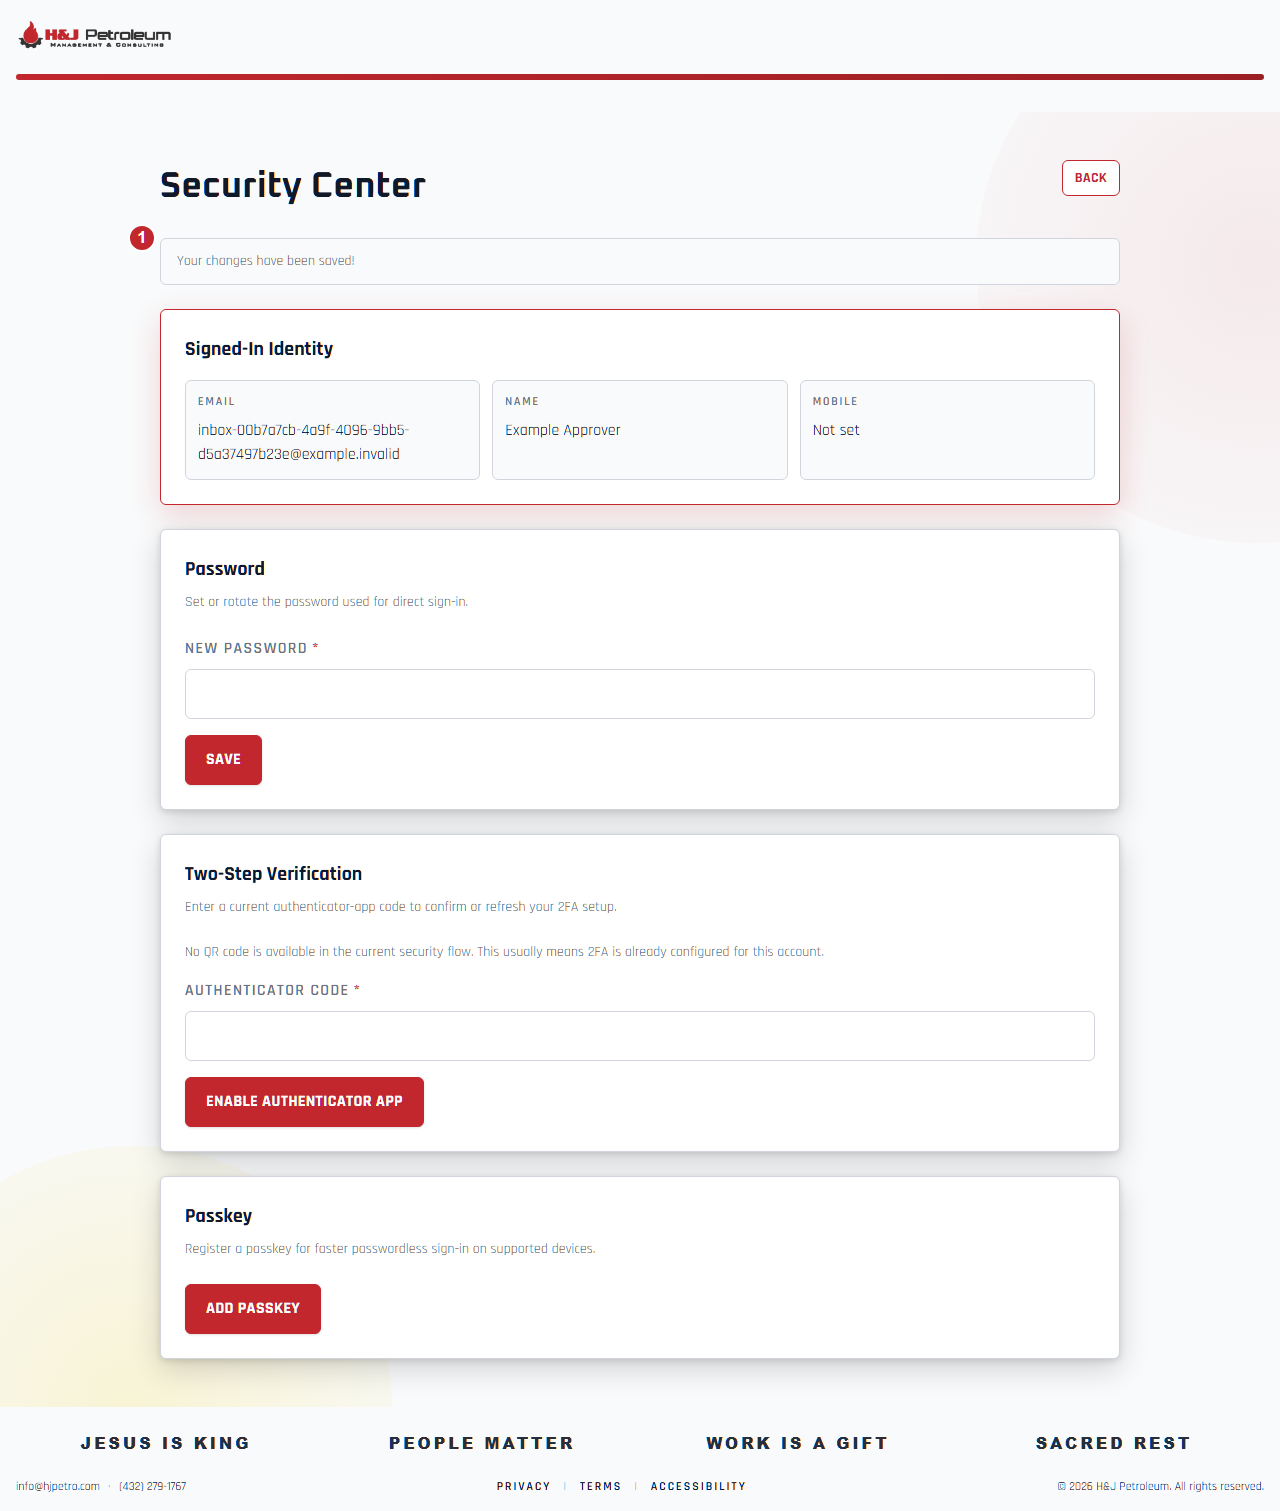
- Look for the success message, such as Your changes have been saved!, after saving. If an error appears, resolve it before leaving. Next time, use the new password and your existing authenticator if required. Password recovery does not change project access.
Check your existing two-step verification
Open Security Center from your account menu and find Two-Step Verification. This is the current enabled-state example; the full section is shown so its status and available action are readable on a phone.
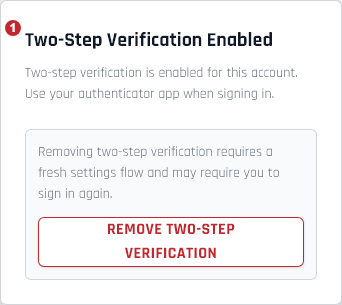
- Look for Two-Step Verification Enabled. An authenticator is already configured; keep using it when signing in. If setup or removal is unavailable, reload the page or contact H&J. Remove the authenticator only by following Remove an existing authenticator.
Set up authenticator verification
Security Center — setup for an account that still needs an authenticator. If Two-Step Verification Enabled is shown, use your existing authenticator. Setup fields appear only when setup is available in the current session. The account-specific QR code and setup secret are hidden in this training image.
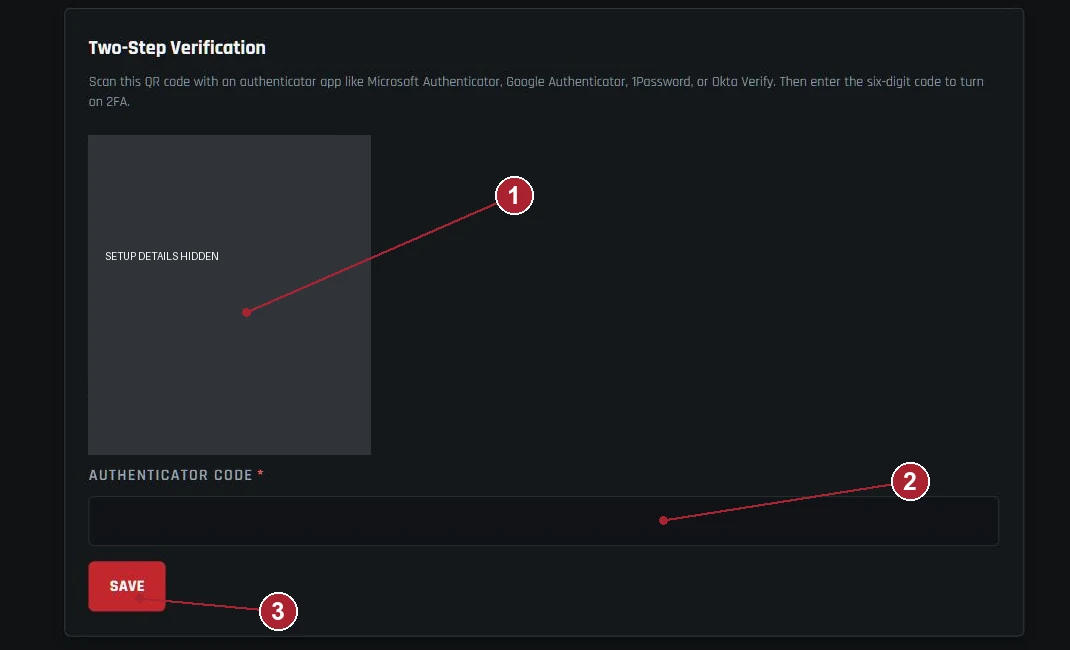
- In your authenticator app, add an account and scan your own QR code from this section. Do not scan an image from a guide.
- Enter the current six-digit Authenticator Code generated by your app.
- Choose the setup button in this section, such as Save or Enable Authenticator App, and wait for confirmation. Keep access to your configured sign-in and recovery methods. Never share the QR code or setup secret.
Register a passkey
Register a passkey in a supported browser or password manager. Keep your existing password, authenticator and passkeys available. Device prompts vary; physical-device compatibility has not been verified.
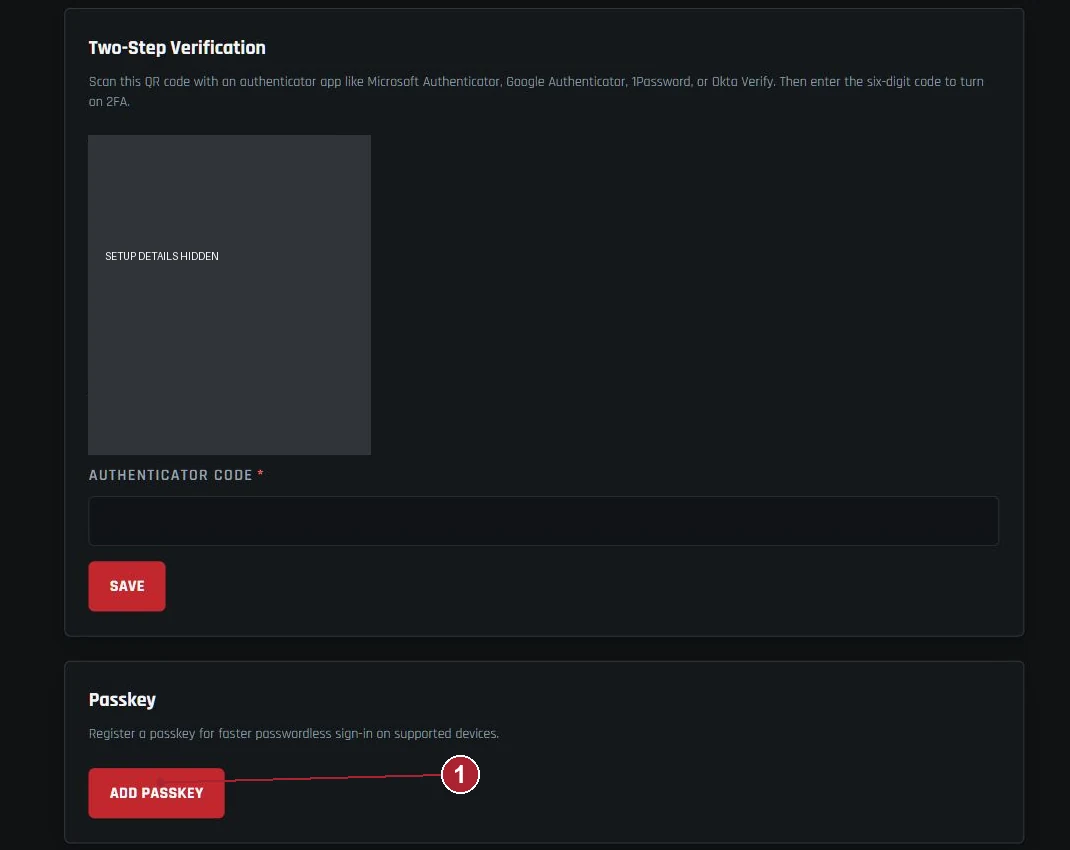
- Select Add Passkey. If a Passkey Name field is offered, use a recognizable device name.
- Continue: Complete the device or password-manager registration prompt. Wait for the site to confirm the passkey is registered.
- Continue: At future sign-ins, enter your work email and choose Use Passkey. Follow the device prompt. A passkey must be registered before it can be used.
Confirm that passkey registration was saved
Registration and a subsequent sign-in were verified on both environments using a browser test authenticator. This does not establish compatibility with your physical device or every older passkey.
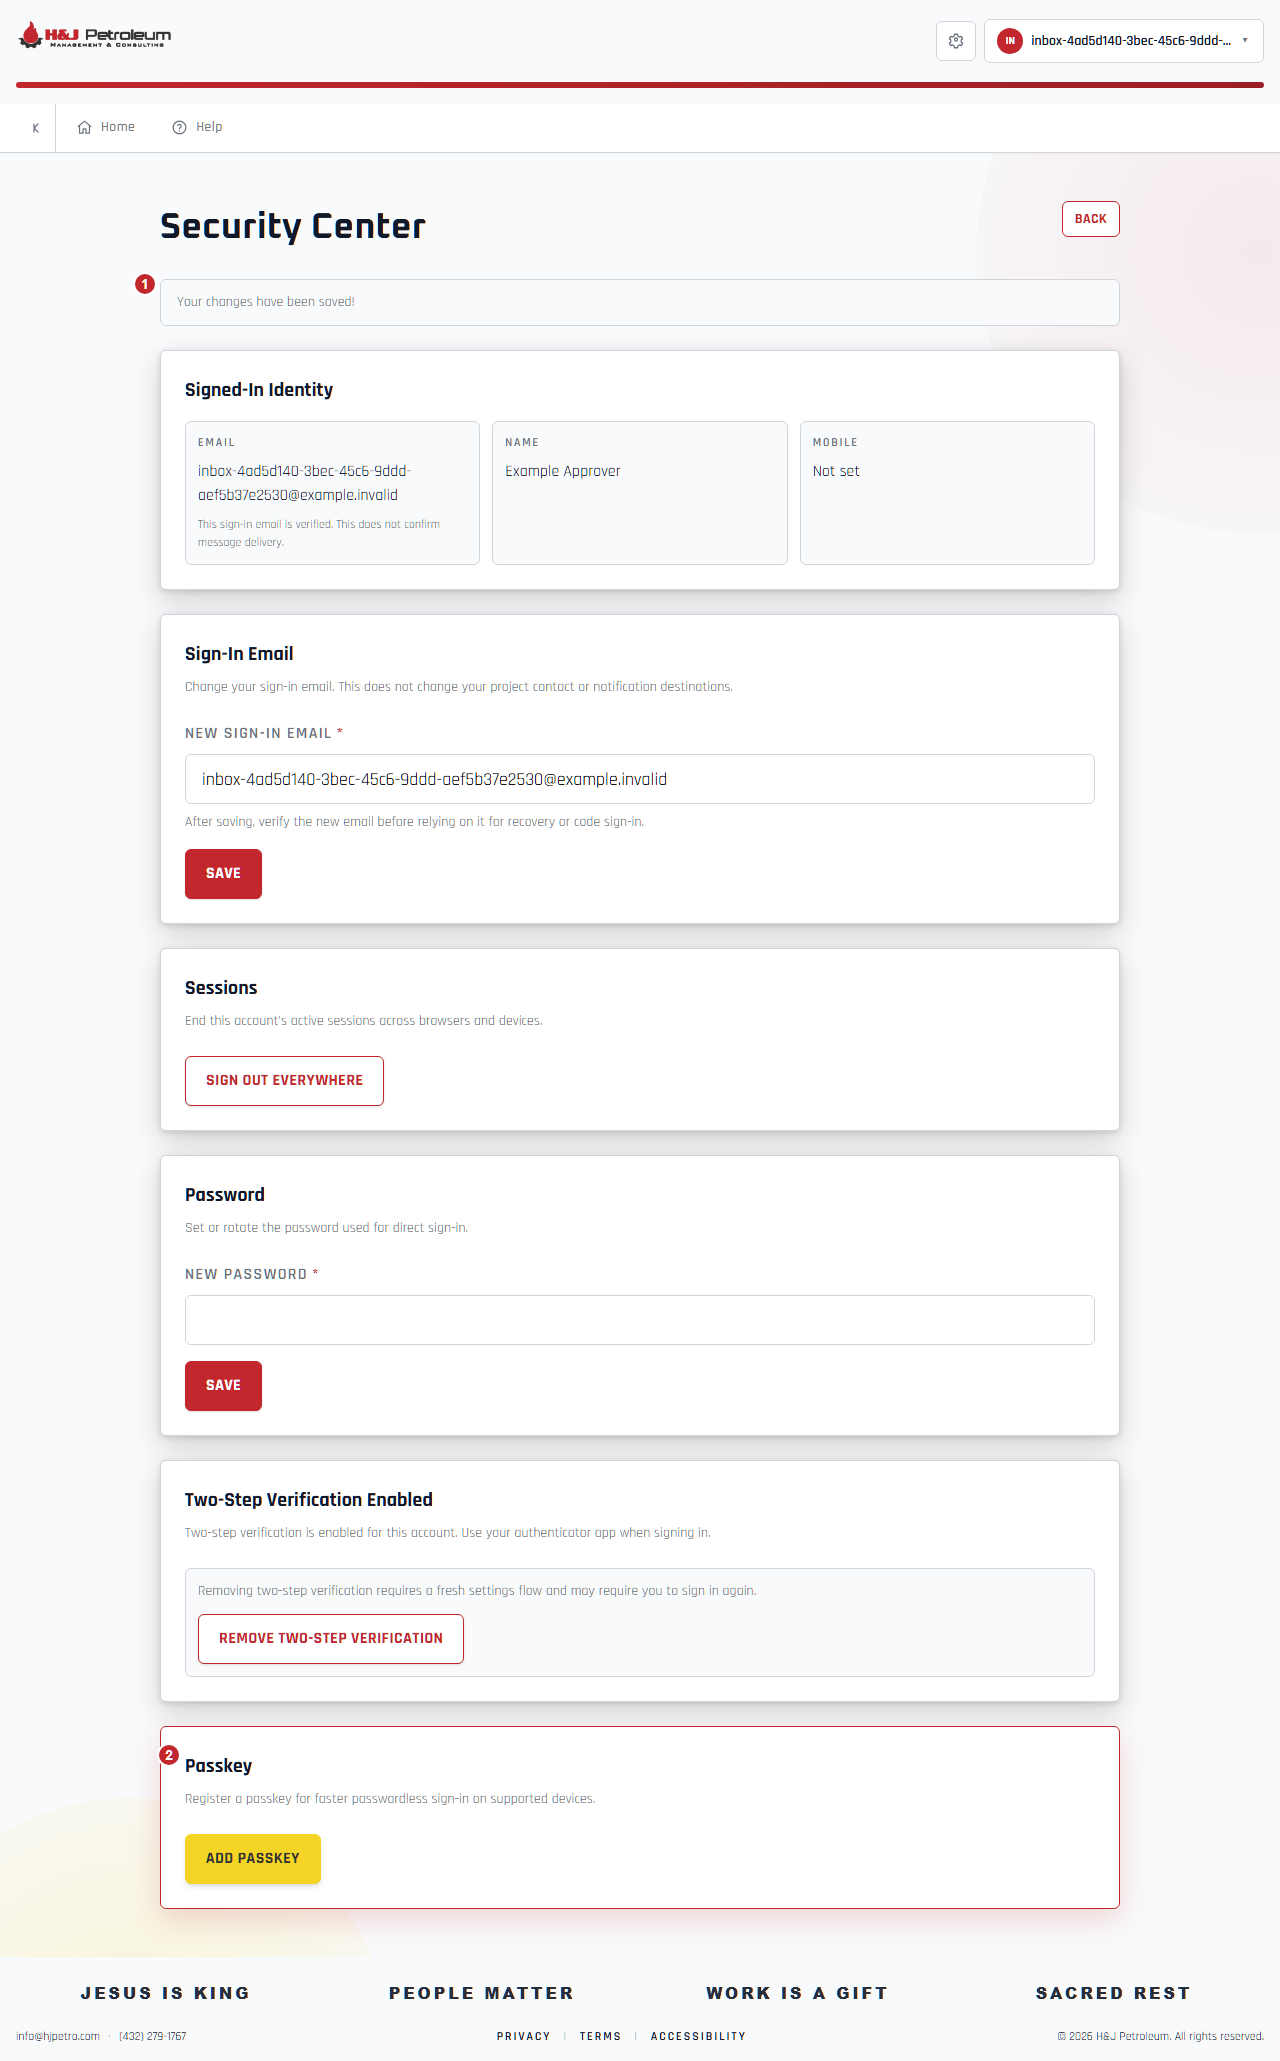
- After completing the device or password-manager prompt, look for Your changes have been saved! Do not assume registration succeeded if an error remains.
- The Passkey section remains available to register another passkey. Keep existing credentials; test the new passkey at a fresh sign-in before relying on it.
Use a registered passkey at a fresh sign-in
Use the same account email for which you registered the passkey. The device or password manager supplies the private credential; never send it to H&J.
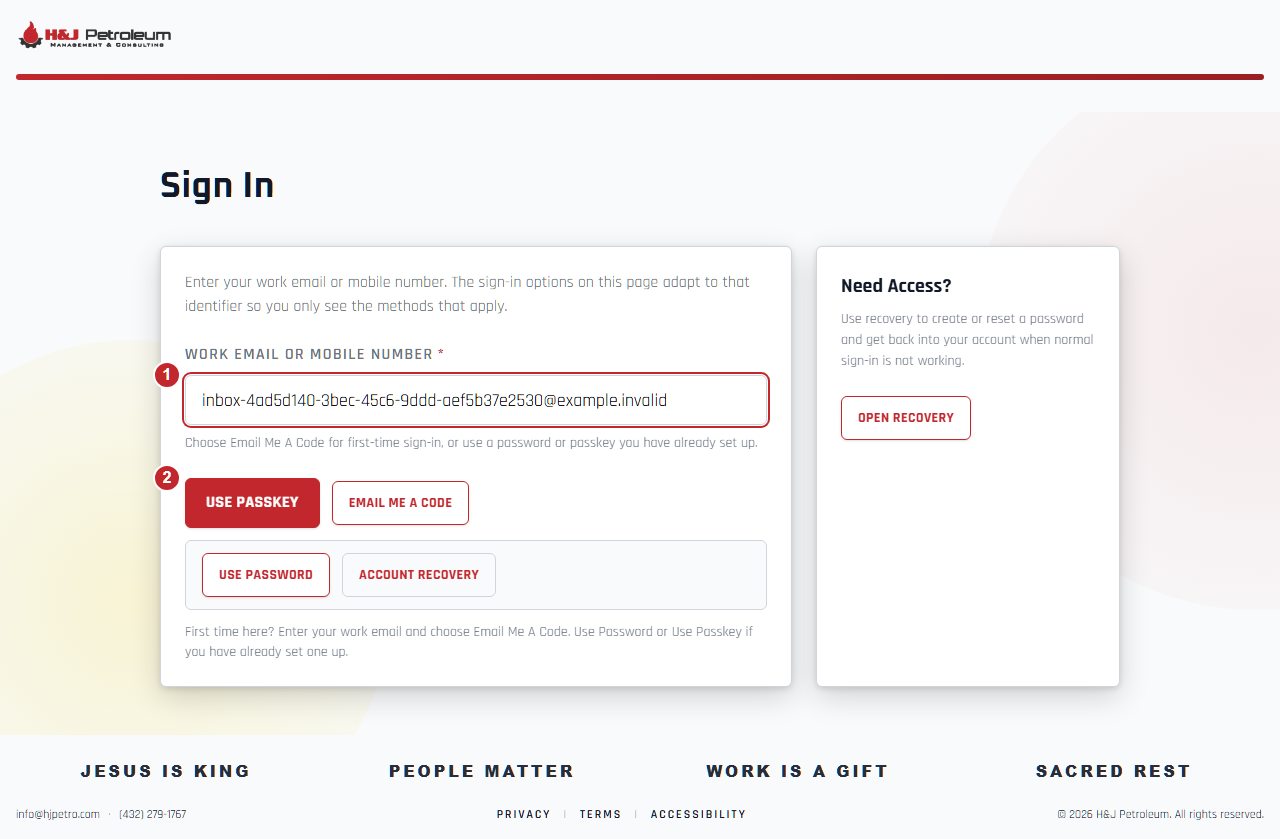
- Enter your work email on Sign In. A passkey must already be registered for that account.
- Choose Use Passkey and complete the device or password-manager prompt. If it fails or is unavailable, use your existing password and authenticator and contact H&J; do not delete existing passkeys to troubleshoot.
Choose instant alerts and daily reminders
Open Inbox Settings from All approvals. Each notification type has independent Email and SMS controls. These choices do not change payment emails.
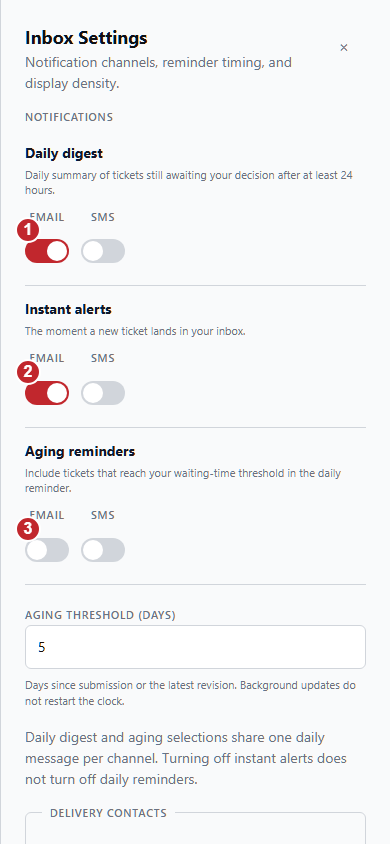
- Daily digest includes tickets still awaiting your decision after at least 24 hours. Select the delivery channels you want.
- Instant alerts notify you when a new approval request arrives. Turning these off does not disable daily reminders.
- Aging reminders include tickets that reach your selected waiting-time threshold. Digest and aging selections share one daily message per channel. Scroll down and save your changes.
Set the aging threshold
Aging is waiting time for approval, not invoice balance or payment status.
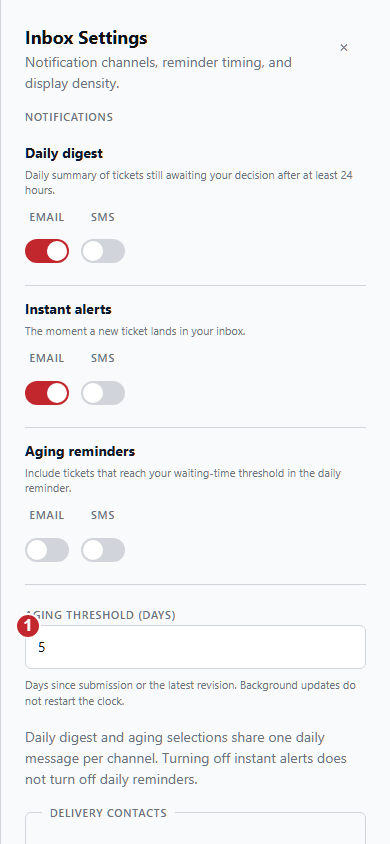
- Enter a whole number from 1 to 90 days. Waiting time starts at submission or the latest revision; background updates do not reset it. Save settings to apply the threshold to the inbox and aging reminders.
Choose your default inbox view
Open Inbox Settings from All approvals. This example uses Awaiting Approval; choose the option that suits your work.
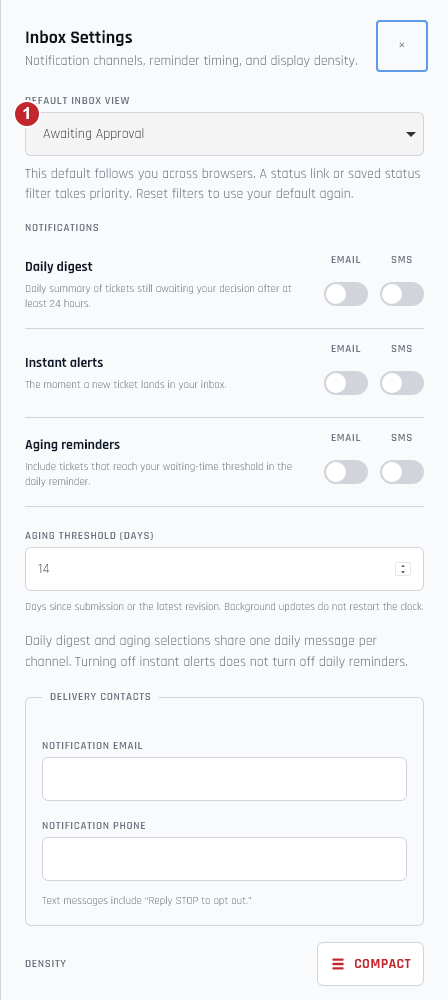
- Choose Default inbox view, then scroll down and select Save settings. Your saved default follows you across browsers and devices. A status link or a status you explicitly selected in this browser takes priority, including All. Use Reset filters to follow your default again. Search, project and date filters can still narrow the tickets shown.
Choose inbox email and SMS notifications
In Inbox Settings, email and SMS are separate choices for each notification. The switches are off in this training example.
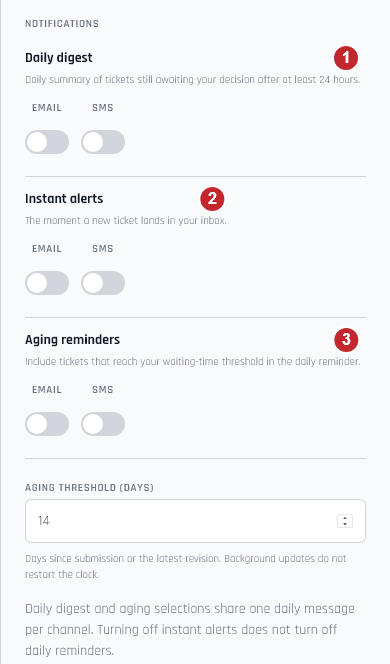
- Choose Daily digest email and/or SMS for a daily summary of tickets still awaiting your decision after at least 24 hours.
- Choose Instant alerts email and/or SMS for new tickets. Turning off instant alerts does not turn off the daily digest or aging reminders.
- Choose Aging reminders email and/or SMS, and set Aging threshold (days). Days count from submission or the latest revision; background updates do not restart the clock. Digest and aging choices share one daily message per channel. Scroll to Save settings to commit your choices. SMS requires a valid phone. These controls do not change invoice balances, payment status or every service email.
Set delivery contacts and save inbox settings
Scroll down in Inbox Settings to Delivery contacts. This current mobile example uses synthetic details.
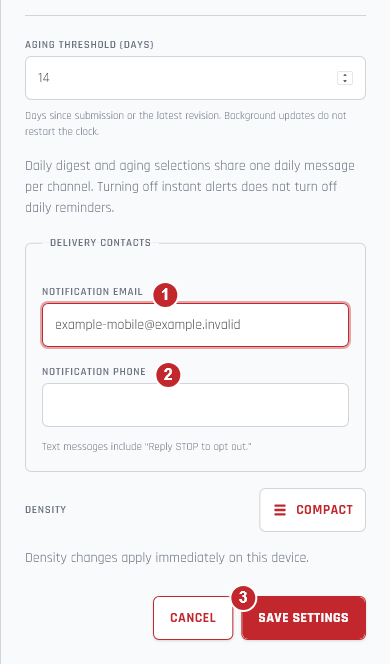
- Set an alternate notification email, or leave it blank to use your sign-in email.
- Set an alternate notification phone, or leave it blank to use your profile phone. Email and SMS choices are separate; SMS requires a valid phone.
- Select Save settings and wait for the panel to close successfully. If saving fails, your edits remain available for retry. Reopen Inbox Settings to check your saved choices. Density changes apply immediately on this device.
Keep or discard unsaved settings
Closing Inbox Settings with unsaved notification edits asks for confirmation. Escape follows the same rule.
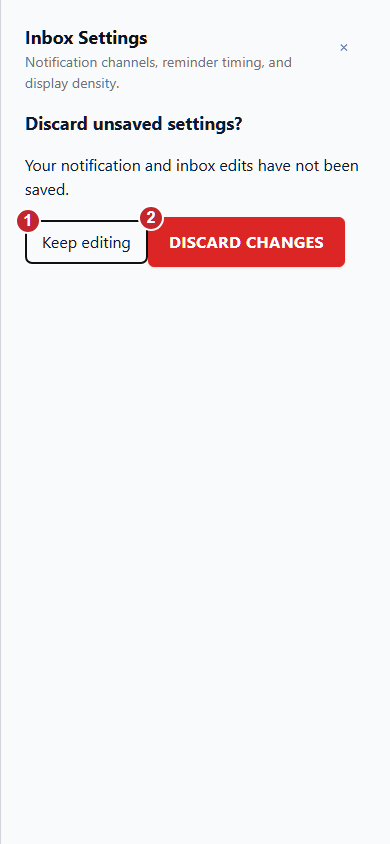
- Choose Keep editing to return to the form with your changes intact.
- Choose Discard changes to close without saving notification edits. Display density is a separate immediate device preference.
Read your approval Insights summary
Open All approvals and find Approver Insights above the ticket list. These examples use synthetic ticket counts.
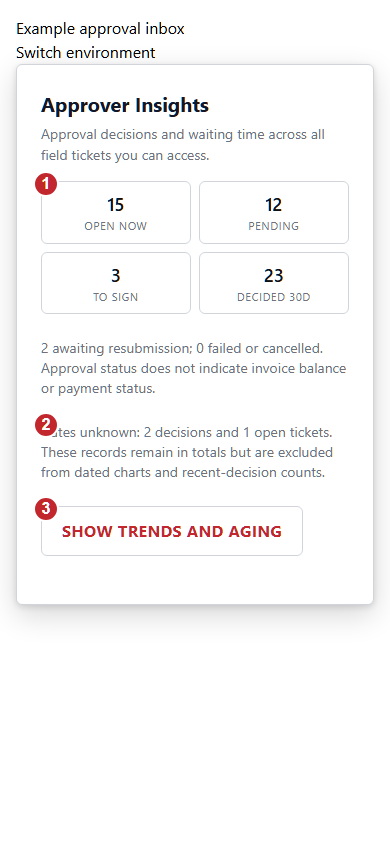
- Open now is the number waiting for review or signing. Pending needs review; To sign needs a signature. Decided 30d counts tickets with a recorded approval or full/partial rejection date in the last 30 days. Failed and cancelled tickets are listed separately.
- Read any Dates unknown notice. Those tickets remain in the status totals but cannot be placed in dated charts or recent-decision counts. A recent background update is not a new decision. Approval counts do not indicate invoice balances or consultant payment status.
- On a phone, select Show trends and aging to open the charts. Select Hide trends and aging to return to the compact summary. Desktop shows the charts directly.
Understand decision trends and waiting time
Insights includes all tickets you can access, including records beyond the currently loaded inbox page. Charts describe each ticket current state, not an audit of every historical revision.
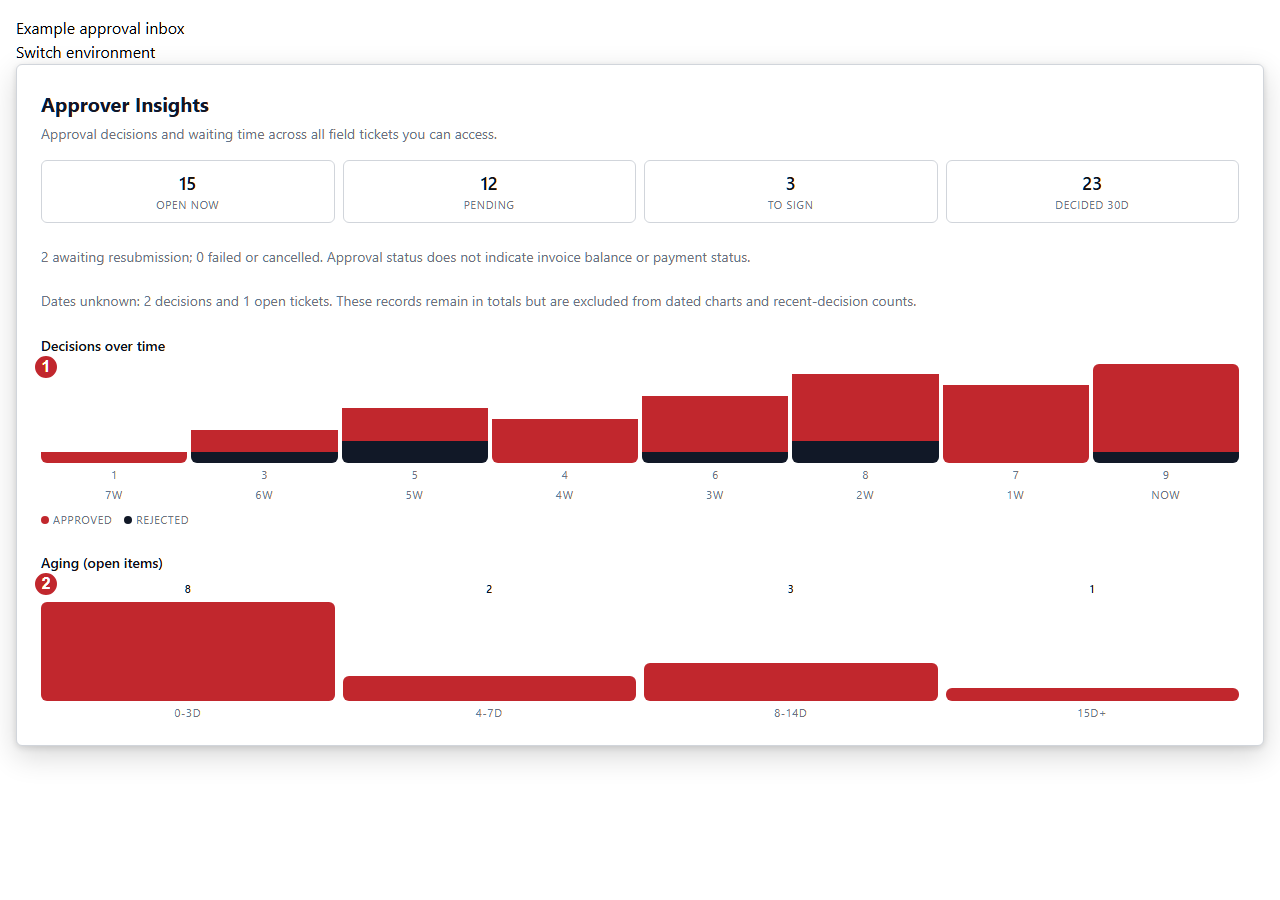
- Read Decisions over time from oldest on the left to newest on the right. NOW is the most recent seven-day window; 1W is the preceding window. Approved and rejected segments use actual decision evidence. Partial rejection counts as a rejection, while failed or cancelled records do not.
- Read Aging (open items) to see waiting time since submission or the latest revision. Background synchronization does not reset the age. Dates unknown are excluded from these buckets. These are approval waiting days, not invoice due dates.
Retry an unavailable Insights summary
An error is shown instead of partial or stale totals. You can still use the ticket list when it is available.
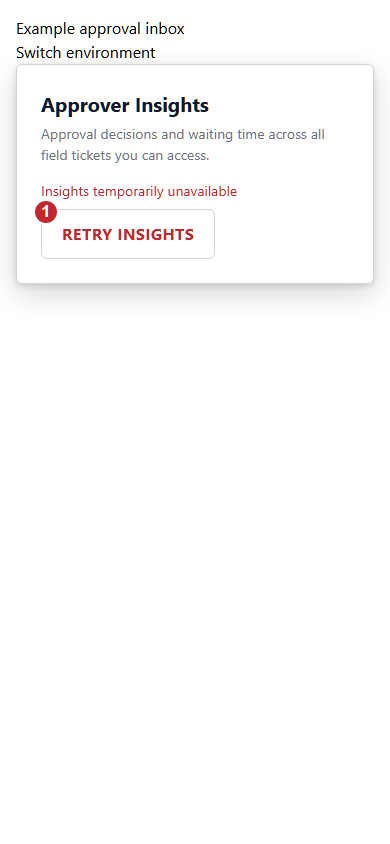
- Select Retry insights. Wait for a new summary. If access is denied or the error continues, contact H&J; retrying does not grant additional access or submit any approval.
Read the service calendar
Choose Show service calendar in All approvals. The calendar includes all tickets you can access, independently of loaded inbox rows. These examples use synthetic records.
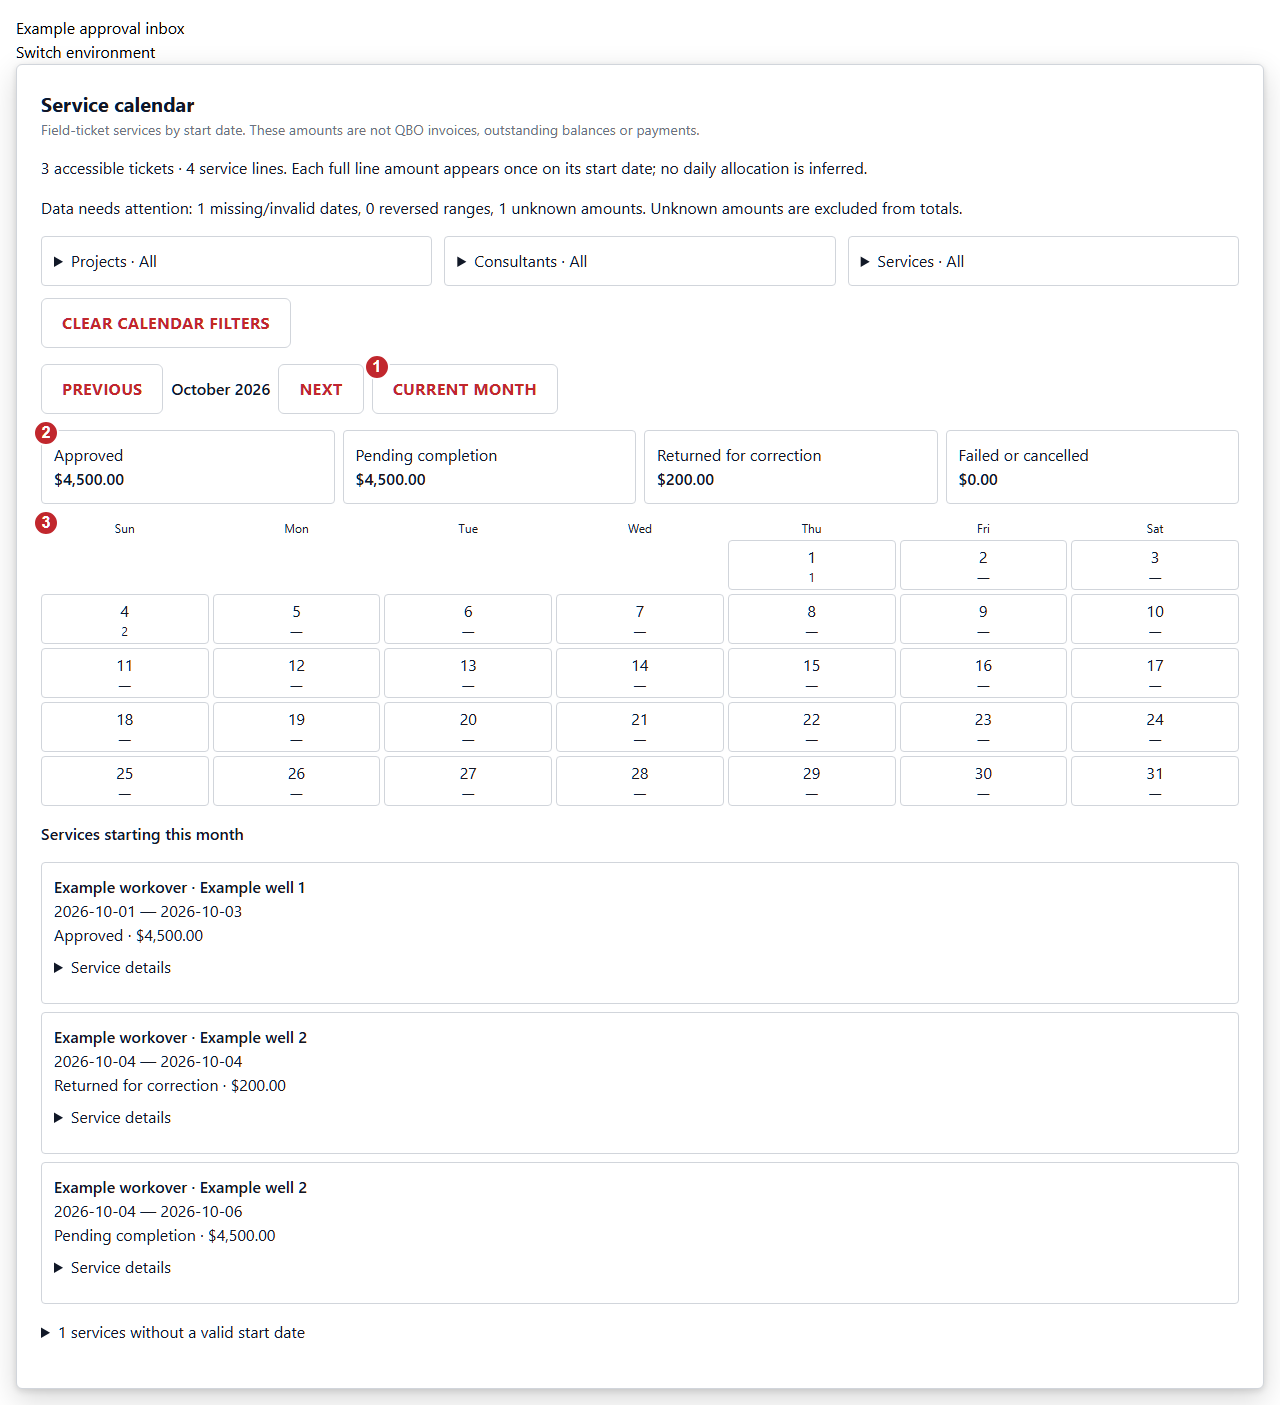
- Use Previous and Next to change month, or Current month to return. The month totals group full service-line amounts by their start date; they are not daily allocations.
- Compare Approved, Pending completion, Returned for correction, and Failed or cancelled amounts. Retained lines on a partially rejected ticket remain pending completion. These are field-ticket amounts, not QBO invoice balances or payment status.
- Select a day to see services starting on that day. Choose All days this month to clear that selection. Each card retains the full service range, including dates in another month.
Filter calendar services
Project, consultant and service filters work together. While the calendar is shown, its filters also narrow Home task and recently updated lists. Summary counts, Insights and inbox table filters keep their own scope.
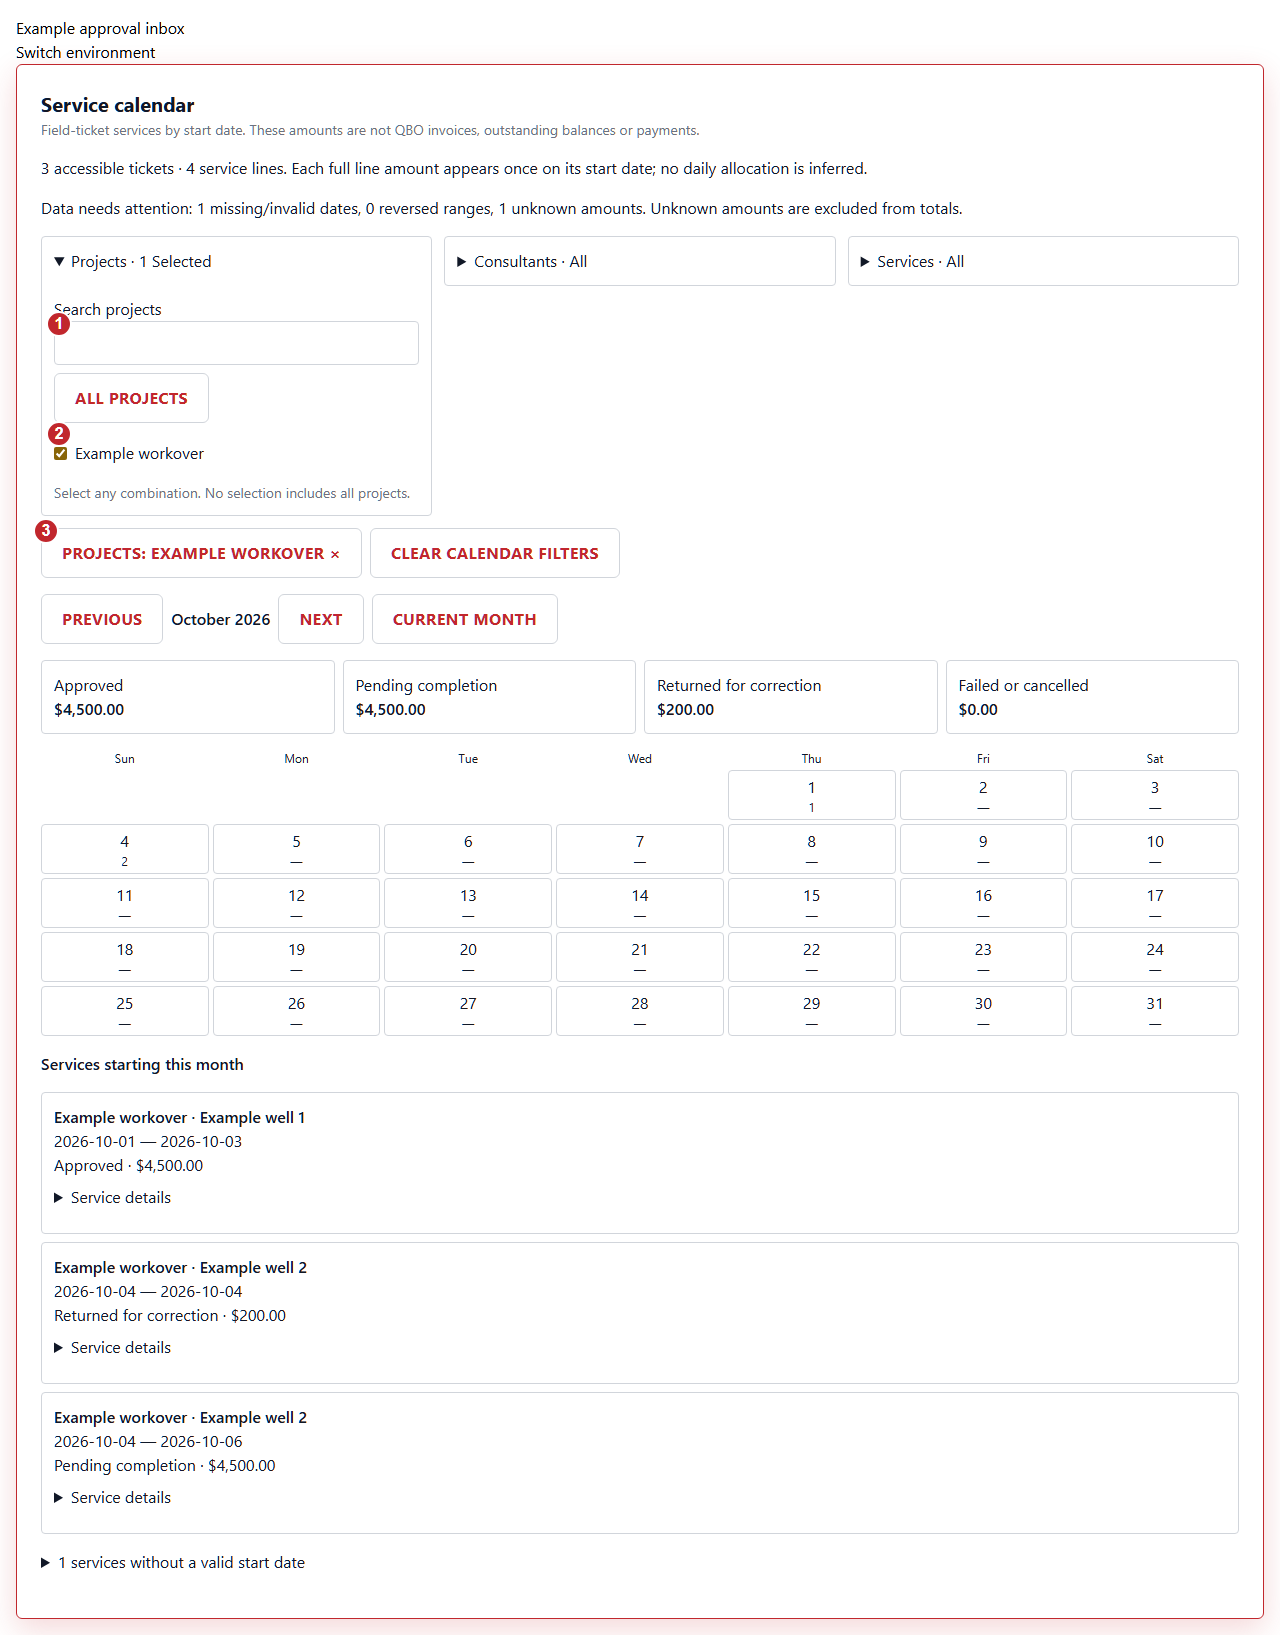
- Open a filter and search for the project, consultant or service you need.
- Select one or more options. Options within a filter are combined; all active filter categories must match. No selection means all options in that category.
- Remove an individual filter using its labeled button, or select Clear calendar filters. Changing filters clears the selected day. Filters reset when you change accounts. The Show/Hide choice is remembered for this browser and account; hiding the calendar pauses its effect on Home lists.
Understand calendar filters on Home
When calendar filters narrow the Home lists, a visible note explains their scope. These screenshots use example tickets.
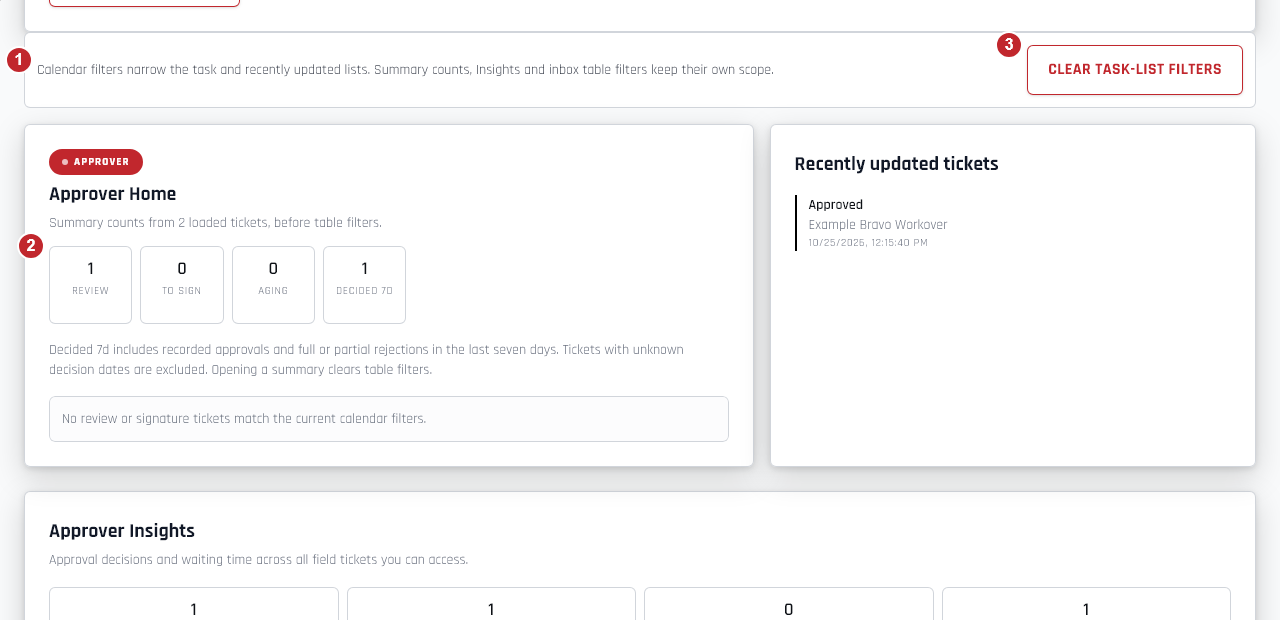
- Read the calendar-filter note above Approver Home. A filtered-empty message means no review or signature tickets match those calendar selections; other work can still exist.
- Summary counts still describe all loaded inbox tickets before table filters. Insights keeps its access-wide scope, and the ticket table keeps its own filters. A Review count can therefore remain nonzero while calendar-filtered tasks are empty.
- Choose Clear task-list filters to remove calendar selections from both the calendar and Home lists. Clear calendar filters does the same; hiding the calendar pauses its effect on Home lists.
Open the calendar when your inbox is empty
The calendar remains available when no tickets have been loaded. Zero accessible tickets describes field-ticket coverage, not invoice balances or payment status.
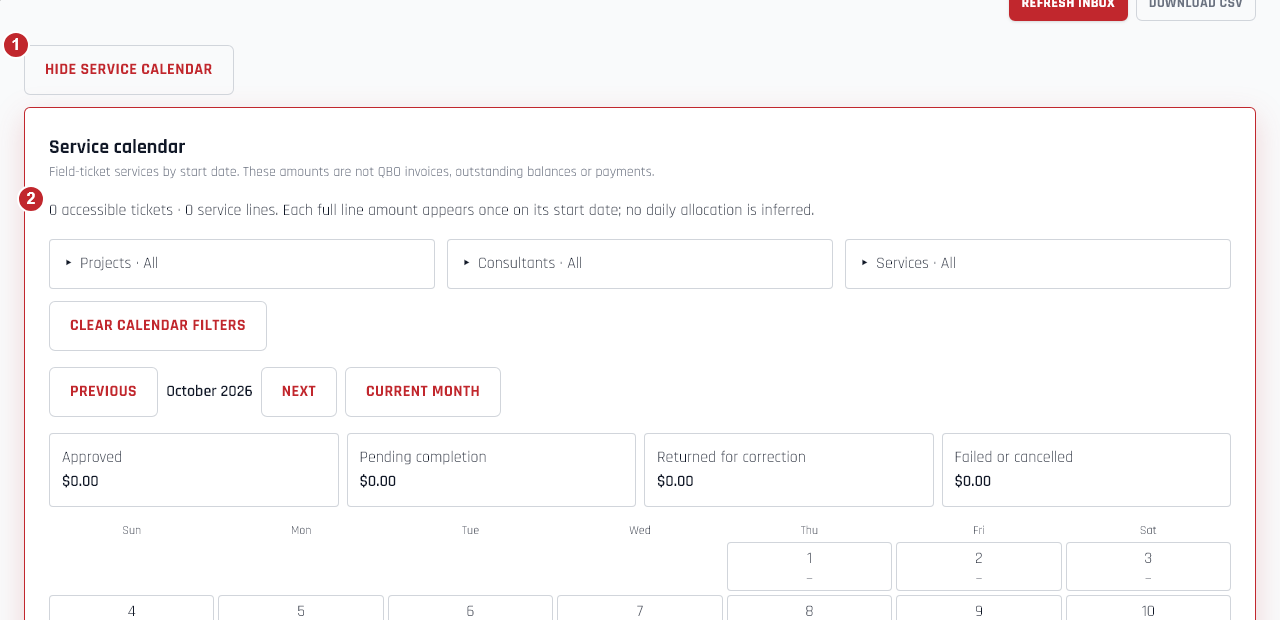
- Choose Show service calendar in All approvals, even when the inbox has no tickets. The control becomes Hide service calendar while it is open.
- Check the accessible-ticket and service-line coverage. If both are zero, there are no accessible services to display; this does not indicate whether any QBO invoice is paid.
Review service dates on your phone
The phone layout starts with readable service cards and keeps the month grid optional. The same service-date view is available inside an open ticket for that ticket only.
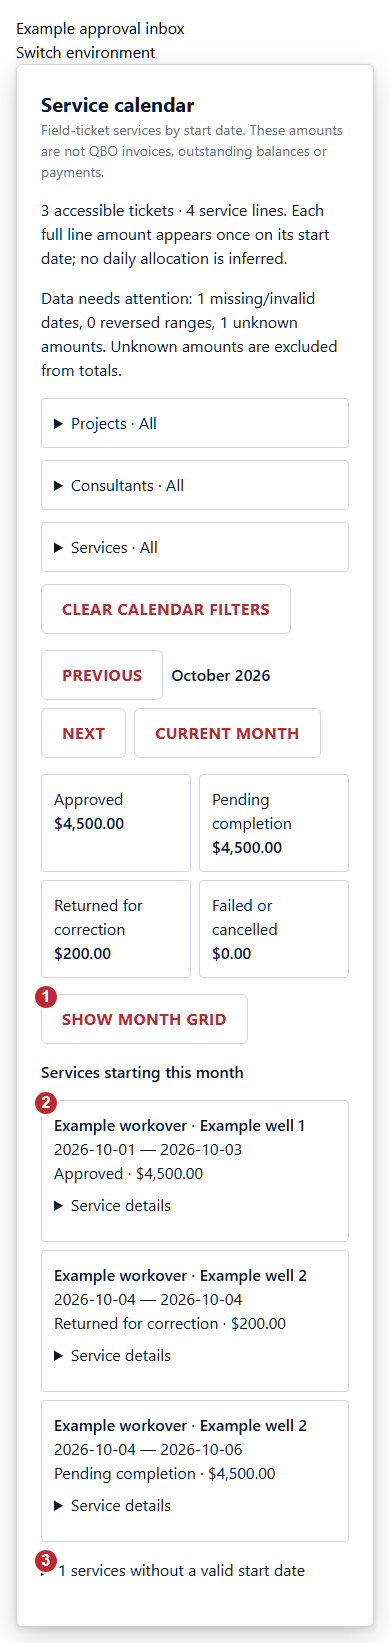
- Choose Show month grid when you want to select a start date. Hide month grid returns to the compact list.
- Read the project, well, complete service range, approval state and full line amount. Expand Service details for the consultant, service and ticket reference.
- Expand services without a valid start date to inspect rows that cannot be placed on the calendar. Unknown amounts are labeled and excluded from totals; reversed or missing date ranges are reported for correction.
Retry the service calendar
A failed request shows an error instead of a partial calendar. Your ticket list remains independently available.
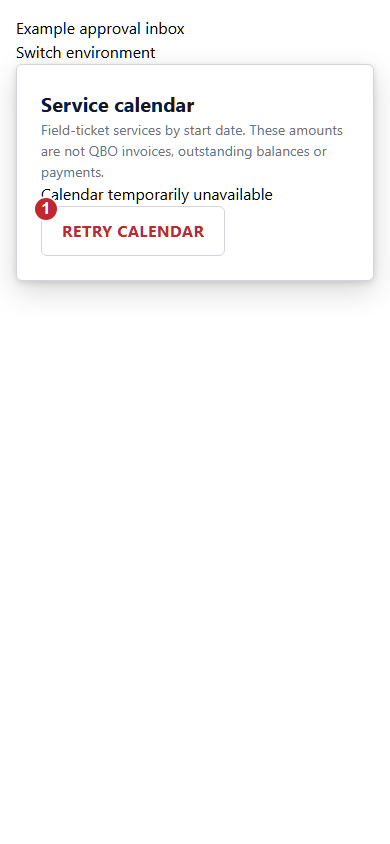
- Choose Retry calendar. Wait for the fresh scoped snapshot before using its totals. Contact H&J if the request keeps failing; do not treat an unavailable calendar as zero work.
Administrator access tools
For authorized H&J administrators: review grants, revoke access and recover pending permission updates.
Administrators: find approver access
Administrator-only tools. This mobile example uses disposable training data from the deployed app; desktop shows the same grants in a table. These instructions do not grant administrator access.
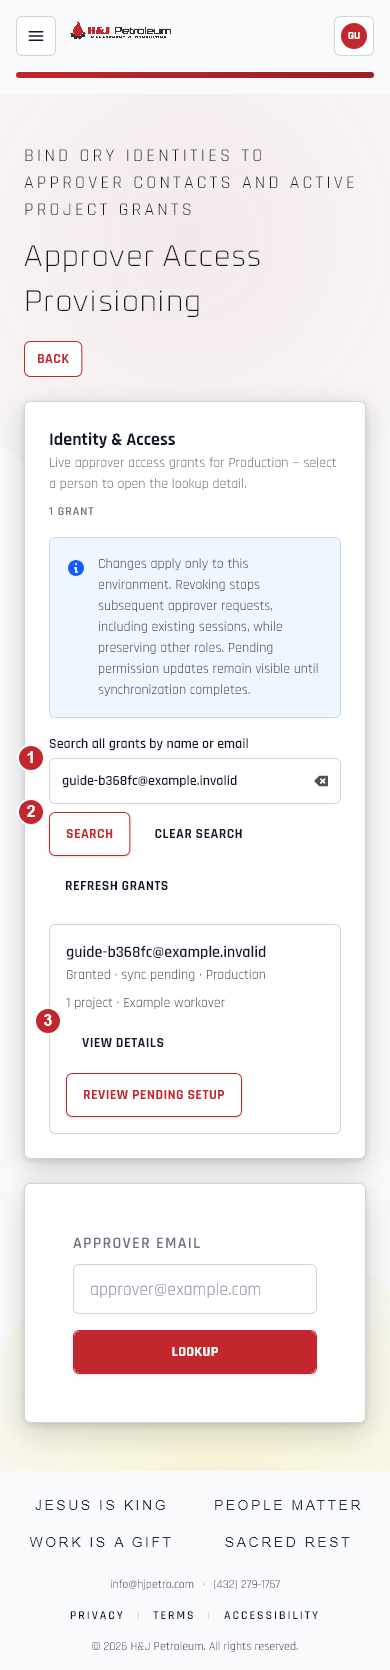
- Open Admin, then Approver Access Provisioning. Confirm the environment shown in Identity & Access. Enter a name or email in Search all grants by name or email; this searches beyond the currently loaded page.
- Select Search. Clear search restores the full list; Load more grants loads the next page and Refresh grants retrieves current status. The desktop Search visible access grants box filters only loaded rows.
- Select View details on mobile, or select the person row on desktop, to open the lookup below. Review identity, contact and projects. If the status includes sync pending, follow the pending-change review instructions before making another access change.
Administrators: confirm or cancel revocation
Revocation affects approver access in the displayed environment, including subsequent requests from existing sessions. Other roles and the other environment are preserved. Synthetic example.
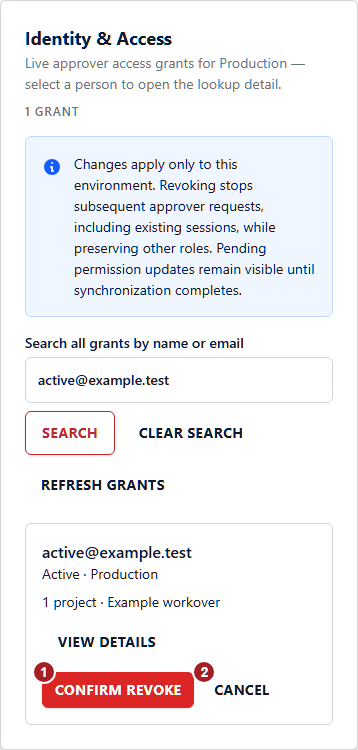
- Check the person and environment, then select Revoke. Select Confirm revoke only when you intend to remove that approver access. The record remains visible with Revoked status after success.
- Select Cancel to keep the existing access. To restore access later, use Review access, verify the lookup and available projects, then explicitly select Provision Access. Automatic reconciliation does not restore a revoked identity.
Administrators: review a pending access change
Sync pending means completion is not confirmed. Review the original operation; do not repeat Provision Access or revoke access again to clear it. Deployed training example.

- Confirm the person and environment, then select Review pending setup. Provision Access stays disabled while this change is pending. The pending status alone does not prove that permissions were applied or removed.
- Find Access change needs verification and note the Operation reference. This identifies the original change for investigation; it is not a sign-in code.
- Select Review access change. If permissions match, continue with Finish recording change. If the outcome is uncertain or permissions differ, follow the corresponding investigation topic; do not submit a replacement change.
Administrators: provision or restore reviewed access
Deployed training example of a reviewed form. The screenshot shows existing access after original-operation recovery; it does not show a new provisioning request. Explicit provisioning can send the existing account-created notification.

- Enter the Approver Email and select Lookup, or open View details above. Changing the email clears the previous lookup. Confirm the identity and contact; stop if this is the wrong person.
- Review Project Grants and confirm that it contains only the intended projects before submitting. Stop if the person or assignments are wrong. Lookup does not change accounts.
- Select Provision Access only for a new or explicitly restored assignment. Do not use it to repair sync pending. Wait for the request and refresh, then confirm the Provisioned message and Active status without sync pending. Automatic reconciliation does not restore revoked access; existing co-approval notification settings are retained for restored projects. Incomplete synchronization requires original-operation review.
Administrators: finish a verified original change
Finish recording change is offered only when the original update was acknowledged and current permissions match. It records completion without replaying permissions. Deployed training example.

- Read the verified result: Permissions match the confirmed update. Confirm that this is still the intended person, environment and original Operation reference.
- Select Finish recording change once and wait for the lookup and grants to refresh. If completion cannot be confirmed, select Reload access and review the same original operation before taking another action.
Administrators: confirm recovery is complete
Finishing an original operation refreshes the existing access record. It does not create a second provisioning request or promise a new account email. Deployed training example.

- Confirm that sync pending and the recovery panel are gone. A completed provision shows Active, as illustrated; a completed revocation shows Revoked. Neither status establishes field-ticket approval or payment.
- Use Refresh grants to retrieve current status if needed, then open View details to check the intended project access. If sync pending remains, review the original change rather than repeating Provision Access or revocation.
Administrators: handle an uncertain permission update
An uncertain outcome cannot be safely finished or replaced from this screen. Access changes and project activation remain blocked until an administrator investigates the original operation. Deployed training example.

- Read the uncertain-outcome message. Finish recording change is not offered, and Provision Access remains disabled. Do not assume a pending revocation removed all permissions or a pending provision granted them.
- Give the investigating administrator the person, environment and Operation reference. After investigation, use Reload access and Review access change to check that same operation. Do not repeat the original mutation just to clear the warning.
Administrators: investigate differing permissions
Current permissions differ from the saved change. Reviewing this result does not change permissions, and completion remains blocked. Deployed training example.

- Read Current permissions differ from the saved change. Finish recording change is not offered. Do not use Provision Access or another revocation to overwrite the difference.
- Give an administrator the person, environment and Operation reference for investigation. Use Reload access and review the original operation after the discrepancy is resolved; only a verified match can be finished.
Troubleshooting
- Missing ticket or access denied?
- Use the email registered with H&J. Clear filters and refresh All approvals. An emailed ticket link does not grant permission; contact H&J if your project access needs updating.
- Still awaiting signature?
- Use Continue Signing and finish the final submission. Check Approval Status or refresh. Opening the signing page alone does not approve the ticket. Contact H&J if a completed signature does not update; avoid duplicate requests.
- PDF or download will not open?
- Use the page and zoom controls to read the inline signed PDF. If it fails to load, choose Retry PDF. For the original file, allow the new tab for this site, then try View PDF again. The browser viewer may have download and print controls. CSV is a separate export, not the signed document.
- Need help from H&J?
- Reply to your approval-request email with the ticket reference, what you expected and the error shown. Do not send passwords, authentication codes, QR codes or recovery secrets.